
YouCam API (v1.9)
Download OpenAPI specification:
This document has been deprecated as of v1.9.
For the latest version, please visit docs.perfectcorp.com
Last modified: Mar. 31, 2026 28c19a5
The YouCam APIs are series of AI effects that let you beautify your photos, as well as generate amazing aesthetic creations beyond human imagination. Let the magic begin.
PLEASE NOTE that by reading this API documentation, or by setting up code pursuant to the instructions in this API documentation, you acknowledge it adheres to Perfect Corp's Privacy policy, and Terms of Service. And If you have any issue, please contact: YouCamOnlineEditor_API@perfectcorp.com

YouCam API is a powerful and easy-to-use AI platform that provides beautiful and true-to-life visual effects thanks to the latest AI technology. This API document will briefly introduce how to integrate these awesome AI effects into your business. YouCam API are standard RESTful APIs to let you easily integrate to your website, e-commerce platforms, iOS/Android APP, applets, mini-programs, and more.

The YouCam APIs are built on top of RESTful web APIs. The API server is the host of all APIs. Once you complete the authentication, you can start your AI tasks through the API Server.
YouCam API server:
https://yce-api-01.makeupar.com
To ensure fair usage and prevent abuse, our API implements rate limiting. There are two types of rate limits:
Per IP Address
Each IP address is allowed a maximum of 250 requests per 300 seconds with 5 queries per second(QPS). If this limit is exceeded, subsequent requests will receive a
429 Too Many Requestserror.Per Access Token
Each access token is allowed a maximum of 250 requests per 300 seconds with 5 queries per second(QPS). If this limit is exceeded, subsequent requests will receive a
429 Too Many Requestserror.
Both conditions must be met for a request to be accepted. If either condition is not met, the request will receive a 429 Too Many Requests error. Please note that each query related to unit will be processed real-time. Other APIs can use the access token util expired.
It is recommended that you handle rate limit errors gracefully in your application by implementing the appropriate backoff and retry mechanisms.
Any files you upload are stored on our server for 24 hours, and then they're automatically deleted. Processed results are retained for 24 hours after completion.
Warning: Even though those result files are still good for 7 days, the link to download them might only be active for about two hours after they're created. If that download link expires, you can still access the file using its file ID – you can use that ID with another feature to get it.
| AI Photo Editing | Supported Dimensions | Supported File Size | Supported Formats |
|---|---|---|---|
| AI Photo Enhance | Input: long side <= 4096, Output: long side <= 4096 | < 10MB | jpg/jpeg/png |
| AI Photo Colorize | Input: long side <= 4096, Output: long side <= 4096 | < 10MB | jpg/jpeg/png |
| AI Photo Color Correction | Input: long side <= 4096, Output: long side <= 4096 | < 10MB | jpg/jpeg/png |
| AI Photo Lighting | 4096x4096 (long side <= 4096, short side >= 256) | < 10MB | jpg/jpeg/png |
| AI Image Extender | Input: long side <= 4096, Output: short side <= 1024, long side <= 2048 | < 10MB | jpg/jpeg/png |
| AI Replace | Input: long side <= 4096, Output: short side <= 1024, long side <= 2048 | < 10MB | jpg/jpeg/png |
| AI Object Removal | Input: long side <= 4096, Output: long side <= 4096 | < 10MB | jpg/jpeg/png |
| AI Image Generator | Input: long side <= 4096, Output: long side <= 1024 | < 10MB | jpg/jpeg/png |
| Al Photo Background Removal | Input: long side <= 4096, Output: long side <= 4096 | < 10MB | jpg/jpeg/png |
| AI Photo Background Blur | Input: long side <= 4096, Output: long side <= 4096 | < 10MB | jpg/jpeg/png |
| AI Photo Background Change | Input: long side <= 4096, Output: long side <= 4096 | < 10MB | jpg/jpeg/png |
| AI Portrait | Supported Dimensions | Supported File Size | Supported Formats |
|---|---|---|---|
| AI Avatar Generator | Input: long side <= 4096, Output: long side <= 1024 | < 10MB | jpg/jpeg/png |
| AI Face Swap | 4096x4096 (long side <= 4096), single face only, need to show full face | < 10MB | jpg/jpeg/png |
| AI Video Editing | Supported Dimensions | Supported File Size | Supported Formats |
|---|---|---|---|
| AI Video Enhance | input: long side <= 1920; output: max 2x input resolution, up to 60 sec, 30 FPS, 8 bit | <100MB | container: mov, mp4; video codec: MPEG-4, H.264 AVC; audio codec: aac, mp3; |
| AI Video Face Swap | input: long side <= 4096; output: 1280x720, 30 FPS, up to 30 sec, 8 bit, single face only | <100MB | container: mov, mp4; video codec: MPEG-4, H.264 AVC; audio codec: aac, mp3 |
| AI Video Style Transfer | input: long side <= 4096; output: long side <= 1280, 16 FPS, up to 30 sec, 8 bit | <100MB | container: mov, mp4; video codec: MPEG-4, H.264 AVC; audio codec: aac, mp3 |
- Successful responses (100 - 399)
- Client error responses (400 - 499)
- Server error response (500 - 599)
| General Error Code | Description |
|---|---|
| exceed_max_filesize | The input file size exceeds the maximum limit |
| invalid_parameter | The parameter value is invalid |
| error_download_image | There was an error downloading the source image |
| error_download_mask | There was an error downloading the mask image |
| error_decode_image | There was an error decoding the source image |
| error_decode_mask | There was an error decoding the mask image |
| error_download_video | There was an error downloading the source video |
| error_decode_video | There was an error decoding the source video |
| error_nsfw_content_detected | NSFW content was detected in the source image |
| error_no_face | No face was detected in the source image |
| error_pose | Failed to detect pose in the source image |
| error_face_parsing | Failed to perform face parsing on the source image |
| error_inference | An error occurred in the inference pipeline |
| exceed_nsfw_retry_limits | Retry limits exceeded to avoid generating NSFW image |
| error_upload | There was an error uploading the result image |
| error_multiple_people | Multiple people were detected in the source image |
| error_no_shoulder | Shoulders are not visible in the source image |
| error_large_face_angle | The face angle in the uploaded image is too large |
| error_hair_too_short | The input hair is too short |
| error_unexpected_video_duration | The video duration does not match the expected duration |
| error_bald_image | The input hairstyle is bald |
| error_unsupport_ratio | The aspect ratio of the input image is unsupported |
| unknown_internal_error | Other internal errors |
First, you need to register a YouCam API account for free at https://yce.makeupar.com/. You can then purchase or subscribe to get your units to use the service. You can see your subscription plan, pay as you go units, and your usage record at https://yce.makeupar.com/api-console/en/api-keys/. You can go to the API Key tab under your account page to generate and maintain your API keys to start using the YouCam API.
Overview
Starting from API version v1.5, we have introduced a simplified V2 API to streamline integration processes.
Scope: Starting from API version v1.7, all YouCam APIs are supported V2 API.
Note: V2 API is designed for workflow simplification only. It does not introduce advanced functionality. Both V1 APIs and V2 APIs use the same underlying AI models.
V1 API legacy API document: https://yce.makeupar.com/document/v1.x/index.html
Key Changes in V2 API
1. Endpoint Reduction
There is no need to call a separate authentication API to complete the authentication process.
V1 API Endpoints:
POST /s2s/v1.0/client/auth– AuthenticationPOST /s2s/v1.1/file/ai-task– Upload a filePOST /s2s/v1.0/task/ai-task– Run an AI taskGET /s2s/v1.0/task/ai-task– Get the result
V2 API Endpoints:
POST /s2s/v2.0/file/ai-task– Upload a file or provide a file URLPOST /s2s/v2.0/task/ai-task– Run an AI taskGET /s2s/v2.0/task/ai-task– Get the result
Warning: Ensure that you replace the placeholder
ai-taskwith the exact AI feature name supported by the API (for example,skin-analysis,cloth,hair-style,makeup-vto, orskin-tone-analysis). Using an incorrect or generic placeholder will result in an invalid request or API error. Always refer to the latest API specification for the list of valid feature identifiers.
2. Authentication
- V1 API: Requires explicit call to Authentication endpoint.- V2 API: No separate authentication endpoint. - Include your API key in the request header using Bearer Token:
You can find your API Key at https://yce.makeupar.com/api-console/en/api-keys/.Authorization: Bearer YOUR_API_KEY
3. Image Input
- Supports both file upload and file URL as input sources.
4. Polling Mechanism
- Processed results are retained for 24 hours after completion.
- No need for short-interval polling.
- Flexible polling intervals within the 24-hour window.
- Important: Polling is still required to check task status, as execution time is not guaranteed.
5. JSON Structure Simplification
- List Style API now uses a simplified JSON parameter structure.
- AI Hairstyle Generator: https://yce-api-01.makeupar.com/s2s/v2.0/task/template/hair-style
- AI Clothes: https://yce-api-01.makeupar.com/s2s/v2.0/task/template/cloth
Summary
- V2 API = Simplified workflow, same AI models.- Reduced endpoints, easier authentication, flexible input options, improved polling, and cleaner JSON.
v1.9 – 2026-03-02
New Features
- AI Skin Simulation AI-powered skin simulation technology delivers precise, real-time, clinical-grade before-and-after visualizations of up to ten skin concerns.
- AI Breast Augmentation Simulator AI-powered, hyper-realistic breast augmentation with subtle, natural enhancements and realistic previews for social or professional use.
Overview
Enhancements:
- AI Hairstyle Generator v2.1
- Added support for trying on customized hair styles using a reference image. Please check the Integration Guide.
- Allows users to match the output hair color to that of the source image or preset (for supported built-in templates)
- Introduced new preset hair styles
- AI Hairstyle Generator v2.1
Error Handling Improvements:
- Invalid Parameters Error now provides detailed information about the specific parameters that contain errors
MCP (Model Context Protocol) Server:
- Now supports the APIs released in v1.8
JS Camera Kit v2.2 (included in the API documentation with sample code):
- support AI Skin Simulation functionality using
skincareinit param.
- support AI Skin Simulation functionality using
v1.8 – 2026-01-28
Overview
- Enhanced AI Skin Analysis for higher resolution input (up to 4096 pixels from previous 1920), enabling more detailed skin evaluation.
- Customizable hairstyle generation using reference images via the AI Hairstyle Generator.
- AI Clothes API
- Supports automatic detection of garment categories by introducing a new parameter
autoforgarment_category. - A new parameter,
change_shoes, is introduced to manage whether shoes should be swapped. This allows users to create tasks (/s2s/v2.0/task/cloth) to handle category changes efficiently. - Additionally, it confirms the addition of a
shoesgarment category undergarment_category. - Performance enhancements and bug fixes.
- Supports automatic detection of garment categories by introducing a new parameter
- JS Camera Kit:
- Supports new types ('facereshape')
- Jewelry & Watch UI Optimization
- iPad camera optimization
- Integrated support for MCP with access to 26 APIs.
- See MCP Capabilities
New Features
Fashion API
- AI Nail Virtual Try-On: Experience lifelike nail designs with a high-resolution virtual try-on feature, allowing you to see how different styles and colors look on your hands.
- AI Face Reshape: Utilize advanced facial analysis to reshape your face naturally, enhancing symmetry and overall appearance with AI-driven adjustments.
- AI Body Reshape: Achieve a more balanced body shape by applying intelligent reshaping techniques that refine proportions and contours.
v1.7 – 2025-12-29
Overview
- All YouCam AI APIs now support the simplified V2 API structure.
- AI Skin Analysis API optimisation:
- Accepts any number of skin concerns as input. You may specify as many concerns as required. However, SD and HD Skin Analysis cannot be mixed in a single request. The call must include either all SD concerns or all HD concerns.
- Returns result images and scores directly in the output response rather than in a single ZIP file, allowing you to parse the scores first and download detection masks separately.
- JS Camera Kit:
- Supports new types ('ring', 'wrist', 'necklace', and 'earring')
- MCP support: See MCP
- Supports common MCP clients.
- Now supports 18 APIs.
New Features
Fashion API
Jewelry & Watch API
- AI Ring Virtual Try-On
- AI Bracelet Virtual Try-On
- AI Watch Virtual Try-On
- AI Earring Virtual Try-On
- AI Necklace Virtual Try-On
Q: What does 'Unit' mean, and how is it used? A: Please note that credits are exclusively used within the YouCam Online Editor UI, whereas units are designated solely for AI API usage. Throughout this document, all references to 'credit' or 'unit' pertain to the Unit.
Please check the page https://yce.makeupar.com/ai-api for details on how many units each AI feature consumes.Q: Why am I getting InvalidTaskId error? A: You will get a InvalidTaskId error once you check the status of a timed out task. So, once you run an AI task, you need to polling to check the status within the polling_interval until the status become either success or error.
Q: What is client_id, client_secret and id_token? A: Your API Key is the client_id and the Secret key is the client_secret. And please follow the Quick start guide to get the id_token to complete the authentication process.
For more information and questions, please refer to our blog page and the FAQ page. Or send an e-mail to YouCamOnlineEditor_API@perfectcorp.com. Our customer success team are very happy to help. ;)
Q: How to uplaod an image through curl? A: curl --location --request PUT '{url_api_response}' --header '{headers_in_api_response}' --data-binary @'{local_file_path}'
curl --location --request PUT 'https://example.com/sample-result-url' --header 'Content-Type: image/jpg' --header 'Content-Length: 50000' --data-binary @'./test.jpg'Q: What platforms does the AI API support? Can it be used on mobile devices? A: The AI API works seamlessly across different platforms. Since it's built on a standard RESTful API, you can use it for server-to-server communication, on mobile devices, or in a web browser - whatever best fits your needs.
Q: Does the AI Skin Analysis API support camera access within mobile app environments such as iOS and Android?
A: Our API adheres to standard RESTful conventions, enabling integration across any platform capable of making HTTP network requests. For mobile application development, we recommend the following workflow:
- Use the native camera APIs provided by Android or iOS to capture an image that complies with our specified image requirements.
- Call our File API to obtain a pre-signed upload URL and file identifier.
- Upload the captured image using the provided URL.
- Submit a request via our AI Skin Analysis API to initiate analysis.
- Implement periodic polling of the task status endpoint until the results are available.
Q: Is it possible to use the AI API with Flutter on both Android and iOS? A: Absolutely. Since AI APIs are standard RESTful APIs, you can access them using Flutter's built-in HTTP APIs to make requests.
Here are some official Flutter documents on making network queries.
And here’s a simple way to call a http GET with Bearer Authentication using Flutter’s http package:
import 'dart:convert'; import 'package:http/http.dart' as http; Future<void> fetchData() async { String token = "your_bearer_token_here"; // Replace with your actual token final response = await http.get( Uri.parse("https://yce-api-01.makeupar.com/s2s/v1.0/task/ai-task"), // Replace the `ai-task` with the AI feature you intend to use. headers: { "Content-Type": "application/json", "Authorization": "Bearer $token", }, ); if (response.statusCode == 200) { print("Data fetched successfully: ${response.body}"); } else { print("Failed to fetch data: ${response.statusCode}"); } }Key Steps to Auth:
- Retrieve the Token – You can store and retrieve the token using SharedPreferences or another secure storage method.
- Include the Token in Headers – Use "Authorization": "Bearer $token" in the request headers.
- Handle Expired Tokens – If the API returns a 401 InvalidAccessToken error, refresh the token if needed.
Q: API key is the API key, Where can I find the secret key? A: The secret key is created only when you first generate it. So make sure to save it right away, you won't be able to see it again later.
Q: Is it possible to integrate AI APIs into your website using Wix? A: We do not currently have an official integration guide for using AI APIs with Wix. However, the RESTful API itself does not impose any restrictions on the platform, provided it supports standard web queries.
We strongly recommend to begin by reading the official documentation provided by Wix: https://dev.wix.com/docs/develop-websites/articles/get-started/integrate-with-3rd-parties
Wix offers several methods for integrating with third-party APIs, primarily through its Velo development platform:
Fetch API: This is the most common method and an implementation of the standard JavaScript Fetch API. It allows you to make HTTP requests to external APIs from your Wix site's frontend or backend code. Backend calls: Recommended for security (especially for APIs requiring keys) and to avoid CORS issues. Use the Secrets Manager to securely store API keys. Frontend calls: Possible but less secure and may encounter CORS restrictions.
npm Packages: Velo supports the use of approved npm packages, allowing you to leverage a wide array of prebuilt JavaScript modules to extend your site's functionality with third-party features.
Service Plugins (formerly SPIs/Custom Extensions): These enable you to inject custom logic or integrate third-party services directly into Wix's business solutions (e.g., Wix Stores, Wix Bookings). Service plugins allow you to customize specific parts of existing app flows or integrate external services for functionalities like custom shipping rates, dynamic pricing, or alternative payment providers.
HTTP Functions: You can expose your site's functionality as an API, allowing third-party services to call your Wix site''s backend functions and interact with your site's data or logic.
Steps for Integration (using Fetch API as an example):
Store API Keys: If the third-party API requires authentication, store sensitive credentials like API keys securely in Wix's Secrets Manager. Import wix-fetch: In your Velo backend or frontend code, import the wixFetch module.
import { fetch } from 'wix-fetch';Make API Calls: Use the fetch function to send requests to the third-party API, including necessary headers and body data.
export async function getWeatherData() { const apiKey = await getSecret("yourApiKeyName"); // Retrieve from Secrets Manager const response = await fetch(`https://api.weatherapi.com/v1/current.json?key=${apiKey}&q=London`, { method: 'GET', headers: { 'Content-Type': 'application/json' } }); const data = await response.json(); return data; }Handle Responses: Process the data received from the API and integrate it into your site's design or functionality.
Q: Is it possible to integrate AI APIs into WooCommerce? A: We do not currently have an official integration guide for using AI APIs with WooCommerce. However, the RESTful API itself does not impose any restrictions on the platform, provided it supports standard web queries.
We strongly recommend to begin by reading the official documentation provided by WooCommerce: https://woocommerce.com/document/woocommerce-rest-api/
Integrating third-party APIs with WooCommerce enhances store functionality and streamlines operations. This can be achieved through various methods:
Utilizing WooCommerce REST API:
WooCommerce provides a robust REST API that allows external applications to interact with your store data. You can create API keys with specific permissions (Read, Write, or Read/Write) in WooCommerce > Settings > Advanced > REST API. This enables you to automate tasks like inventory syncing, order processing, customer data synchronization, and more, by building custom integrations or using third-party services that leverage this API.
Employing Plugins:
Many WordPress and WooCommerce plugins are designed specifically for integrating with popular third-party services like payment gateways, shipping carriers, CRM systems, and accounting software. Plugins often offer pre-built integrations, simplifying the setup process and reducing the need for custom coding. Examples include plugins for specific payment processors (e.g., Stripe, PayPal), shipping solutions (e.g., FedEx, USPS), or general API integration tools like WPGet API.
Custom Code and Webhooks:
For unique integration needs or when a suitable plugin isn't available, you can implement custom code within your WordPress theme or a custom plugin. This involves using WordPress/WooCommerce hooks and filters to trigger API calls at specific events (e.g., woocommerce_payment_complete for post-purchase actions). Webhooks can also be used to send real-time data from WooCommerce to a third-party service when certain events occur (e.g., new order, product update).
Invalid TaskId Error Why: You’ll receive an InvalidTaskId error if you attempt to check the status of a task that has timed out. Therefore, once an AI task is initiated, you’ll need to poll for its status within the polling_interval until the status changes to either success or error. Solution: To avoid the task becoming invalid, it’s necessary to implement a timed loop that queries the task status at regular intervals within the allowed polling window.
500 Server Error / unknown_internal_error A: Important: Simply calling the File API does not upload your file. You must manually upload the file to the URL provided in the File API response. That URL is your upload destination, make sure the file is successfully transferred there before proceeding.
Before calling the AI API, ensure your file has been successfully uploaded. Use the File API to retrieve an upload URL, then upload your file to that location. Once the upload is complete, you'll receive a file_id in the response, this ID is what you'll use to access AI features related to that file.404 Not Found error when using AI APIs A: Important: Simply calling the File API does not upload your file. You must manually upload the file to the URL provided in the File API response. That URL is your upload destination, make sure the file is successfully transferred there before proceeding.
Before calling the AI API, ensure your file has been successfully uploaded. Use the File API to retrieve an upload URL, then upload your file to that location. Once the upload is complete, you'll receive a file_id in the response, this ID is what you'll use to access AI features related to that file.The API response returns the same style ID on the Postman A: The is because Postman (Pretty view) and Chrome use JavaScript to parse JSON responses. In JavaScript, numbers larger than 9007199254740991 (2^53-1) cannot be represented precisely. They are rounded to the nearest representable value, which makes different IDs appear identical (e.g., 219691778809271815 → 219691778809271800).
- Precision Loss in JavaScript/JSON Error Handling
- Cause: JavaScript's Number type cannot safely handle integers beyond 2^53 - 1, leading to silent truncation or rounding.
- Solution: Use a JSON parser like json-bigint to treat IDs as strings and retain full precision.
- Precision Loss in JavaScript/JSON Error Handling
Beard Authentication 400 Error A: When using the V2 API, you must include your API key in every request by adding a Bearer authorization header. Failure to do so will result in authentication errors. Valid Request Header Format
Authorization: Bearer YOUR_API_KEYCommon Issues
Missing Bearer Prefix The
Authorizationheader must start withBearerfollowed by the API key. Example:Authorization: YOUR_API_KEYUnnecessary Characters Do not include angle brackets
<or>around the API key. These characters are not required and will cause the request to fail. Example:Authorization: Bearer <YOUR_API_KEY>Incorrect API Key Ensure that the API key provided in the
Authorizationheader is correct and active.
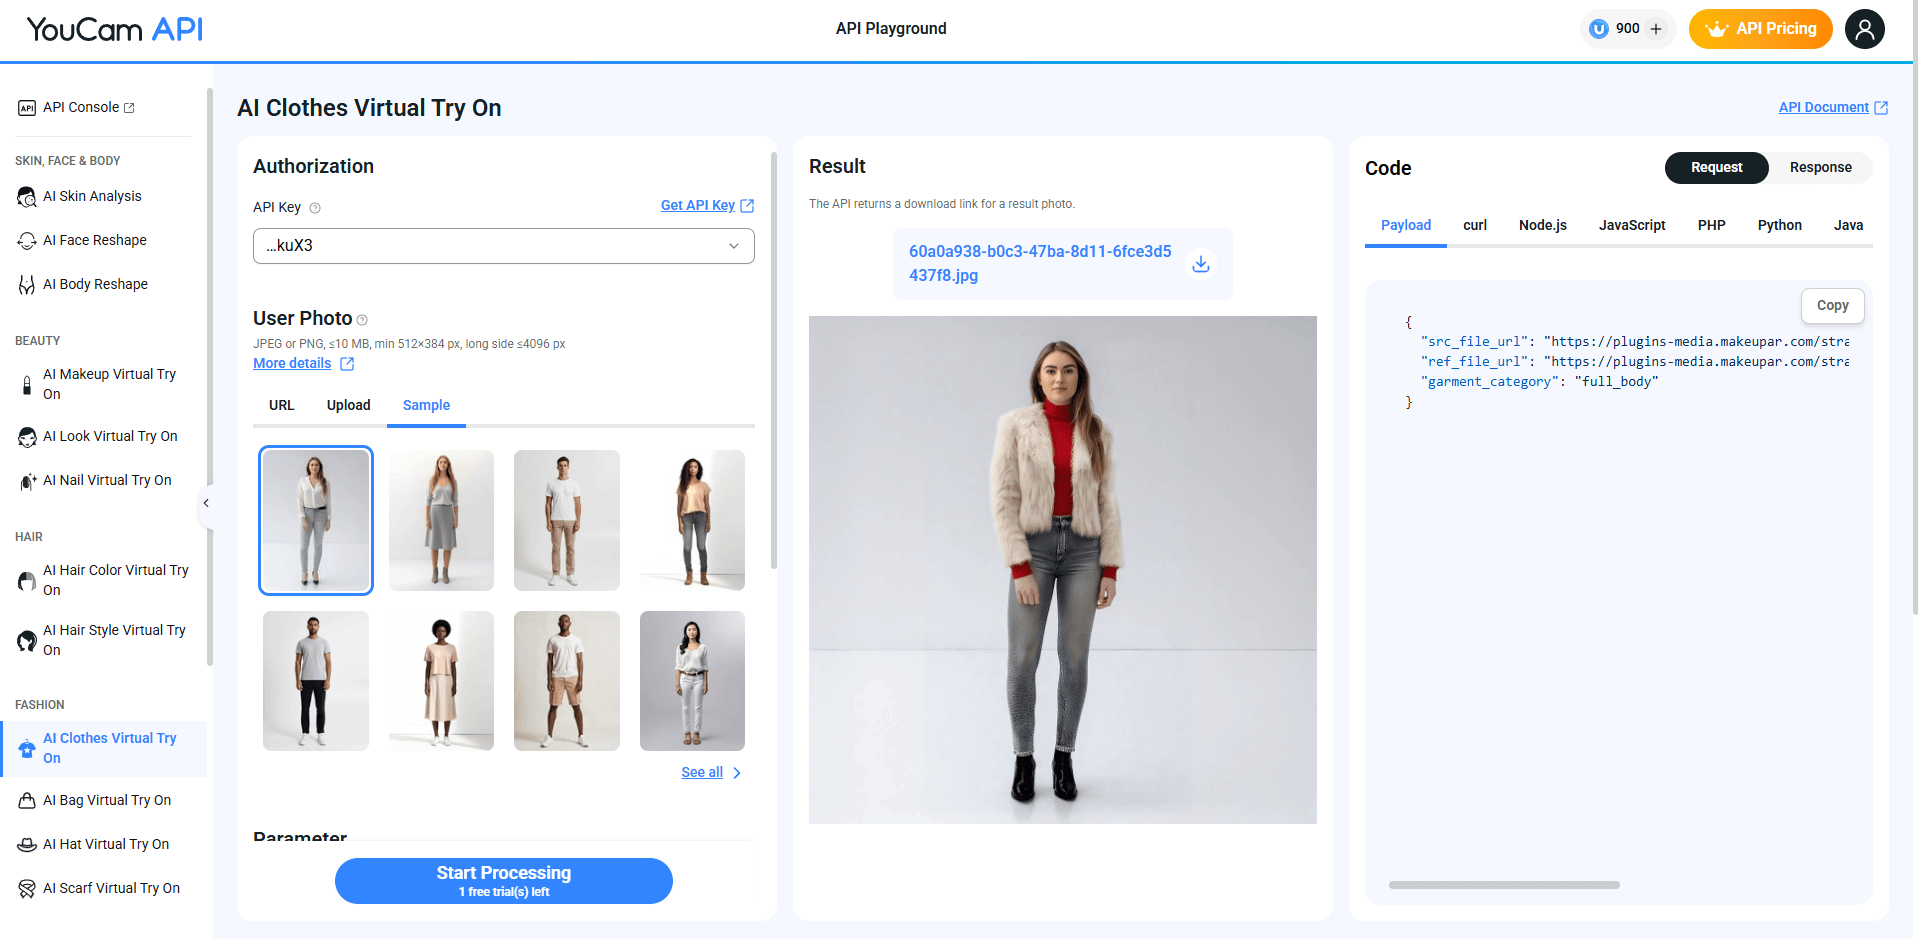
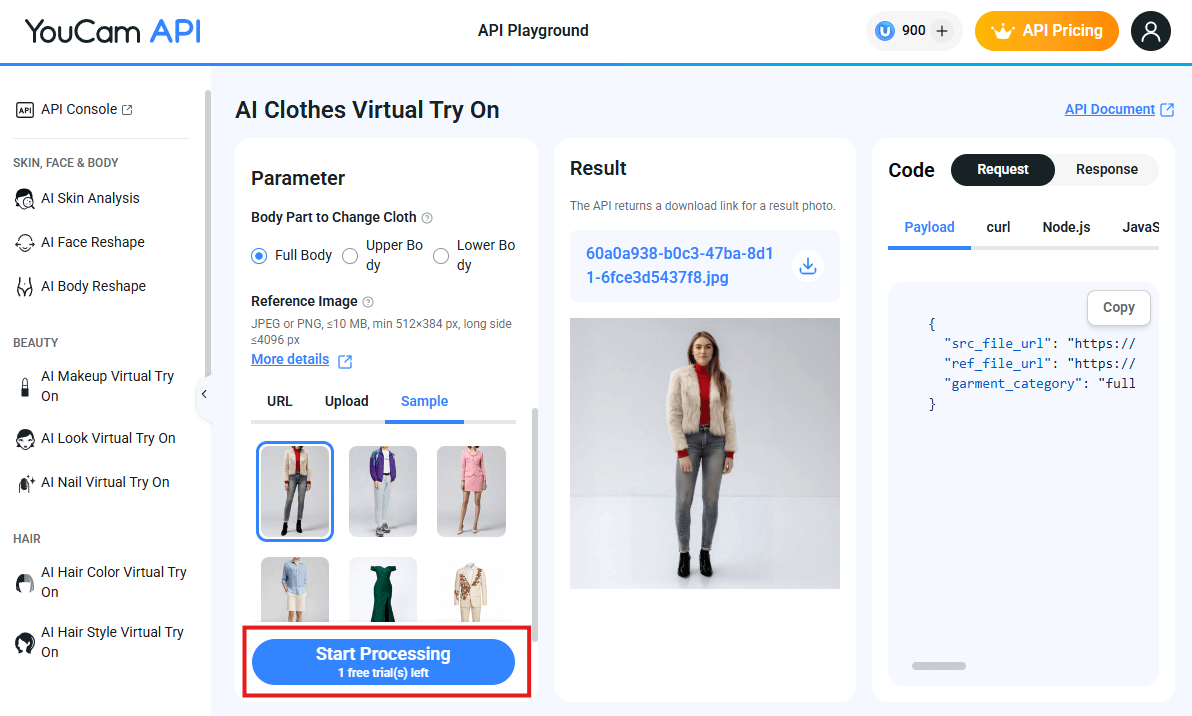
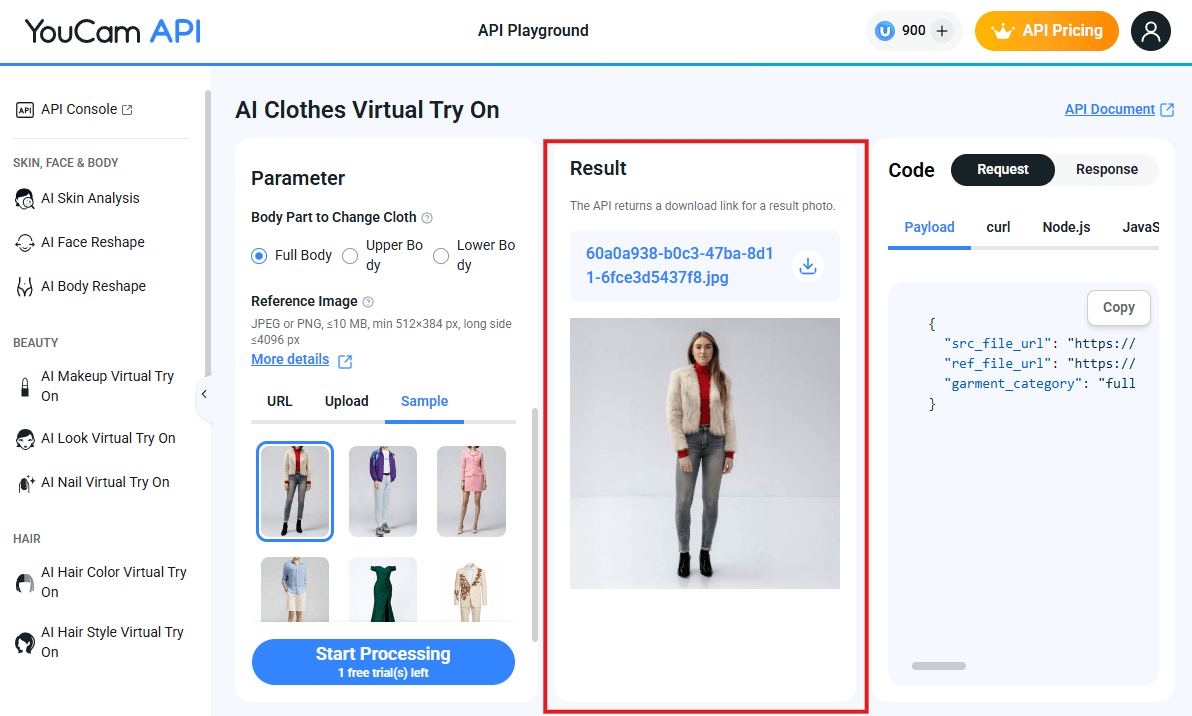
The YouCam API - API Playground provides an excellent overview of how to configure AI workflows. It lets you run tests, validate results, and debug issues while supplying ready‑to‑use code snippets that you can copy directly into your environment.
Url: https://yce.perfectcorp.com/api-console/en/api-playground/ai-skin-analysis/
Follow these steps to register, create an API key, and run your first AI workflow.
1. Register & Log In
- Visit: https://yce.perfectcorp.com/ai-api
- Sign up for a new account or log in if you already have one.
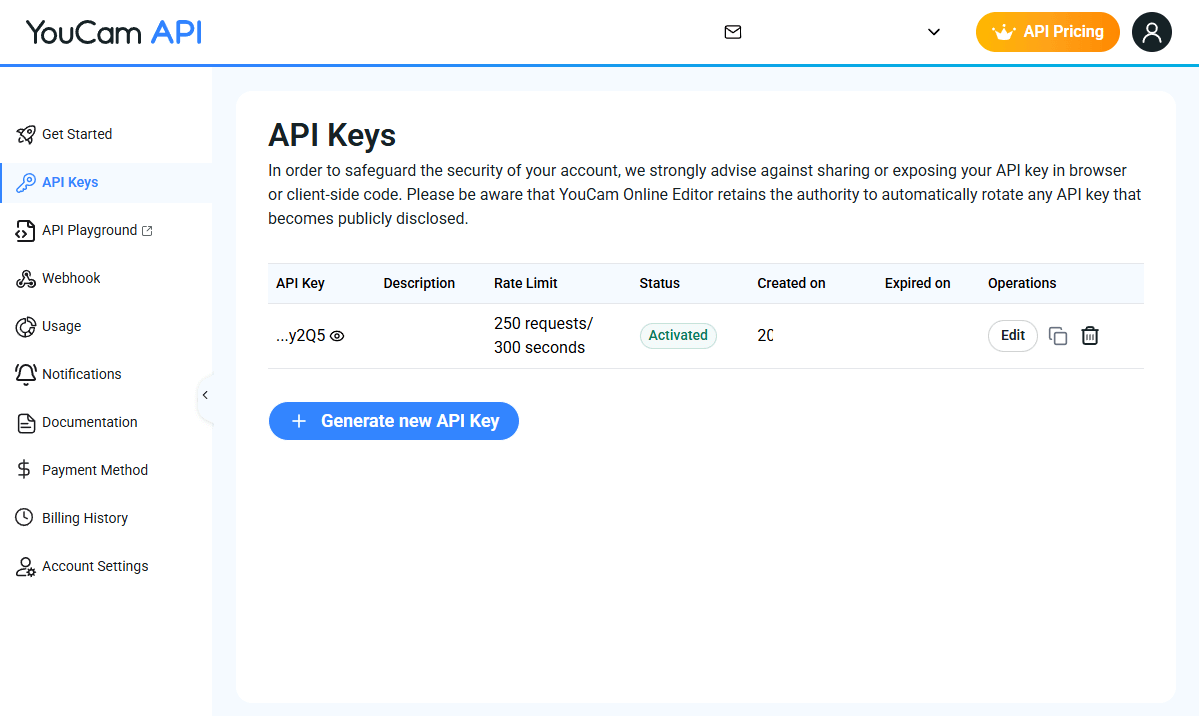
2. Create an API Key
Navigate to the API Console and generate a key:
3. Select a Feature in the API Playground
Choose an AI feature to test.
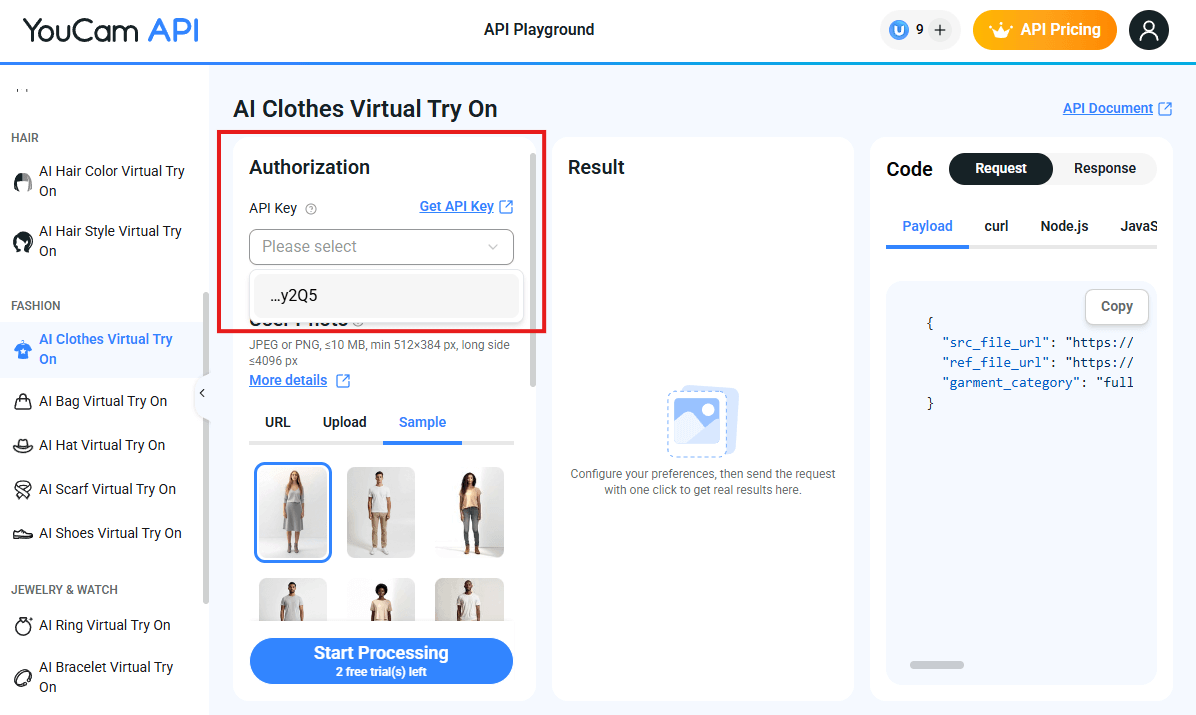
4. Authorize with Your API Key
Select an API key you created into the Authorization field of the playground.
5. Choose a Source
Specify where your data comes from (e.g., local file, file url, or samples).
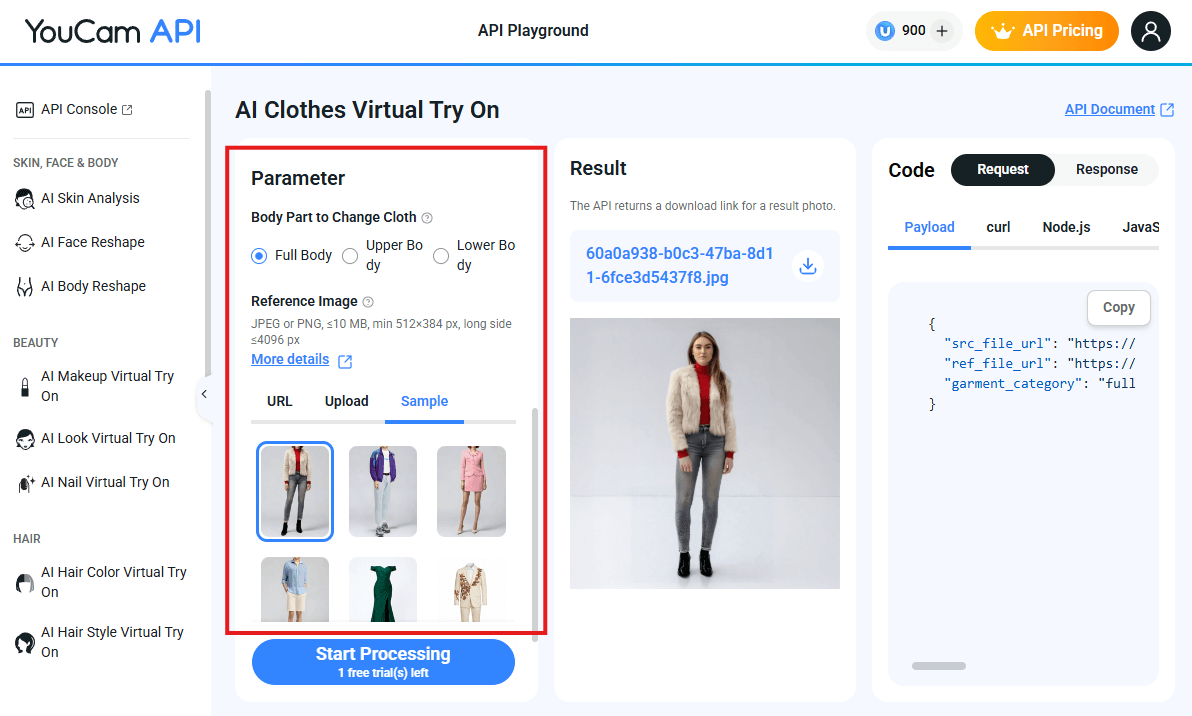
6. Configure AI Parameters
Adjust the parameters to match your use case:
7. Check Request Payload & Sample Code
Review the generated request payload and sample code for correctness.
8. Start Processing
Click Start Processing to execute the workflow.
9. Check Results
Inspect the output and verify that it meets expectations.
Check your unit details and usage history. Please note that credits are exclusively used within the YouCam Online Editor UI, whereas units are designated solely for AI API usage. Throughout this document, all references to 'credit' or 'unit' pertain to the Unit.
Request samples
- curl
- Node.js
- JavaScript
- PHP
- Python
- Java
curl --request GET \ --url https://yce-api-01.makeupar.com/s2s/v1.0/client/credit \ --header 'Authorization: Bearer <access_token for v1, API Key for v2>'
Response samples
- 200
{- "status": 200,
- "results": [
- {
- "id": 13105541279084536,
- "type": "ApiSubsToken",
- "amount": 10,
- "expiry": 1704789135000
}
]
}View unit history
Authorizations:
query Parameters
| page_size | integer Example: page_size=20 Number of results to return in a page. Valid value should be between 1 and 30. Default 20. |
| starting_token | string Example: starting_token=13045969587275114 Token for current page. Start with |
Responses
Request samples
- curl
- Node.js
- JavaScript
- PHP
- Python
- Java
curl --request GET \ --url 'https://yce-api-01.makeupar.com/s2s/v1.0/client/credit/history?page_size=20&starting_token=13045969587275114' \ --header 'Authorization: Bearer <access_token for v1, API Key for v2>'
Response samples
- 200
- 400
- 401
{- "status": 200,
- "result": {
- "next_token": 13045969587275114,
- "history": [
- {
- "id": 38173479337460984,
- "timestamp": 1703146067000,
- "action": "photo_enhance",
- "target_id": "7TWFkuE2Z9uR0NOxSmQ1rh4PJ5Zx7YJ5U9SAz51q0QHVwMP+Jb1XbjPsf7ZgUgLY",
- "info": {
- "credits": [
- {
- "id": 24409059381740548,
- "amount": -2
}, - {
- "id": 27297116883780870,
- "amount": 0
}
], - "dst_actions": "[ \"hd_wrinkle\", \"hd_pore\", \"hd_texture\" ]"
}
}
]
}
}Get feature cost
Authorizations:
query Parameters
| page_size | integer [ 1 .. 20 ] Example: page_size=20 Number of results to return in a page. Default 20. value range: [1 - 20] |
| starting_token | string Example: starting_token=MjA Token for current page. Start with |
Responses
Request samples
- curl
- Node.js
- JavaScript
- PHP
- Python
- Java
curl --request GET \ --url 'https://yce-api-01.makeupar.com/s2s/v2.0/credit/feature-cost?page_size=20&starting_token=MjA' \ --header 'Authorization: Bearer <access_token for v1, API Key for v2>'
Response samples
- 200
- 400
- 401
{- "status": 200,
- "result": {
- "next_token": "MjA",
- "skus": [
- {
- "description": "AI Skin Analysis for SD 1~4 concerns",
- "amount": 9,
- "unit": "result_image",
- "proc_unit": 1,
}, - {
- "description": "AI Skin Analysis for SD 5~7 concerns",
- "amount": 12,
- "unit": "result_image",
- "proc_unit": 1,
}
]
}
}Webhook
Webhooks allow your application to receive asynchronous notifications when an AI task completes with either a success or error status. Notifications are sent to an HTTP endpoint you control and follow the Standard Webhooks Specification.
Webhook Secret
Construction of Webhook Secret
We use HMAC-SHA256 signature schme webhook secret, and webhook secret is base64 encoded, prefixed with whsec_ for easy identification.
Example webhook secret:
whsec_NDQzMzYxNzkzMzE0NjYyNDM6OTIxOTcwNDIxODQ
Implement Webhook with Standard Webhooks Library
We strongly recommend using an official implementation of the Standard Webhooks Library, and you do not have to worry about the signature validation details.
Using an official implementation also ensures secure and correct signature validation.
Implement Webhook by Yourself
Please carefully understand the construction of the webhook secret, refer to Symmetric part of Signature scheme.
When you are trying to sign signature input, please remove the whsec_ prefix and base64 decode the remaining string to obtain the actual bytes of secret to do HMAC-SHA256 hash.
Webhook Request Example
POST https://yourdomain.com/webhook-endpoint
Content-Type: application/json
webhook-id: msg_1eWPv9cWJCnEP99UJncmVJ6KjK_xVXRhZPe_eSGnRNbLlXEPjiG3gb3Usg9le3_4:1761112848
webhook-timestamp: 1761112900
webhook-signature: v1,vyVNWrjoZcBK1JXrFGkdDKK2slo5+Q5yfzpkHmqO5R0=
{
"created_at": 1761112848,
"data": {
"task_id": "1eWPv9cWJCnEP99UJncmVJ6KjK_xVXRhZPe_eSGnRNbLlXEPjiG3gb3Usg9le3_4",
"task_status": "success"
}
}
HTTP Headers
webhook-id
A unique identifier for the webhook delivery. This value remains consistent across retries and should be used for idempotency handling.
webhook-timestamp
The Unix epoch timestamp (seconds) when the webhook was sent.
webhook-signature
'v1' followed by a comma (,), followed by the base64 encoded HMAC-SHA256 signature.
'v1' indicates the version of the signature scheme, and is currently the only supported version.
The base64 encoded HMAC-SHA256 signature is the result of signing signature input using your webhook secret.
Signature input format:
{webhook-id}.{webhook-timestamp}.{raw-minified-json-body}
Example signed content:
msg_1eWPv9cWJCnEP99UJncmVJ6KjK_xVXRhZPe_eSGnRNbLlXEPjiG3gb3Usg9le3_4:1761112848.1761112900.{"created_at":1761112848,"data":{"task_id":"1eWPv9cWJCnEP99UJncmVJ6KjK_xVXRhZPe_eSGnRNbLlXEPjiG3gb3Usg9le3_4","task_status":"success"}}
Request Body
created_at
Unix epoch timestamp (seconds) indicating when the task completed.
data
Contains the event payload.
| Field | Description |
|---|---|
task_id |
The task identifier returned when the task was created. Use this ID to query the final task result. |
task_status |
Task completion status. Possible values: success, error. |
Webhook Integration Guide
Prepare a webhook endpoint on your server. Ensure the endpoint accepts
POSTrequests and is accessible via HTTPS.Create a webhook in the API Console.
Run an AI task and record the
task_id.Process webhook notifications using the
task_idto retrieve task results.
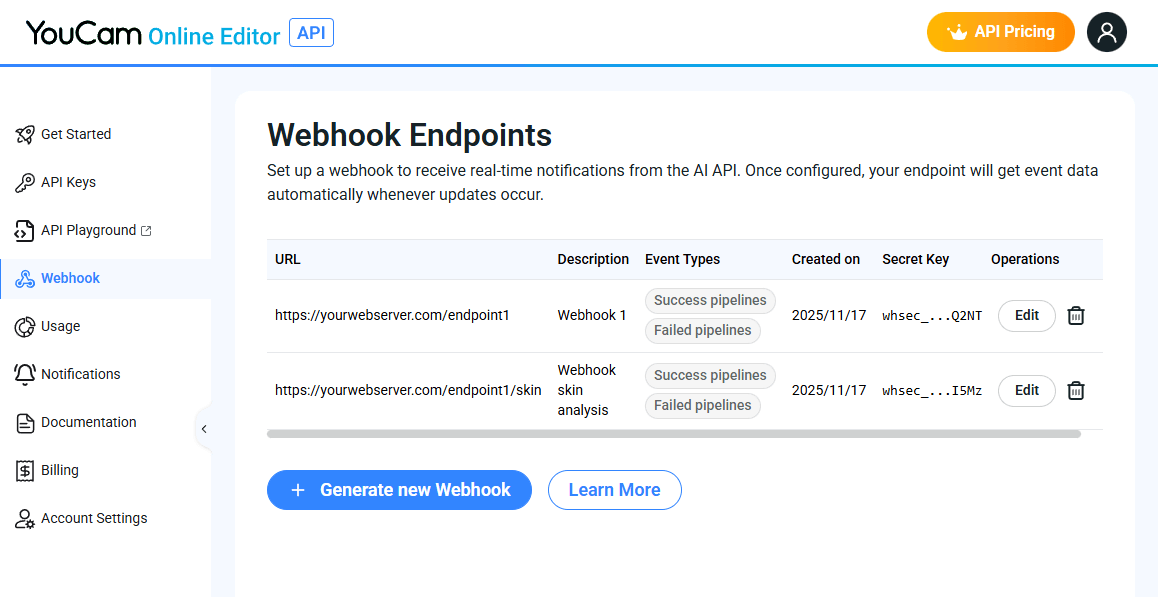
Creating a Webhook Endpoint
Visit the API Console's Webhook Management page:
https://yce.makeupar.com/api-console/en/webhook/
1. Locate the Webhook Section

2. Create a New Webhook Endpoint

You may configure up to 10 webhook endpoints concurrently.
3. Secure Your Webhook Secret
Your webhook secret is used to validate the webhook-signature.
Keep it safe and never expose it publicly.

4. Manage Existing Webhooks
Handling Webhook Requests on Your Server
We recommend using an official implementation of the Standard Webhooks Library:
This ensures secure and correct signature validation.
You can also test or debug payloads using the Standard Webhooks Simulator:
https://www.standardwebhooks.com/simulate
Verifying Webhook Signatures
Consider the webhook request example:
POST https://yourdomain.com/webhook-endpoint
Content-Type: application/json
webhook-id: msg_1eWPv9cWJCnEP99UJncmVJ6KjK_xVXRhZPe_eSGnRNbLlXEPjiG3gb3Usg9le3_4:1761112848
webhook-timestamp: 1761112900
webhook-signature: v1,vyVNWrjoZcBK1JXrFGkdDKK2slo5+Q5yfzpkHmqO5R0=
Request body:
{
"created_at": 1761112848,
"data": {
"task_id": "1eWPv9cWJCnEP99UJncmVJ6KjK_xVXRhZPe_eSGnRNbLlXEPjiG3gb3Usg9le3_4",
"task_status": "success"
}
}
Signature input format will be like:
{webhook-id}.{webhook-timestamp}.{raw-minified-json-body}
Example signed content:
msg_1eWPv9cWJCnEP99UJncmVJ6KjK_xVXRhZPe_eSGnRNbLlXEPjiG3gb3Usg9le3_4:1761112848.1761112900.{"created_at":1761112848,"data":{"task_id":"1eWPv9cWJCnEP99UJncmVJ6KjK_xVXRhZPe_eSGnRNbLlXEPjiG3gb3Usg9le3_4","task_status":"success"}}
Veriry HMAC-SHA256 encrypted signed content using your webhook secret key with the received webhook-signature. Example:
v1,vyVNWrjoZcBK1JXrFGkdDKK2slo5+Q5yfzpkHmqO5R0=
Overview of MCP
The Model Context Protocol (MCP) is a lightweight, JSON‑based wrapper that enables client applications (e.g., Cursor, Copilot in VS Code, Claude for Desktop) to invoke the YouCam AI services without dealing with low‑level HTTP details.
Key benefits: By adding a single entry to MCP configuration JSON file and supplying your YouCam API key, any MCP‑compatible client (Cursor, Copilot in VS Code, Claude for Desktop) can instantly access the full suite of YouCam AI services - skin analysis, cloth virtual try‑on, hair styling, fashion rendering, and more functions. The client abstracts request formatting, authentication handling, and asynchronous polling, allowing developers to focus on workflow integration rather than low‑level API mechanics.
1. Prerequisites
- An MCP‑compatible client installed (Cursor, Copilot in VS Code, Claude for Desktop, etc.).
- Network access to
https://mcp-api-01.makeupar.com. - A valid YouCam API key (see next Section).
The client itself already implements request/response serialization and polling logic; no additional code is required from the developer.
2. Obtaining an API Key
- Navigate to the API‑key console: https://yce.makeupar.com/api-console/en/api-keys/
- Create a new key or copy an existing one.
- Store the key securely (environment variable, secret manager, etc.).
Example environment variable (adjust for your deployment):
YOUR_API_KEY=your‑api‑key
3. Configuring the MCP configuration JSON file
MCP clients read a JSON configuration file named mcp.json. Add an entry for the YouCam MCP server as shown below:
{
"mcpServers": {
"youcam-api-mcp": {
"url": "https://mcp-api-01.makeupar.com/mcp",
"headers": {
"Authorization": "Bearer YOUR_API_KEY"
}
}
}
}
Configuration steps
| Step | Action |
|---|---|
| 1. Setup MCP configuration JSON file | Put the file in the root of your project or in the client‑specific configuration directory (refer to each client’s documentation). |
| 2. Replace placeholder | Substitute YOUR_API_KEY with the value obtained in Section 3, or reference an environment variable (${YOUR_API_KEY}) if supported by the client. |
| 3. Verify connectivity | Open the client UI and confirm that “YouCam API MCP” appears as a selectable service. |
The configuration is static; any change to the key requires a client reload.
Integration with Popular MCP‑Aware Clients
Cursor
Open Settings → Tools & MCP → Add Custom MCP
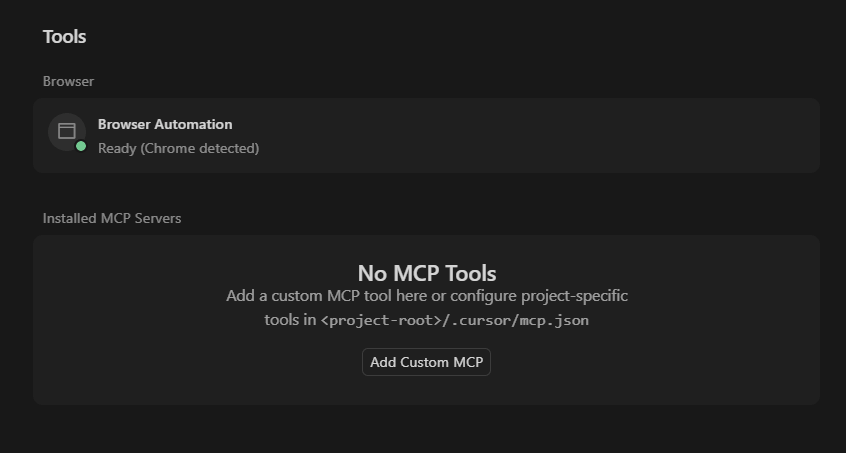
Add settings into mcp.json file
{
"mcpServers": {
"youcam-api-mcp": {
"url": "https://mcp-api-01.makeupar.com/mcp",
"type": "http",
"headers": {
"Authorization": "Bearer YOUR_API_KEY"
}
}
}
}
Navigate to Cursor Settings → Tools & MCP
Enable or Disable the desired tools in 'Installed MCP Servers' section
Copilot in VS Code (Visual Studio Code)
Copilot in VS Code option 1:
> MCP: Add Server
choose
HTTP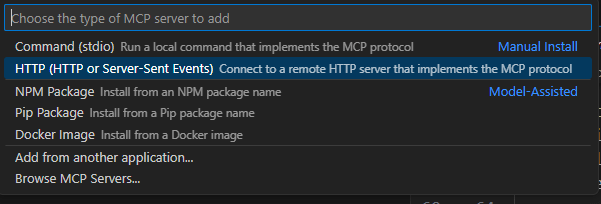
enter the server url
name the mcp server
header setting: fill in the api token
Copilot in VS Code option 2:
> MCP: Open User Configuration
Update the youcam-api-mcp setting to
mcp.json
{
"servers": {
"youcam-api-mcp": {
"url": "https://mcp-api-01.makeupar.com/mcp",
"type": "http",
"headers": {
"Authorization": "Bearer YOUR_API_KEY"
}
}
}
}
Claude for Desktop
Settings → Developer → Edit config → open claude_desktop_config.json file

update the
mcpServerssectionreplace the
YOUR_API_KEYpart with your actual api key
{
"mcpServers": {
"youcam-api-mcp": {
"command": "npx",
"args": [
"-y",
"mcp-remote",
"https://mcp-api-01.makeupar.com/mcp",
"--header",
"Authorization:${AUTH_HEADER}"
],
"env": {
"AUTH_HEADER": "Bearer YOUR_API_KEY"
}
}
}
}
- File → Exit to restart claude desktop app
YouCam AI Capabilities Exposed via MCP
Below is a categorical overview of the APIs available on the youcam-api-mcp server. Each entry indicates whether the operation can be invoked directly or requires a template_id obtained from a dedicated "templates" endpoint.
Skin and Face
| API | Execution Type | Brief Description |
|---|---|---|
| AI‑Skin‑Analysis | Direct | Analyses skin texture, pigmentation, hydration, pores, etc., and returns personalized skincare recommendations. |
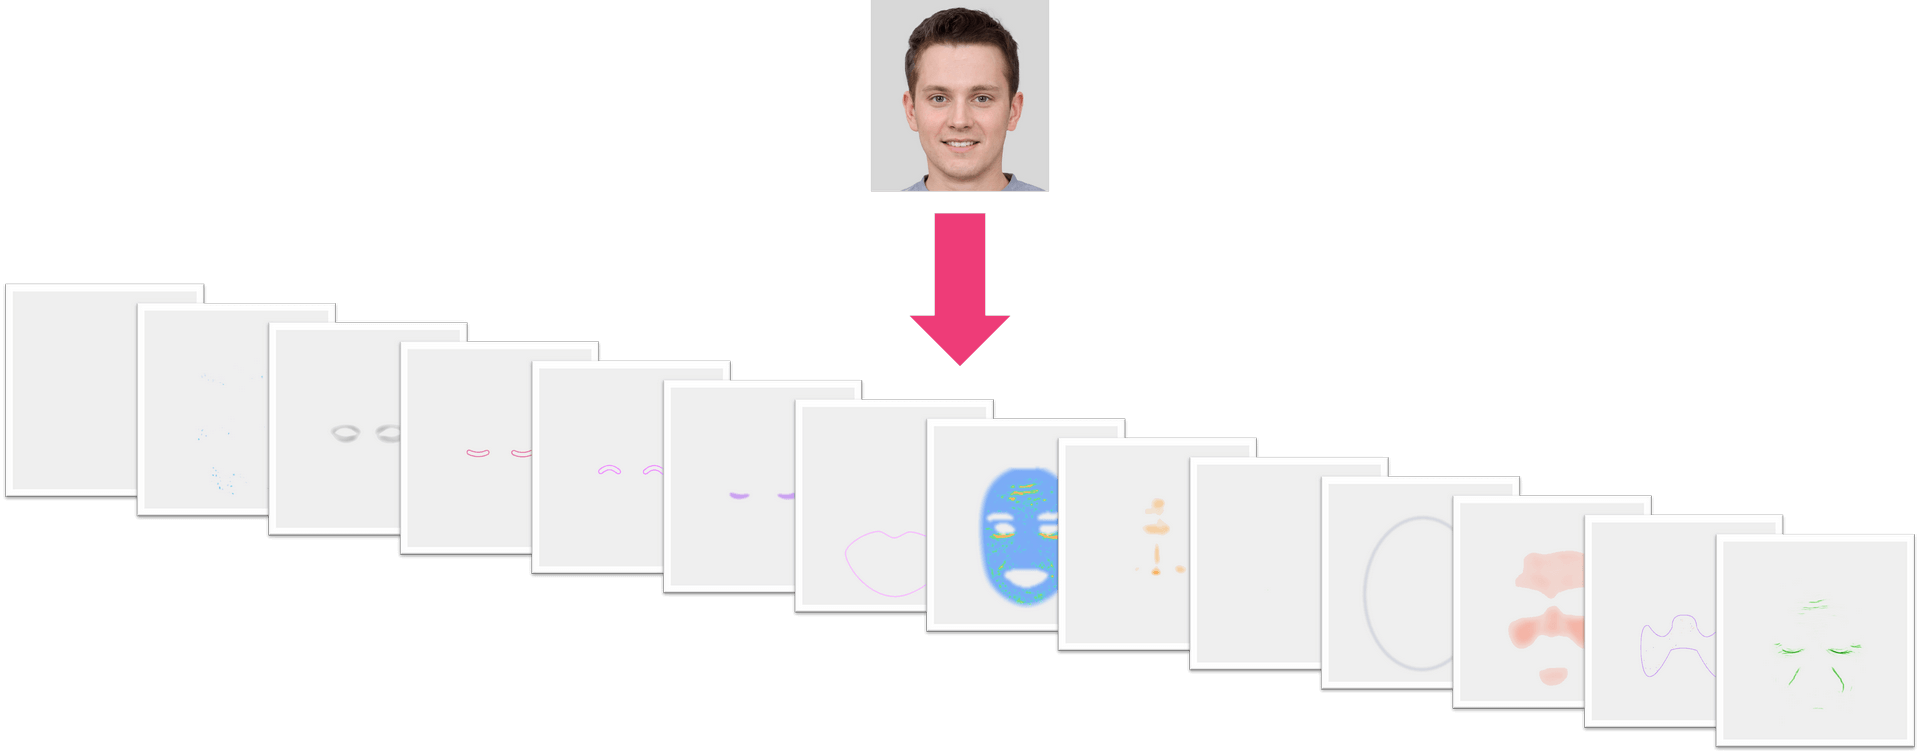
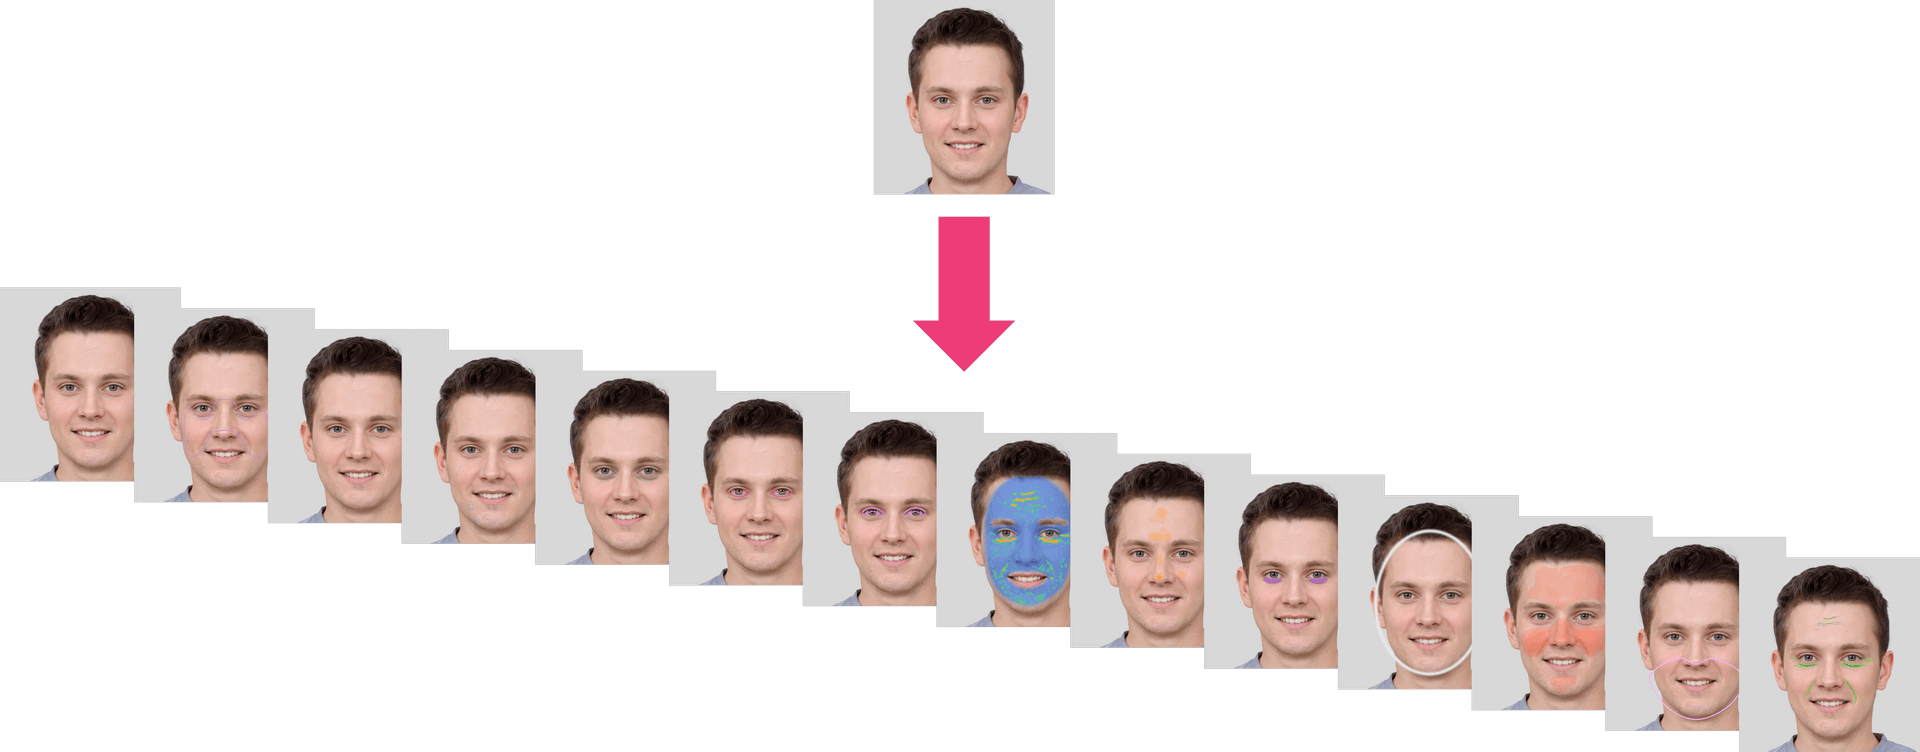
| AI‑Aging‑Generator | Direct | Generates a series of age-progressed images from a single selfie (youth → older). |
| AI‑Skin‑Tone‑Analysis | Direct | Detects facial skin tone together with eye, eyebrow, lip & hair colours for colour‑matching recommendations. |
| AI‑Face‑Analyzer | Direct | Examines facial geometry (eye shape, nose, cheekbones, etc.) to drive custom beauty or product suggestions. |
Beauty API
| API | Execution Type | Brief Description |
|---|---|---|
| AI‑Makeup‑Virtual‑TryOn | Direct (Pattern‑Based**) | Applies professionally designed makeup virtual try-on; first retrieve available pattern names via AI‑Makeup‑Virtual‑Try‑On‑Pattern‑Name. |
| AI‑Makeup‑Virtual‑Try‑On‑Pattern‑Name | Template/Pattern Query | Returns a list of predefined makeup patterns (pattern_id). |
| AI‑Look‑Vto | Direct (Template‑Based*) | Applies curated “look” styles to an image; retrieve style IDs via AI‑Look‑Virtual‑TryOn‑Templates. |
| AI‑Look‑Virtual‑TryOn‑Templates | Template/Pattern Query | Lists available look templates (template_id). |
* Template‑based APIs require a preceding call to the corresponding “templates” endpoint to obtain an identifier that is then supplied in the execution request.
** The AI Makeup API supports the following effects: SkinSmoothEffect, BlushEffect, BronzerEffect, ConcealerEffect, ContourEffect, EyebrowsEffect, EyelinerEffect, EyeshadowEffect, EyelashesEffect, FoundationEffect, HighlighterEffect, LipColorEffect and LipLinerEffect. Each effect has its own JSON structure. Some include a pattern, others may include a texture, and most contain at least one colour parameter within a palette structure.
It is recommended to copy the sample code for the makeup effect you wish to apply from AI-Makeup-Vto/Inputs-and-Outputs and include the pattern JSON when sending to the LLM. This ensures the LLM understands what AI Makeup supports and what you intend to apply.
For example, a lipstick sample effect is shown below:
{
"category": "lip_color", // string, const "lip_color"
"shape": { // object, driven by lipshape.json
"name": "original" // string, must match a label from lipshape.json
},
"morphology": { // optional object
"fullness": 50, // integer, range 0 to 100 (default 0)
"wrinkless": 50 // integer, range 0 to 100 (default 0)
},
"palettes": [ // minimum items depend on style; often one or more
{
"color": "#ff0000", // string, hex colour "#RRGGBB"
"texture": "matte", // string, enum ["matte","gloss","holographic","metallic","satin","sheer","shimmer"]
"colorIntensity": 50, // integer, range 0 to 100
"gloss": 50, // integer, required if texture is gloss, holographic, metallic, sheer or shimmer
"shimmerColor": "#ff0000", // string, required if texture is holographic, metallic or shimmer
"shimmerIntensity": 50, // integer, required if texture is holographic, metallic or shimmer
"shimmerDensity": 50, // integer, required if texture is holographic, metallic or shimmer
"shimmerSize": 50, // integer, required if texture is holographic, metallic or shimmer
"transparencyIntensity": 50 // integer, required if texture is gloss, sheer or shimmer
}
],
"style": {
"type": "full", // string, enum ["full","ombre","twoTone"]
"innerRatio": 50, // integer, required if type is ombre
"featherStrength": 50 // integer, required if type is ombre
}
}
The lipstick pattern JSON can be found in the Full Pattern Catalogue at: https://plugins-media.makeupar.com/wcm-saas/shapes/lipshape.json This is also available in AI-Makeup-Vto/Inputs-and-Outputs within the API documentation.
Fashion API
| API | Execution Type | Brief Description |
|---|---|---|
| AI-Cloth | Direct | Virtual clothing try-on. |
| AI-Cloth-Templates | Template/Pattern Query | Queries predefined clothing templates. |
| AI-Fabric | Direct | Generates or analyses fabrics. |
| AI-Fabric-Templates | Template/Pattern Query | Retrieves fabric templates. |
| AI-Bag | Direct | Virtual bag try-on or placement. |
| AI-Scarf | Direct | Virtual scarf try-on. |
| AI-Shoes | Direct | Virtual shoes try-on. |
| AI-Hat | Direct | Virtual hat try-on. |
Jewellery and Watch
| API | Execution Type | Brief Description |
|---|---|---|
| AI-Ring-Virtual-Try-On | Direct | Virtual ring fitting and preview. |
| AI-Bracelet-Virtual-Try-On | Direct | Virtual bracelet try-on. |
| AI-Watch-Virtual-Try-On | Direct | Virtual watch fitting. |
| AI-Earring-Virtual-Try-On | Direct | Virtual earring try-on. |
| AI-Necklace-Virtual-Try-On | Direct | Virtual necklace try-on. |
Hair API
| API | Execution Type | Brief Description |
|---|---|---|
| AI‑Hairstyle‑Generator | Direct | Generates realistic hairstyles; can also use predefined styles from AI‑Hairstyle‑Generator‑Templates. |
| AI‑Hairstyle‑Generator‑Templates | Template/Pattern Query | Lists hairstyle template IDs. |
| AI‑Hair‑Color | Direct | Changes hair colour with adjustable intensity sliders. |
| AI‑Hair‑Extension | Direct | Simulates extensions of various lengths and styles; requires a template_id from AI‑Hair‑Extension‑Templates. |
| AI‑Hair‑Extension‑Templates | Template/Pattern Query | Provides extension style IDs. |
| AI‑Hair‑Volume‑Generator | Direct | Adds natural volume to fine or thinning hair; optional presets via AI‑Hair‑Volume‑Generator‑Templates. |
| AI‑Hair‑Volume‑Generator‑Templates | Template/Pattern Query | Lists volume‑enhancement template IDs. |
| AI‑Hair‑Bang‑Generator | Direct | Applies realistic bangs; predefined bang styles available via AI‑Hair‑Bang‑Generator‑Templates. |
| AI‑Hair‑Bang‑Generator‑Templates | Template/Pattern Query | Returns bang style IDs. |
| AI‑Wavy‑Hair | Direct | Generates wavy or curly hair effects; preset wave patterns from AI‑Wavy‑Hair‑Templates. |
| AI‑Wavy‑Hair‑Templates | Template/Pattern Query | Lists wavy‑hair template IDs. |
| AI‑Beard‑Style‑Generator | Direct | Simulates a variety of beard styles; additional preset options via AI‑Beard‑Style‑Generator‑Templates. |
| AI‑Beard‑Style‑Generator‑Templates | Template/Pattern Query | Provides beard style IDs. |
| AI‑Hair‑Frizziness‑Detection | Direct | Quantifies hair frizz level from three‑view photos (front, left, right). |
| AI‑Hair‑Length‑Detection | Direct | Measures hair length and categorises it into predefined ranges. |
| AI‑Hair‑Type‑Detection | Direct | Identifies curl pattern, thickness and overall hair type. |
* Template‑based APIs require you to first request the list of available templates, select a template_id, then invoke the main endpoint with that identifier.
Image Editing
| API | Execution Type | Brief Description |
|---|---|---|
| AI-Photo-Lighting | Direct | Enhances or corrects lighting. |
| AI-Photo-Background-Removal | Direct | Removes backgrounds. |
| AI-Object-Removal-Pro | Direct | Advanced object removal. |
| AI-Object-Removal | Direct | Regular object removal. |
| AI-Photo-Enhance | Direct | Improves image quality. |
| AI-Photo-Colorize | Direct | Adds colour to black-and-white images. |
| AI-Photo-Color-Correction | Direct | Adjusts colour balance. |
| AI-Replace | Direct | Replaces selected image regions. |
| AI-Image-Extender | Direct | Extends image borders (outpainting). |
| AI-Headshot-Generator | Direct | Creates headshots. |
| AI-Headshot-Generator-Templates | Template/Pattern Query | Headshot style templates. |
| AI-Studio-Generator | Direct | Generates studio-style portraits. |
| AI-Studio-Generator-Templates | Template/Pattern Query | Studio look templates. |
| AI-Avatar-Generator | Direct | Generates avatars. |
| AI-Avatar-Generator-Templates | Template/Pattern Query | Avatar style templates. |
| AI-Makeup-Transfer | Direct | Transfers makeup between faces. |
| AI-Face-Swap | Direct | Swaps faces in photos. |
| AI-Face-Swap-Face-Detection | Direct | Detects faces specifically for swapping. |
Video Editing
| API | Execution Type | Brief Description |
|---|---|---|
| AI-Video-Enhance | Direct | Enhances video quality. |
| AI-Face-Swap-Video | Direct | Swaps faces in video. |
| AI-Style-Transfer-Video | Direct | Applies artistic style to video. |
| AI-Style-Transfer-Video-Templates | Template/Pattern Query | Queries built-in video style templates. |
Utility
| API | Execution Type | Brief Description |
|---|---|---|
| Get‑Running‑Task‑Status | Direct | Checks the status and results of a previously started asynchronous task using its task_id. This endpoint is used internally by MCP‑aware clients for polling; developers typically do not call it directly. |
Asynchronous Task Management (Utility API)
All AI APIs run asynchronously:
- The initial request returns a
task_id. - The client automatically polls
Get-Running-Task-Statusuntil the task reaches a terminal state (completed,failed).
It is useful to retrieve a result within the retention period once it has completed and the polling has timed out.
Delete a task and its files.
Delete a finished task — removes the task, its output files, and the uploaded input files it was run on. Provide the task_id returned by the task's run endpoint.
Authorizations:
Request Body schema: application/jsonrequired
| task_id required | string The task id returned by the task's run endpoint. |
Responses
Request samples
- Payload
- curl
- Node.js
- JavaScript
- PHP
- Python
- Java
{- "task_id": "grH0CvsgXuAIHLUzD0V1Ol34hoet3R1tvdbtiVHrDb6_UqCLKIejAIajwxrhOAfe"
}Response samples
- 200
- 400
- 401
{- "status": 200
}AI Skin Analysis
 AI skincare analysis technology harnesses the power of artificial intelligence to analyze various aspects of the skin, from texture and pigmentation to hydration and pore size, with remarkable precision. By employing advanced algorithms and machine learning, AI skin analysis can offer personalized recommendations and skincare routines tailored to an individual's unique skin type and concerns.
This not only enhances the effectiveness of skincare products but also empowers users to make informed decisions about their skincare regimen. With the integration of AI skin analysis, individuals can now embark on a journey towards healthier, more radiant skin, guided by data-driven insights and the promise of more effective skincare solutions.
How to Take Photos for AI Skin Analysis
- Take a selfie facing forward
- Just one clear shot, looking straight into the camera. Leave your hair down so it falls over your chest, and make sure you're staring directly ahead for that front-on view.
- Instead, use the JS Camera Kit to take a photo. Just leave your hair down so it falls over your chest. Don't tie it up.
Workflow
Skin Analysis API Usage Guide This guide explains how to upload an image and create a skin analysis task using the File API and AI Task API.
Step 1: Resize your source image
Resize your photo to fit the supported dimensions - up to 4096 pixels on the long side and at least 480 pixels on the short side for SD, or up to 4096 pixels on the long side and at least 1080 pixels on the short side for HD. See details in File Specs & Errors
Step 2: Upload File Metadata via File API
- Image Requirements
- See details in File Specs & Errors
Send a POST request to initialise the file upload:
curl --request POST \
--url https://yce-api-01.makeupar.com/s2s/v2.0/file/skin-analysis \
--header 'Authorization: Bearer YOUR_API_KEY' \
--header 'Content-Type: application/json' \
--data '{
"files": [
{
"content_type": "image/png",
"file_name": "skin_analysis_01_3dbd1b6683.png",
"file_size": 547541
}
]
}'
Important: Simply calling the File API does not upload your file. You must additionally upload the file to the URL provided in the File API response. That URL is your upload destination, make sure the file is successfully transferred there before proceeding.
Warning: Please note that, you will get an 500 Server Error / unknown_internal_error or 404 Not Found error when using AI APIs if you do not upload the file to the URL provided in the File API response.
Step 3: Retrieve Upload URL and File ID
The response includes:
requests.url– Pre-signed URL for image upload.file_id– Identifier for creating an AI task.
Example Response:
{
"status": 200,
"data": {
"files": [
{
"content_type": "image/png",
"file_name": "skin_analysis_01_3dbd1b6683.png",
"file_id": "SaGaqpDgKwFrVBgMpQMA3HY0LeqdT9/13W5TOD8/u/FfjK3xgCQ+hRt9MJXBFaud",
"requests": [
{
"method": "PUT",
"url": "https://yce-us.s3-accelerate.amazonaws.com/demo/ttl30/...signature...",
"headers": {
"Content-Length": "547541",
"Content-Type": "image/png"
}
}
]
}
]
}
}
Step 4: Upload Image to Pre-signed URL
Use the provided requests.url and headers:
curl --location --request PUT 'https://yce-us.s3-accelerate.amazonaws.com/demo/ttl30/...signature...' \
--header 'Content-Type: image/png' \
--header 'Content-Length: 547541' \
--data-binary @'./skin_analysis_01_3dbd1b6683.png'
Step 5: Create AI Task
Use the file_id from Step 2 to create a skin analysis task:
curl --request POST \
--url https://yce-api-01.makeupar.com/s2s/v2.0/task/skin-analysis \
--header 'Authorization: Bearer YOUR_API_KEY' \
--header 'Content-Type: application/json' \
--data '{
"src_file_id": "SaGaqpDgKwFrVBgMpQMA3HY0LeqdT9/13W5TOD8/u/FfjK3xgCQ+hRt9MJXBFaud",
"dst_actions": ["wrinkle", "pore", "texture", "acne"],
"miniserver_args": {
"enable_mask_overlay": true,
"enable_dark_background_hd_pore": true,
"color_dark_background_hd_pore": "3D3D3D",
"opacity_dark_background_hd_pore": 0.4
// Additional parameters omitted for brevity
},
"format": "json"
}'
Once the upload is complete, you can select any skin concerns to analyze using your file ID or image file url. Please refer to the Inputs & Outputs. Subsequently, calling POST 'task/skin-analysis' with the File ID or image file url executes the enhance task and obtains a task_id. Please be advised that simultaneous use of SD and HD skin concern parameters is NOT supported.
- Use an Existing Public Image URL Instead of uploading, you may supply a publicly accessible image URL directly when initiating the AI task.
Example Response:
{
"status": 200,
"data": {
"task_id": "SaGaqpDgKwFrVBgMpQMA3HY0LeqdT9_13W5TOD8_u_GPi6NqQ3dhlmN-6ntFwhzT"
}
}
Step 6: Poll Task Status
Retrieve task results using the task_id:
curl --request GET \
--url https://yce-api-01.makeupar.com/s2s/v2.0/task/skin-analysis/<YOUR_TASK_ID> \
--header 'Authorization: Bearer YOUR_API_KEY' \
--header 'Content-Type: application/json'
This task_id is used to monitor the task's status through polling GET 'task/skin-analysis' to retrieve the current engine status. Until the engine completes the task, the status will remain 'running', and no units will be consumed during this stage.
Processed results are retained for 24 hours after completion.- No need for short-interval polling.- Flexible polling intervals within the 24-hour window.
Important: Polling is still required to check task status, as execution time is not guaranteed.
The task will change to the 'success' status after the engine successfully processes your input file and generates the resulting image. You will get an url of the processed image and a dst_id that allow you to chain another AI task without re-upload the result image.
Your units will only be consumed in this case. If the engine fails to process the task, the task's status will change to 'error' and no unit will be consumed. When deducting units, the system will prioritize those nearing expiration. If the expiration date is the same, it will deduct the units obtained on the earliest date.
Step 7: Interpret Results
The response includes:
ui_score– User-friendly score.raw_score– Raw analysis score.mask_urls– URLs for detection masks.
Example Response:
{
"status": 200,
"data": {
"results": {
"output": [
{
"type": "texture",
"ui_score": 68,
"raw_score": 57.33,
"mask_urls": ["https://yce-us.s3-accelerate.amazonaws.com/...texture_output.jpg"]
},
{
"type": "pore",
"ui_score": 92,
"raw_score": 95.34,
"mask_urls": ["https://yce-us.s3-accelerate.amazonaws.com/...pore_output.jpg"]
}
// Additional results omitted for brevity
]
},
"task_status": "success"
}
}
Debugging Guide
Warning: Please be advised that simultaneous use of SD and HD skin concern parameters is NOT supported. Attempting to deviate from these specifications will result in an InvalidParameters error.
- If you mix using HD and SD skin concerns, you will get an error as following:
{ "status": 400, "error": "cannot mix HD and SD dst_actions", "error_code": "InvalidParameters" } - If you misspell a skin concern or sending unknown skin concerns, you will get an error as following:
{ "status": 400, "error": "Not available dst_action abc123", "error_code": "InvalidParameters" }
Real-world examples:


Input Paramenter Description
There are two options for controlling the visual output of AI Skin Analysis results: either generate multiple images, with each skin concern displayed as an independent mask, or produce a single blended image using the enable_mask_overlay parameter. By default, the system outputs multiple masks, giving you full control over how to blend each skin concern mask with the image.
Default: enable_mask_overlay false
Set enable_mask_overlay to true
Output ZIP Data Structure Description
The system provides a ZIP file with a 'skinanalysisResult' folder inside. This folder contains a 'score_info.json' file that includes all the detection scores and references to the result images.
The 'score_info.json' file contains all the skin analysis detection results, with numerical scores and the names of the corresponding output mask files.
The PNG files are detection result masks that can be overlaid on your original image. Simply use the alpha values in these PNG files to blend them with your original image, allowing you to see the detection results directly on the source image.
File Structure in the Skin Analysis Result ZIP
HD Skincare ZIP
- skinanalysisResult
- score_info.json
- hd_acne_output.png
- hd_age_spot_output.png
- hd_dark_circle_output.png
- hd_droopy_lower_eyelid_output.png
- hd_droopy_upper_eyelid_output.png
- hd_eye_bag_output.png
- hd_firmness_output.png
- hd_moisture_output.png
- hd_oiliness_output.png
- hd_radiance_output.png
- hd_redness_output.png
- hd_texture_output.png
- hd_pore_output_all.png
- hd_pore_output_cheek.png
- hd_pore_output_forehead.png
- hd_pore_output_nose.png
- hd_wrinkle_output_all.png
- hd_wrinkle_output_crowfeet.png
- hd_wrinkle_output_forehead.png
- hd_wrinkle_output_glabellar.png
- hd_wrinkle_output_marionette.png
- hd_wrinkle_output_nasolabial.png
- hd_wrinkle_output_periocular.png
- skinanalysisResult
SD Skincare ZIP
- skinanalysisResult
- score_info.json
- acne_output.png
- age_spot_output.png
- dark_circle_v2_output.png
- droopy_lower_eyelid_output.png
- droopy_upper_eyelid_output.png
- eye_bag_output.png
- firmness_output.png
- moisture_output.png
- oiliness_output.png
- pore_output.png
- radiance_output.png
- redness_output.png
- texture_output.png
- wrinkle_output.png
- skinanalysisResult
JSON Data Structure (score_info.json)
"all": A floating-point value between 1 and 100 representing the general skin condition. A higher score indicates healthier and more aesthetically pleasing skin condition.
"skin_age": AI-derived skin age relative to the general population distribution across all age groups.
Each category contains:
- "raw_score": A floating-point value ranging from 1 to 100. A higher score indicates healthier and more aesthetically pleasing skin condition.
- "ui_score": An integer ranging from 1 to 100. The UI Score functions primarily as a psychological motivator in beauty assessment. We adjust the raw scores to produce more favorable results, acknowledging that consumers generally prefer positive evaluations regarding their skin health. This calibration serves to instill greater confidence in users while maintaining the underlying beauty psychology framework.
- "output_mask_name": The filename of the corresponding output mask image.
Categories and Descriptions
HD Skincare:
- "hd_redness": Measures skin redness severity.
- "hd_oiliness": Determines skin oiliness level.
- "hd_age_spot": Detects age spots and pigmentation.
- "hd_radiance": Evaluates skin radiance.
- "hd_moisture": Assesses skin hydration levels.
- "hd_dark_circle": Analyzes the presence of dark circles under the eyes.
- "hd_eye_bag": Detects eye bags.
- "hd_droopy_upper_eyelid": Measures upper eyelid drooping severity.
- "hd_droopy_lower_eyelid": Measures lower eyelid drooping severity.
- "hd_firmness": Evaluates skin firmness and elasticity.
- "hd_texture": Subcategories[whole]; Analyzes overall skin texture.
- "hd_acne": Subcategories[whole]; Detects acne presence.
- "hd_pore": Subcategories[forehead, nose, cheek, whole]; Detects and evaluates pores in different facial regions.
- "hd_wrinkle": Subcategories[forehead, glabellar, crowfeet, periocular, nasolabial, marionette, whole]; Measures the severity of wrinkles in various facial areas.
SD Skincare:
- "wrinkle": General wrinkle analysis.
- "droopy_upper_eyelid": Measures upper eyelid drooping severity.
- "droopy_lower_eyelid": Measures lower eyelid drooping severity.
- "firmness": Evaluates skin firmness and elasticity.
- "acne": Evaluates acne presence.
- "moisture": Measures skin hydration.
- "eye_bag": Detects eye bags.
- "dark_circle_v2": Analyzes dark circles using an alternative method.
- "age_spot": Detects age spots.
- "radiance": Evaluates skin brightness.
- "redness": Measures skin redness.
- "oiliness": Determines skin oiliness.
- "pore": Measures pore visibility.
- "texture": Analyzes overall skin texture.
Sample score_info.json of HD Skincare
{ "hd_redness": { "raw_score": 72.011962890625, "ui_score": 77, "output_mask_name": "hd_redness_output.png" }, "hd_oiliness": { "raw_score": 60.74365234375, "ui_score": 72, "output_mask_name": "hd_oiliness_output.png" }, "hd_age_spot": { "raw_score": 83.23274230957031, "ui_score": 77, "output_mask_name": "hd_age_spot_output.png" }, "hd_radiance": { "raw_score": 76.57244205474854, "ui_score": 79, "output_mask_name": "hd_radiance_output.png" }, "hd_moisture": { "raw_score": 48.694559931755066, "ui_score": 70, "output_mask_name": "hd_moisture_output.png" }, "hd_dark_circle": { "raw_score": 80.1993191242218, "ui_score": 76, "output_mask_name": "hd_dark_circle_output.png" }, "hd_eye_bag": { "raw_score": 76.67280435562134, "ui_score": 79, "output_mask_name": "hd_eye_bag_output.png" }, "hd_droopy_upper_eyelid": { "raw_score": 79.05348539352417, "ui_score": 80, "output_mask_name": "hd_droopy_upper_eyelid_output.png" }, "hd_droopy_lower_eyelid": { "raw_score": 79.97175455093384, "ui_score": 81, "output_mask_name": "hd_droopy_lower_eyelid_output.png" }, "hd_firmness": { "raw_score": 89.66898322105408, "ui_score": 85, "output_mask_name": "hd_firmness_output.png" }, "hd_texture": { "whole": { "raw_score": 66.3921568627451, "ui_score": 75, "output_mask_name": "hd_texture_output.png" } }, "hd_acne": { "whole": { "raw_score": 59.92677688598633, "ui_score": 76, "output_mask_name": "hd_acne_output.png" } }, "hd_pore": { "forehead": { "raw_score": 79.59770965576172, "ui_score": 80, "output_mask_name": "hd_pore_output_forehead.png" }, "nose": { "raw_score": 29.139814376831055, "ui_score": 58, "output_mask_name": "hd_pore_output_nose.png" }, "cheek": { "raw_score": 44.11081314086914, "ui_score": 65, "output_mask_name": "hd_pore_output_cheek.png" }, "whole": { "raw_score": 49.23978805541992, "ui_score": 67, "output_mask_name": "hd_pore_output_all.png" } }, "hd_wrinkle": { "forehead": { "raw_score": 55.96956729888916, "ui_score": 67, "output_mask_name": "hd_wrinkle_output_forehead.png" }, "glabellar": { "raw_score": 76.7251181602478, "ui_score": 75, "output_mask_name": "hd_wrinkle_output_glabellar.png" }, "crowfeet": { "raw_score": 83.4361481666565, "ui_score": 78, "output_mask_name": "hd_wrinkle_output_crowfeet.png" }, "periocular": { "raw_score": 67.88706302642822, "ui_score": 72, "output_mask_name": "hd_wrinkle_output_periocular.png" }, "nasolabial": { "raw_score": 74.03312683105469, "ui_score": 74, "output_mask_name": "hd_wrinkle_output_nasolabial.png" }, "marionette": { "raw_score": 71.94477319717407, "ui_score": 73, "output_mask_name": "hd_wrinkle_output_marionette.png" }, "whole": { "raw_score": 49.64699745178223, "ui_score": 65, "output_mask_name": "hd_wrinkle_output_all.png" } }, "all": { "score": 75.75757575757575 }, "skin_age": 37 }Sample score_info.json of SD Skincare
{ "wrinkle": { "raw_score": 36.09360456466675, "ui_score": 60, "output_mask_name": "wrinkle_output.png" }, "droopy_upper_eyelid": { "raw_score": 79.05348539352417, "ui_score": 80, "output_mask_name": "droopy_upper_eyelid_output.png" }, "droopy_lower_eyelid": { "raw_score": 79.97175455093384, "ui_score": 81, "output_mask_name": "droopy_lower_eyelid_output.png" }, "firmness": { "raw_score": 89.66898322105408, "ui_score": 85, "output_mask_name": "firmness_output.png" }, "acne": { "raw_score": 92.29713000000001, "ui_score": 88, "output_mask_name": "acne_output.png" }, "moisture": { "raw_score": 48.694559931755066, "ui_score": 70, "output_mask_name": "moisture_output.png" }, "eye_bag": { "raw_score": 76.67280435562134, "ui_score": 79, "output_mask_name": "eye_bag_output.png" }, "dark_circle_v2": { "raw_score": 80.1993191242218, "ui_score": 76, "output_mask_name": "dark_circle_v2_output.png" }, "age_spot": { "raw_score": 83.23274230957031, "ui_score": 77, "output_mask_name": "age_spot_output.png" }, "radiance": { "raw_score": 76.57244205474854, "ui_score": 79, "output_mask_name": "radiance_output.png" }, "redness": { "raw_score": 72.011962890625, "ui_score": 77, "output_mask_name": "redness_output.png" }, "oiliness": { "raw_score": 60.74365234375, "ui_score": 72, "output_mask_name": "oiliness_output.png" }, "pore": { "raw_score": 88.38014125823975, "ui_score": 84, "output_mask_name": "pore_output.png" }, "texture": { "raw_score": 80.09742498397827, "ui_score": 76, "output_mask_name": "texture_output.png" }, "all": { "score": 75.75757575757575 }, "skin_age": 37 }
Supported Formats & Dimensions
| AI Feature | Supported Dimensions | Supported File Size | Supported Formats |
|---|---|---|---|
| SD Skincare | long side <= 4096, short side >= 480 | < 10MB | jpg/jpeg/png |
| HD Skincare | long side <= 4096, short side >= 1080 | < 10MB | jpg/jpeg/png |
Warning: It is your resposibility to resize input images based on the Supported Dimensions of HD or SD Skincare before runing AI Skin Analysis. It is highly recommended to use portrait rather than landscape aspect ratio as input.
Suggestions for How to Shoot:

Get Ready to Start Skin Analysis Instructions
- Take off your glasses and make sure bangs are not covering your forehead
- Make sure that you’re in a well-lit environment
- Remove makeup to get more accurate results
- Look straight into the camera and keep your face in the center
Photo requirement
We will check the image quality to ensure it is suitable for AI Skin Analysis. Please make sure the face occupies approximately 60–80% of the image width, without any overlays or obstructions. The lighting should be bright and evenly distributed, avoiding overexposure or blown-out highlights. The pose should be front-facing, neutral, and relaxed, with the mouth closed and eyes open.
You should fully reveal your forehead and brush your fringe back or tie your hair to ensure the best quality. It is recommended that you remove your spectacles for optimal AI Skin Analysis performance, although this is not mandatory.
Warning: The width of the face needs to be greater than 60% of the width of the image.

Error Codes
| Error Code | Description |
|---|---|
| error_below_min_image_size | Input image resolution is too small |
| error_exceed_max_image_size | Input image resolution is too large |
| error_src_face_too_small | The face area in the uploaded image is too small. The width of the face needs to be greater than 60% of the width of the image. |
| error_src_face_out_of_bound | The face area in the uploaded image is out of bound |
| error_lighting_dark | The lighting in the uploaded image is too dark |
Environment & Dependency
| Sample Code Language / Tool | Recommended Runtime Versions |
|---|---|
| cURL | - bash >= 3.2 - curl >= 7.58 (modern TLS/HTTP support) - jq >= 1.6 (robust JSON parsing) |
| Node.js (JavaScript) | Node >= 18 (for global fetch) |
| JavaScript | - Chrome / Edge >= 80 - Firefox >= 74 - Safari >= 13.1 |
| PHP | PHP >= 7.4 (for modern TLS/compat), ext-curl (recommended) or allow_url_fopen=On + ext-openssl, ext-json |
| Python | Python >= 3.10 (for f-strings), requests >= 2.20.0 |
| Java | Java 11+ (for HttpClient), Jackson Databind >= 2.12.0 |
Overview
The JavaScript Camera Kit provides a complete in-browser camera solution designed for high-accuracy face-based imaging tasks. It includes:
- Camera permission handling
- Real-time face detection
- Automatic face quality validation (lighting, pose, angle, distance)
- Guided capture UI
- Multi-step capture flows for advanced hair/face tasks
- Support for both base64 and blob output formats
The module is particularly optimized for AI-driven image analysis, such as AI Skin Analysis (SD/HD), AI Face Tone Analysis, and hair-related analysis.
Download the JS Camera Kit
Include the JS Camera Kit SDK via CDN:
https://plugins-media.makeupar.com/v2.2-camera-kit/sdk.js
Once loaded, the SDK installs a global YMK object.
Quick Start Example
The following sample demonstrates:
- Loading the JS Camera Kit SDK
- Implementing
window.ymkAsyncInit - Initializing the module
- Opening the camera
- Receiving captured images
<!DOCTYPE html>
<html lang="en">
<head>
<meta charset="UTF-8" />
<meta name="viewport" content="width=device-width, initial-scale=1.0" />
<title>Camera Kit Sample</title>
</head>
<body>
<script>
window.ymkAsyncInit = function() {
YMK.addEventListener('loaded', function() {
/* Module fully loaded and ready */
});
YMK.addEventListener('faceDetectionCaptured', function(capturedResult) {
/* Display all captured images */
const container = document.getElementById('captured-results');
container.innerHTML = '';
for (const image of capturedResult.images) {
const img = document.createElement('img');
img.src = typeof image.image === 'string'
? image.image
: URL.createObjectURL(image.image);
container.appendChild(img);
}
});
};
function openCameraKit() {
YMK.init({
faceDetectionMode: 'skincare',
imageFormat: 'base64',
language: 'enu',
});
YMK.openCameraKit();
}
</script>
<!-- Load SDK -->
<script>
window.addEventListener('load', function() {
(function(d) {
const s = d.createElement('script');
s.type = 'text/javascript';
s.async = true;
s.src = 'https://plugins-media.makeupar.com/v2.2-camera-kit/sdk.js';
d.getElementsByTagName('script')[0].parentNode.insertBefore(s, null);
})(document);
});
</script>
<button onClick="openCameraKit()">Open Camera Kit</button>
<div id="YMK-module"></div>
<h3>Captured Results:</h3>
<div id="captured-results"></div>
</body>
</html>
Prerequisites
You must define the asynchronous initialization entry point:
<script>
window.ymkAsyncInit = function() {
YMK.init(); // default settings
};
</script>
Additional requirements:
| Requirement | Description |
|---|---|
| Browser | Must support getUserMedia |
| HTTPS | Required on most browsers for webcam access |
<div id="YMK-module"> |
Mandatory mount point for the UI |
Integration Guide
Step 1 — Initialize the Module
Call YMK.init() before calling YMK.openCameraKit():
YMK.init({
faceDetectionMode: 'skincare',
imageFormat: 'base64',
language: 'enu'
});
Supported Detection Modes
| Mode | Description |
|---|---|
makeup |
Standard camera mode for virtual cosmetic try-on |
skincare |
Standard skin analysis mode, close-up face capture |
hdskincare |
HD Skin capture using webcams with ≥ 2560px width |
shadefinder |
Skin Tone Analysis front-face capture |
facereshape |
AI Face Reshape capture |
hairlength |
Full hair-length capture (from a distance) |
hairfrizziness |
3-phase capture: front, right-turn, left-turn |
hairtype |
Same 3-phase multi-angle capture flow |
ring |
Hand capture for ring try‑on |
wrist |
Wrist capture for watch or bracelet try‑on |
necklace |
Selfie capture for necklace try-on |
earring |
Selfie capture for earring try-on |
Step 2 — Add Event Handlers
Event examples:
YMK.addEventListener('faceQualityChanged', function(q) {
console.log('Quality updated:', q);
});
See the full Events List below.
Step 3 — Open Camera Kit
YMK.openCameraKit();
This automatically:
- Shows the UI
- Opens webcam
- Begins real-time face quality monitoring
- Automatically captures when conditions are acceptable
Step 4 — Receiving Captured Result
Captured images arrive via:
YMK.addEventListener('faceDetectionCaptured', function(result) {
console.log(result.images);
});
Step 5 — Close Module
YMK.close();
API Reference
YMK.init(args)
Configures module appearance, detection mode, language, and capture format.
Arguments
args.faceDetectionMode
Detection flow to use.
Values:
"makeup" | "skincare" | "hdskincare" | "shadefinder" | "facereshape" | "hairlength" | "hairfrizziness" | "hairtype" | "ring" | "wrist" | "necklace" | "earring"
Default: "skincare"
args.width
Pixel width of module container. Default:
360(screens ≥ 500px)screen width(screens < 500px)
Allowed: 300–1920
args.height
Pixel height of module container. Default:
480(screens ≥ 500px)min(screen.height, innerHeight)for smaller screens
Allowed: 300–1920
args.language
UI language.
Available: "chs", "cht", "deu", "enu", "esp", "fra", "jpn", "kor", "ptb", "ita"
Default: "enu"
args.imageFormat
Format returned via faceDetectionCaptured.
"base64" or "blob"
Default: "base64"
args.disableCameraResolutionCheck
Allow running even if webcam does not meet required resolution.
Default: false
Other API Methods
YMK.openCameraKit()
Opens the module and begins detection.
YMK.addEventListener(eventName, callback)
Registers event callbacks.
Returns: EventListenerIdentifier
YMK.removeEventListener(id)
Removes listener by identifier.
YMK.isLoaded()
Returns whether livestream or photo is drawn on canvas.
Returns: boolean
YMK.pause()
Pauses the webcam stream.
YMK.resume(restartWebcam = false)
Resumes webcam after pause.
YMK.getInfo()
Returns current module info:
{
"fps": 30
}
YMK.close()
Closes module and camera.
Events Reference
Lifecycle Events
| Event | Description |
|---|---|
opened |
Module opened |
loading |
Loading progress (0–100) |
loaded |
Camera stream loaded onto canvas |
closed |
Module closed |
Camera Events
| Event | Description |
|---|---|
cameraOpened |
Webcam opened |
cameraClosed |
Webcam closed |
cameraFailed |
Permission denied or no webcam Error code:* "error_resolution_unsupported"* "error_permission_denied"* "error_access_failed" |
faceQualityChanged
Fires continuously during detection.
{
"hasFace": true,
"position": "good",
"frontal": "good",
"lighting": "ok"
}
- Field Descriptions
| Field | Values | Meaning |
|---|---|---|
hasFace |
true/false |
Whether face is detected |
position |
"good", "notgood", "toosmall", "outofboundary" |
Face distance/size quality |
frontal |
"good", "notgood" |
Whether user is facing forward |
lighting |
"good", "ok", "notgood" |
Lighting strength |
Necklace/Earring
| Field | Values | Meaning |
|---|---|---|
hasFace |
true/false |
Whether face is detected |
pose |
"good", "notgood" |
Face pose quality |
size |
"good", "notgood" |
Face size quality |
Wrist/Ring
| Field | Values | Meaning |
|---|---|---|
hasFace |
true/false |
Whether face is detected |
position |
"good", "notgood" |
Hand position quality |
pose |
"good", "notgood" |
Hand pose quality |
Minimum Recommended Quality
const minQuality = {
hasFace: true,
area: "good",
frontal: "good",
lighting: "ok"
};
faceDetectionStarted
User enters detection UI.
faceDetectionCaptured
This event is fired after all required face quality validation checks have passed and the Camera Kit has successfully completed the capture workflow.
Depending on the selected faceDetectionMode, the event may contain one or multiple captured images (e.g., multi-angle capture for hair modes).
Callback Arguments
capturedResult — Object
The result object containing all successfully captured images and metadata.
Field Definitions
mode — string
Indicates the active faceDetectionMode used for capturing.
Possible values include:
"makeup" | "skincare" | "hdskincare" | "shadefinder" | "facereshape" | "hairlength" | "hairfrizziness" | "hairtype" | "ring" | "wrist" | "necklace" | "earring"
This value corresponds directly to the configuration set in YMK.init({ faceDetectionMode }).
images — Array
ImageObject Structure
| Field | Type | Description |
|---|---|---|
phase |
integer | The zero-based index representing the capture step. Examples: • Skincare = 0 • Hair frizziness sequence = 0 (front), 1 (right turn), 2 (left turn) |
image |
string or Blob | The captured image. • Base64 string if args.imageFormat = "base64" • Binary Blob if args.imageFormat = "blob" |
width |
integer | Pixel width of the captured image. |
height |
integer | Pixel height of the captured image. |
Notes
- The number of images varies depending on
faceDetectionMode.- Example:
"hairfrizziness"and"hairtype"typically produce three images.
- Example:
- Image resolution may differ from device to device.
The actual pixel size depends on:
- The user's webcam maximum resolution
- The constraints and recommended settings for the selected mode
- All images are guaranteed to meet the minimum face quality requirements before this event is dispatched.
Configuration Notes
Quality Requirements
- Ensure correct distance
- Ensure frontal face angle
- Provide sufficient lighting (avoid shadows)
Multi-Phase Capture
Modes like hairtype or hairfrizziness require:
- Front face
- Turn right
- Turn left
Ensure event handling is in place.
Create a new file.
To upload a new file, you'll first need to use the File API. It will give you a URL – use that URL to upload your file. Once the upload is finished, you can use the file_id from the same response to start using our AI features.
Authorizations:
Request Body schema: application/jsonrequired
required | Array of objects |
Responses
Request samples
- Payload
- curl
- Node.js
- JavaScript
- PHP
- Python
- Java
{- "files": [
- {
- "content_type": "image/jpg",
- "file_name": "my-selfie.jpg",
- "file_size": 50000
}
]
}Response samples
- 200
- 400
- 401
{- "status": 200,
- "data": {
- "files": [
- {
- "content_type": "image/jpg",
- "file_name": "my-selfie.jpg",
- "file_id": "U8aqJbsXGT537jtGnEDFHqxdDXqh8+oTF/cSkLimzuvVwMP+Jb1XbjPsf7ZgUgLY",
- "requests": [
- {
- "headers": {
- "Content-Type": "image/jpg",
- "Content-Length": 50000
}, - "method": "PUT"
}
]
}
]
}
}Run a Skin Analysis task.
Once you start an AI task, you need to keep polling at given polling_interval to check its status until it shows either success or error because if you don't, the task will time out and when you try to check the status later, you'll get an InvalidTaskId error even if the task did finish successfully and your units will still be consumed.
Authorizations:
Request Body schema: application/jsonrequired
| src_file_url required | string Url of the file to run task. The url should be publicly accessible. |
| dst_actions required | Array of strings (RunSkincareTaskDstActions) Items Enum: "hd_wrinkle" "hd_pore" "hd_texture" "hd_acne" "hd_oiliness" "hd_radiance" "hd_eye_bag" "hd_age_spot" "hd_dark_circle" "hd_droopy_upper_eyelid" "hd_droopy_lower_eyelid" "hd_firmness" "hd_moisture" "hd_redness" "hd_tear_trough" "hd_skin_type" "wrinkle" "pore" "texture" "acne" "oiliness" "radiance" "eye_bag" "age_spot" "dark_circle_v2" "droopy_upper_eyelid" "droopy_lower_eyelid" "firmness" "moisture" "redness" "tear_trough" "skin_type" The actions for Skin Analysis. There are 2 types of features: HD and SD. You can choose one or more features, either all in SD or all in HD. Note: HD and SD features cannot be mixed. HD features:
SD features:
|
object (RunSkincareTaskMiniserverArgs) | |
| format | string Enum: "json" "zip" Response format of the analysis results. Default is 'zip'. - |
Responses
Request samples
- Payload
- curl
- Node.js
- JavaScript
- PHP
- Python
- Java
{- "dst_actions": [
- "hd_wrinkle",
- "hd_pore",
- "hd_texture",
- "hd_acne"
], - "miniserver_args": {
- "enable_mask_overlay": true,
- "enable_dark_background_hd_pore": true,
- "color_dark_background_hd_pore": "3D3D3D",
- "opacity_dark_background_hd_pore": 0.4,
- "enable_dark_background_hd_wrinkle": true,
- "color_dark_background_hd_wrinkle": "3D3D3D",
- "opacity_dark_background_hd_wrinkle": 0.4,
- "enable_dark_background_hd_acne": true,
- "color_dark_background_hd_acne": "3D3D3D",
- "opacity_dark_background_hd_acne": 0.4,
- "enable_dark_background_hd_texture": true,
- "color_dark_background_hd_texture": "3D3D3D",
- "opacity_dark_background_hd_texture": 0.4,
- "enable_dark_background_hd_oiliness": true,
- "color_dark_background_hd_oiliness": "3D3D3D",
- "opacity_dark_background_hd_oiliness": 0.2,
- "enable_dark_background_hd_age_spot": true,
- "color_dark_background_hd_age_spot": "3D3D3D",
- "opacity_dark_background_hd_age_spot": 0.2,
- "enable_dark_background_hd_redness": true,
- "color_dark_background_hd_redness": "3D3D3D",
- "opacity_dark_background_hd_redness": 0.2,
- "enable_dark_background_hd_firmness": true,
- "color_dark_background_hd_firmness": "3D3D3D",
- "opacity_dark_background_hd_firmness": 0.1
}, - "format": "zip"
}
Response samples
- 200
- 400
- 401
{- "status": 200,
- "data": {
- "task_id": "grH0CvsgXuAIHLUzD0V1Ol34hoet3R1tvdbtiVHrDb6_UqCLKIejAIajwxrhOAfe"
}
}Check a Skin Analysis task status.
Authorizations:
path Parameters
| task_id required | string Example: grH0CvsgXuAIHLUzD0V1Ol34hoet3R1tvdbtiVHrDb6_UqCLKIejAIajwxrhOAfe ID of task to check |
Responses
Request samples
- curl
- Node.js
- JavaScript
- PHP
- Python
- Java
curl --request GET \ --url https://yce-api-01.makeupar.com/s2s/v2.0/task/skin-analysis/grH0CvsgXuAIHLUzD0V1Ol34hoet3R1tvdbtiVHrDb6_UqCLKIejAIajwxrhOAfe \ --header 'Authorization: Bearer <access_token for v1, API Key for v2>'
Response samples
- 200
- 400
- 401
- 500
Task completed successfully. Results are packaged as a ZIP file.
{- "status": 200,
}Create a new file V2.1.
To upload a new file, you'll first need to use the File API. It will give you a URL – use that URL to upload your file. Once the upload is finished, you can use the file_id from the same response to start using our AI features.
Authorizations:
Request Body schema: application/jsonrequired
required | Array of objects |
Responses
Request samples
- Payload
- curl
- Node.js
- JavaScript
- PHP
- Python
- Java
{- "files": [
- {
- "content_type": "image/jpg",
- "file_name": "my-selfie.jpg",
- "file_size": 50000
}
]
}Response samples
- 200
- 400
- 401
{- "status": 200,
- "data": {
- "files": [
- {
- "content_type": "image/jpg",
- "file_name": "my-selfie.jpg",
- "file_id": "U8aqJbsXGT537jtGnEDFHqxdDXqh8+oTF/cSkLimzuvVwMP+Jb1XbjPsf7ZgUgLY",
- "requests": [
- {
- "headers": {
- "Content-Type": "image/jpg",
- "Content-Length": 50000
}, - "method": "PUT"
}
]
}
]
}
}Run a Skin Analysis V2.1 task.
Once you start an AI task, you need to keep polling at given polling_interval to check its status until it shows either success or error because if you don't, the task will time out and when you try to check the status later, you'll get an InvalidTaskId error even if the task did finish successfully and your units will still be consumed.
Authorizations:
Request Body schema: application/jsonrequired
| src_file_url required | string Url of the file to run task. The url should be publicly accessible. |
| dst_actions required | Array of strings (RunSkincareTaskDstActions) Items Enum: "hd_wrinkle" "hd_pore" "hd_texture" "hd_acne" "hd_oiliness" "hd_radiance" "hd_eye_bag" "hd_age_spot" "hd_dark_circle" "hd_droopy_upper_eyelid" "hd_droopy_lower_eyelid" "hd_firmness" "hd_moisture" "hd_redness" "hd_tear_trough" "hd_skin_type" "wrinkle" "pore" "texture" "acne" "oiliness" "radiance" "eye_bag" "age_spot" "dark_circle_v2" "droopy_upper_eyelid" "droopy_lower_eyelid" "firmness" "moisture" "redness" "tear_trough" "skin_type" The actions for Skin Analysis. There are 2 types of features: HD and SD. You can choose one or more features, either all in SD or all in HD. Note: HD and SD features cannot be mixed. HD features:
SD features:
|
object (RunSkincareTaskMiniserverArgs) | |
| format | string Enum: "json" "zip" Response format of the analysis results. Default is 'zip'. - |
| pf_camera_kit | boolean |
Responses
Request samples
- Payload
- curl
- Node.js
- JavaScript
- PHP
- Python
- Java
{- "dst_actions": [
- "hd_wrinkle",
- "hd_pore",
- "hd_texture",
- "hd_acne"
], - "miniserver_args": {
- "enable_mask_overlay": true,
- "enable_dark_background_hd_pore": true,
- "color_dark_background_hd_pore": "3D3D3D",
- "opacity_dark_background_hd_pore": 0.4,
- "enable_dark_background_hd_wrinkle": true,
- "color_dark_background_hd_wrinkle": "3D3D3D",
- "opacity_dark_background_hd_wrinkle": 0.4,
- "enable_dark_background_hd_acne": true,
- "color_dark_background_hd_acne": "3D3D3D",
- "opacity_dark_background_hd_acne": 0.4,
- "enable_dark_background_hd_texture": true,
- "color_dark_background_hd_texture": "3D3D3D",
- "opacity_dark_background_hd_texture": 0.4,
- "enable_dark_background_hd_oiliness": true,
- "color_dark_background_hd_oiliness": "3D3D3D",
- "opacity_dark_background_hd_oiliness": 0.2,
- "enable_dark_background_hd_age_spot": true,
- "color_dark_background_hd_age_spot": "3D3D3D",
- "opacity_dark_background_hd_age_spot": 0.2,
- "enable_dark_background_hd_redness": true,
- "color_dark_background_hd_redness": "3D3D3D",
- "opacity_dark_background_hd_redness": 0.2,
- "enable_dark_background_hd_firmness": true,
- "color_dark_background_hd_firmness": "3D3D3D",
- "opacity_dark_background_hd_firmness": 0.1
}, - "format": "zip",
- "pf_camera_kit": true
}Response samples
- 200
- 400
- 401
{- "status": 200,
- "data": {
- "task_id": "grH0CvsgXuAIHLUzD0V1Ol34hoet3R1tvdbtiVHrDb6_UqCLKIejAIajwxrhOAfe"
}
}Check a Skin Analysis V2.1 task status.
Authorizations:
path Parameters
| task_id required | string Example: grH0CvsgXuAIHLUzD0V1Ol34hoet3R1tvdbtiVHrDb6_UqCLKIejAIajwxrhOAfe ID of task to check |
Responses
Request samples
- curl
- Node.js
- JavaScript
- PHP
- Python
- Java
curl --request GET \ --url https://yce-api-01.makeupar.com/s2s/v2.1/task/skin-analysis/grH0CvsgXuAIHLUzD0V1Ol34hoet3R1tvdbtiVHrDb6_UqCLKIejAIajwxrhOAfe \ --header 'Authorization: Bearer <access_token for v1, API Key for v2>'
Response samples
- 200
- 400
- 401
- 500
Task completed successfully. Results are packaged as a ZIP file.
{- "status": 200,
}AI Skin Simulation
AI-Powered Skin Simulation: Visualizing Treatment Progress with Precision and Professionalism
Our cutting-edge AI-driven skin simulation technology enables highly accurate before-and-after visualizations of facial skin conditions, allowing both professionals and consumers to objectively track the efficacy of skincare treatments over time. Engineered for high-fidelity realism and clinical-grade insights, this solution supports the visualization of up to ten distinct skin concerns, including radiance, acne, oiliness, eye bags, dark circles, spots, pores, texture, wrinkles and redness.

By harnessing sophisticated machine learning models combined with advanced augmented reality capabilities, the system delivers realistic, non-invasive previews of potential outcomes using only a standard smartphone camera or desktop webcam. Each simulation is generated in seconds, offering users an immediate yet scientifically grounded understanding of how targeted skincare interventions may enhance their complexion over time.

Designed specifically for skincare brands, dermatology practices, aesthetic clinics, and retail beauty retailers, this platform integrates effortlessly across digital and physical touchpoints, including e-commerce websites, mobile applications, virtual consultations, and point-of-sale kiosks. Its versatility supports a wide array of use cases such as personalized regimen recommendations, product performance simulation, treatment planning for professional procedures, and interactive educational tools that strengthen client engagement and build trust in brand claims.
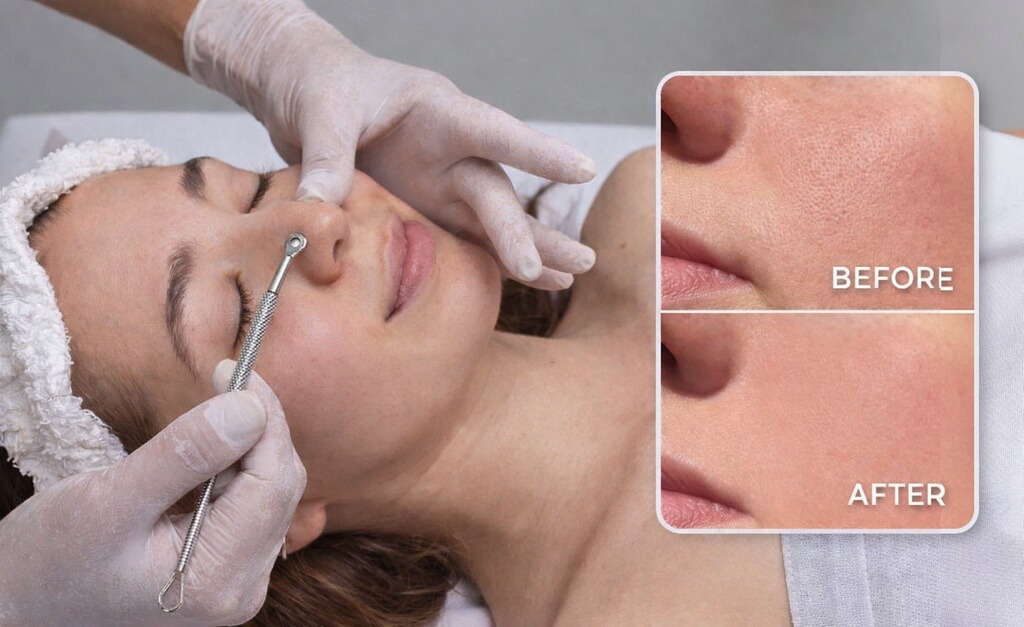
Through objective visualization and data-driven storytelling, our AI skin simulation empowers skincare professionals to set realistic expectations, customize care plans, and demonstrate measurable progress, ultimately elevating the customer experience while reinforcing evidence-based efficacy in an increasingly competitive market landscape.
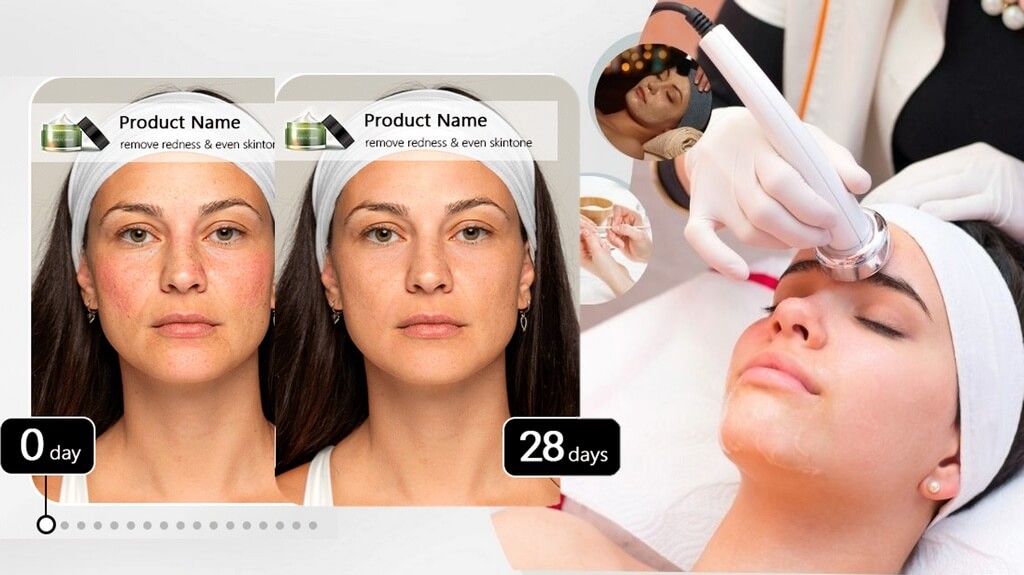
This guide walks you through:
Workflow for AI Skin Simulation API:
Endpoint: /s2s/v2.0/file/skin-simulation
Authentication Required: Authorization: Bearer YOUR_API_KEY
Workflow Steps:
Image Upload Preparation:
- The process begins with preparing a selfie image.
AI Skin Simulation Settings For each skin concern (e.g., wrinkle, pores, redness), adjust the simulation intensity using the value from 0.0 to 1.0:
- 0.0: Shows your original skin appearance—no changes.
- 1.0: Applies the most natural, healthy-looking enhancement AI can generate for that concern.
How it works:
- At low settings (e.g., 0.2–0.4), fine lines or minor imperfections are subtly softened.
- At higher settings (e.g., 0.7–1.0), more pronounced improvements occur, such as significant reduction in moderate or deep wrinkles, smoother texture, and improved tone, even while preserving natural skin details.
Adjust gradually to achieve your desired look!
Initiate AI Task and Obtain Task ID:
- Send the uploaded image along with the skin simulation configuration via an HTTP POST request to
/s2s/v2.0/task/skin-simulation. - Await a unique task ID in the response, which identifies this interaction.
- Send the uploaded image along with the skin simulation configuration via an HTTP POST request to
Poll Task Status (Continuous Check):
- Use the obtained
task_idto periodically poll the task status using an HTTP GET request (e.g.,GET /task/${task_id}). - Continuously monitor for:
Task_status = "success"(process completed).Task_status = "error"(resolve or retry if applicable).
- Update the workflow accordingly once the status transitions to success.
- Use the obtained
This structured workflow ensures efficient integration with user inputs, automated monitoring of tasks, and seamless retrieval of results.
Authentication
- Include your API key in the request header using Bearer Token:
You can find your API Key at https://yce.makeupar.com/api-console/en/api-keys/.Authorization: Bearer YOUR_API_KEY
Upload an Image
You may upload a file directly to the server or provide a valid image URL in the AI task payload.
Upload Endpoint
POST /s2s/v2.0/file/skin-simulation
Alternatively, skip this step if you already have a public image URL.
Adjust AI Skin Simulation Intensity
AI Skin Simulation Settings
For each skin concern (e.g., wrinkle, pores, redness), adjust the simulation intensity on a scale from 0.0 to 1.0:
- 0.0 → Original appearance — no AI enhancement applied.
- 1.0 → Maximum natural, healthy-looking improvement for that concern, as realistically rendered by our AI model.
What to expect at different intensity levels:
| Intensity Range | Effect |
|---|---|
| 0.1 – 0.3 | Subtle refinement — minor smoothing of fine lines, slight pore softening, or gentle redness reduction. Ideal for a natural “fresh-faced” look. |
| 0.4 – 0.6 | Balanced enhancement — noticeable improvement in texture and clarity while retaining individual skin character. |
| 0.7 – 1.0 | Full correction — significantly reduces moderate to deep wrinkles, evens tone, minimizes pores and redness, and enhances overall radiance—without looking over-processed or artificial. |
Pro Tip: Start low (e.g., 0.2) and gradually increase until you reach the desired result in realism.
Create a AI Skin Simulation AI Task and Poll for Results
After uploading an image and setting at least one skin concern's simulation intensity above 0.0, you can initiate a task. The API processes the request asynchronously. You must poll the task status until it reaches success or error.
Create Task Endpoint
POST /s2s/v2.0/task/skin-simulation
Polling Endpoint
GET /s2s/v2.0/task/skin-simulation/{task_id}
AI Skin Simulation Specification
Camera and Imaging Guidance
Lighting Conditions Ensure the environment is well-lit and evenly illuminated. Avoid strong backlighting, localized overexposure, or large shadows on the face. Use natural daylight or soft indoor lighting whenever possible. Do not use colored lights, including pink, blue, or other tinted sources, as they may distort skin tone representation.
Face Position and Occlusion Capture a frontal view with the face directly facing the camera. The head rotation should be minimal; avoid excessive tilting or turning to either side. Ensure the entire face, including forehead, cheeks, and chin, is fully visible and unobstructed. Do not use hair, masks, hands, eyeglass frames, mobile phones, or any other objects that partially cover facial features.
Facial Expression and Pose Maintain a natural, relaxed expression with both eyes open. The mouth may remain closed or slightly open, do not strain or exaggerate the pose.
Face Size in Frame The face must occupy at least 60% of the image width to ensure sufficient detail for accurate analysis. Avoid capturing subjects that are too small, distant, or improperly framed.

Supported Formats & Dimensions
| AI Feature | Supported Dimensions | Supported File Size | Supported Formats |
|---|---|---|---|
| AI Skin Simulation | short side >= 480, long side <= 2560 | < 10MB | jpg/jpeg/png |
Error Codes
| Error Code | Description |
|---|---|
error_below_min_image_size |
Input image resolution is below the minimum required size (e.g., < 256×256 pixels). Please upload a higher-resolution image. |
error_exceed_max_image_size |
Input image resolution exceeds the maximum allowed size (e.g., > 2560×2560 pixels). Resize or downscale your image before uploading. |
error_invalid_params |
Invalid request parameters were provided. |
error_src_face_too_small |
The detected face occupies less than 60% of the image width—too small for accurate skin analysis. Use an image with a larger, clearer face centered in frame. |
error_src_face_out_of_bound |
The detected face is partially or fully outside the image boundaries (e.g., face cropped too tightly). Please ensure the full face—including forehead, cheeks, and chin—is visible and properly framed. |
error_lighting_dark |
Ambient lighting in the image is insufficient for reliable skin analysis (e.g., underexposed, shadows dominate the face). Upload an image taken in well-lit conditions with even illumination on the face. |
Environment & Dependency
| Sample Code Language / Tool | Recommended Runtime Versions |
|---|---|
| cURL | - bash >= 3.2 - curl >= 7.58 (modern TLS/HTTP support) - jq >= 1.6 (robust JSON parsing) |
| Node.js (JavaScript) | Node >= 18 (for global fetch) |
| JavaScript | - Chrome / Edge >= 80 - Firefox >= 74 - Safari >= 13.1 |
| PHP | PHP >= 7.4 (for modern TLS/compat), ext-curl (recommended) or allow_url_fopen=On + ext-openssl, ext-json |
| Python | Python >= 3.10 (for f-strings), requests >= 2.20.0 |
| Java | Java 11+ (for HttpClient), Jackson Databind >= 2.12.0 |
Overview
The JavaScript Camera Kit provides a complete in-browser camera solution designed for high-accuracy face-based imaging tasks. It includes:
- Camera permission handling
- Real-time face detection
- Automatic face quality validation (lighting, pose, angle, distance)
- Guided capture UI
- Multi-step capture flows for advanced hair/face tasks
- Support for both base64 and blob output formats
The module is particularly optimized for AI-driven image analysis, such as AI Skin Analysis (SD/HD), AI Face Tone Analysis, and hair-related analysis.
Download the JS Camera Kit
Include the JS Camera Kit SDK via CDN:
https://plugins-media.makeupar.com/v2.2-camera-kit/sdk.js
Once loaded, the SDK installs a global YMK object.
Quick Start Example
The following sample demonstrates:
- Loading the JS Camera Kit SDK
- Implementing
window.ymkAsyncInit - Initializing the module
- Opening the camera
- Receiving captured images
<!DOCTYPE html>
<html lang="en">
<head>
<meta charset="UTF-8" />
<meta name="viewport" content="width=device-width, initial-scale=1.0" />
<title>Camera Kit Sample</title>
</head>
<body>
<script>
window.ymkAsyncInit = function() {
YMK.addEventListener('loaded', function() {
/* Module fully loaded and ready */
});
YMK.addEventListener('faceDetectionCaptured', function(capturedResult) {
/* Display all captured images */
const container = document.getElementById('captured-results');
container.innerHTML = '';
for (const image of capturedResult.images) {
const img = document.createElement('img');
img.src = typeof image.image === 'string'
? image.image
: URL.createObjectURL(image.image);
container.appendChild(img);
}
});
};
function openCameraKit() {
YMK.init({
faceDetectionMode: 'skincare',
imageFormat: 'base64',
language: 'enu',
});
YMK.openCameraKit();
}
</script>
<!-- Load SDK -->
<script>
window.addEventListener('load', function() {
(function(d) {
const s = d.createElement('script');
s.type = 'text/javascript';
s.async = true;
s.src = 'https://plugins-media.makeupar.com/v2.2-camera-kit/sdk.js';
d.getElementsByTagName('script')[0].parentNode.insertBefore(s, null);
})(document);
});
</script>
<button onClick="openCameraKit()">Open Camera Kit</button>
<div id="YMK-module"></div>
<h3>Captured Results:</h3>
<div id="captured-results"></div>
</body>
</html>
Prerequisites
You must define the asynchronous initialization entry point:
<script>
window.ymkAsyncInit = function() {
YMK.init(); // default settings
};
</script>
Additional requirements:
| Requirement | Description |
|---|---|
| Browser | Must support getUserMedia |
| HTTPS | Required on most browsers for webcam access |
<div id="YMK-module"> |
Mandatory mount point for the UI |
Integration Guide
Step 1 — Initialize the Module
Call YMK.init() before calling YMK.openCameraKit():
YMK.init({
faceDetectionMode: 'skincare',
imageFormat: 'base64',
language: 'enu'
});
Supported Detection Modes
| Mode | Description |
|---|---|
makeup |
Standard camera mode for virtual cosmetic try-on |
skincare |
Standard skin analysis mode, close-up face capture |
hdskincare |
HD Skin capture using webcams with ≥ 2560px width |
shadefinder |
Skin Tone Analysis front-face capture |
facereshape |
AI Skin Simulation capture |
hairlength |
Full hair-length capture (from a distance) |
hairfrizziness |
3-phase capture: front, right-turn, left-turn |
hairtype |
Same 3-phase multi-angle capture flow |
ring |
Hand capture for ring try‑on |
wrist |
Wrist capture for watch or bracelet try‑on |
necklace |
Selfie capture for necklace try-on |
earring |
Selfie capture for earring try-on |
Step 2 — Add Event Handlers
Event examples:
YMK.addEventListener('faceQualityChanged', function(q) {
console.log('Quality updated:', q);
});
See the full Events List below.
Step 3 — Open Camera Kit
YMK.openCameraKit();
This automatically:
- Shows the UI
- Opens webcam
- Begins real-time face quality monitoring
- Automatically captures when conditions are acceptable
Step 4 — Receiving Captured Result
Captured images arrive via:
YMK.addEventListener('faceDetectionCaptured', function(result) {
console.log(result.images);
});
Step 5 — Close Module
YMK.close();
API Reference
YMK.init(args)
Configures module appearance, detection mode, language, and capture format.
Arguments
args.faceDetectionMode
Detection flow to use.
Values:
"makeup" | "skincare" | "hdskincare" | "shadefinder" | "facereshape" | "hairlength" | "hairfrizziness" | "hairtype" | "ring" | "wrist" | "necklace" | "earring"
Default: "skincare"
args.width
Pixel width of module container. Default:
360(screens ≥ 500px)screen width(screens < 500px)
Allowed: 300–1920
args.height
Pixel height of module container. Default:
480(screens ≥ 500px)min(screen.height, innerHeight)for smaller screens
Allowed: 300–1920
args.language
UI language.
Available: "chs", "cht", "deu", "enu", "esp", "fra", "jpn", "kor", "ptb", "ita"
Default: "enu"
args.imageFormat
Format returned via faceDetectionCaptured.
"base64" or "blob"
Default: "base64"
args.disableCameraResolutionCheck
Allow running even if webcam does not meet required resolution.
Default: false
Other API Methods
YMK.openCameraKit()
Opens the module and begins detection.
YMK.addEventListener(eventName, callback)
Registers event callbacks.
Returns: EventListenerIdentifier
YMK.removeEventListener(id)
Removes listener by identifier.
YMK.isLoaded()
Returns whether livestream or photo is drawn on canvas.
Returns: boolean
YMK.pause()
Pauses the webcam stream.
YMK.resume(restartWebcam = false)
Resumes webcam after pause.
YMK.getInfo()
Returns current module info:
{
"fps": 30
}
YMK.close()
Closes module and camera.
Events Reference
Lifecycle Events
| Event | Description |
|---|---|
opened |
Module opened |
loading |
Loading progress (0–100) |
loaded |
Camera stream loaded onto canvas |
closed |
Module closed |
Camera Events
| Event | Description |
|---|---|
cameraOpened |
Webcam opened |
cameraClosed |
Webcam closed |
cameraFailed |
Permission denied or no webcam Error code:* "error_resolution_unsupported"* "error_permission_denied"* "error_access_failed" |
faceQualityChanged
Fires continuously during detection.
{
"hasFace": true,
"position": "good",
"frontal": "good",
"lighting": "ok"
}
- Field Descriptions
| Field | Values | Meaning |
|---|---|---|
hasFace |
true/false |
Whether face is detected |
position |
"good", "notgood", "toosmall", "outofboundary" |
Face distance/size quality |
frontal |
"good", "notgood" |
Whether user is facing forward |
lighting |
"good", "ok", "notgood" |
Lighting strength |
Necklace/Earring
| Field | Values | Meaning |
|---|---|---|
hasFace |
true/false |
Whether face is detected |
pose |
"good", "notgood" |
Face pose quality |
size |
"good", "notgood" |
Face size quality |
Wrist/Ring
| Field | Values | Meaning |
|---|---|---|
hasFace |
true/false |
Whether face is detected |
position |
"good", "notgood" |
Hand position quality |
pose |
"good", "notgood" |
Hand pose quality |
Minimum Recommended Quality
const minQuality = {
hasFace: true,
area: "good",
frontal: "good",
lighting: "ok"
};
faceDetectionStarted
User enters detection UI.
faceDetectionCaptured
This event is fired after all required face quality validation checks have passed and the Camera Kit has successfully completed the capture workflow.
Depending on the selected faceDetectionMode, the event may contain one or multiple captured images (e.g., multi-angle capture for hair modes).
Callback Arguments
capturedResult — Object
The result object containing all successfully captured images and metadata.
Field Definitions
mode — string
Indicates the active faceDetectionMode used for capturing.
Possible values include:
"makeup" | "skincare" | "hdskincare" | "shadefinder" | "facereshape" | "hairlength" | "hairfrizziness" | "hairtype" | "ring" | "wrist" | "necklace" | "earring"
This value corresponds directly to the configuration set in YMK.init({ faceDetectionMode }).
images — Array
ImageObject Structure
| Field | Type | Description |
|---|---|---|
phase |
integer | The zero-based index representing the capture step. Examples: • Skincare = 0 • Hair frizziness sequence = 0 (front), 1 (right turn), 2 (left turn) |
image |
string or Blob | The captured image. • Base64 string if args.imageFormat = "base64" • Binary Blob if args.imageFormat = "blob" |
width |
integer | Pixel width of the captured image. |
height |
integer | Pixel height of the captured image. |
Notes
- The number of images varies depending on
faceDetectionMode.- Example:
"hairfrizziness"and"hairtype"typically produce three images.
- Example:
- Image resolution may differ from device to device.
The actual pixel size depends on:
- The user's webcam maximum resolution
- The constraints and recommended settings for the selected mode
- All images are guaranteed to meet the minimum face quality requirements before this event is dispatched.
Configuration Notes
Quality Requirements
- Ensure correct distance
- Ensure frontal face angle
- Provide sufficient lighting (avoid shadows)
Multi-Phase Capture
Modes like hairtype or hairfrizziness require:
- Front face
- Turn right
- Turn left
Ensure event handling is in place.
Create a new file.
To upload a new file, you'll first need to use the File API. It will give you a URL – use that URL to upload your file. Once the upload is finished, you can use the file_id from the same response to start using our AI features.
Authorizations:
Request Body schema: application/jsonrequired
required | Array of objects |
Responses
Request samples
- Payload
- curl
- Node.js
- JavaScript
- PHP
- Python
- Java
{- "files": [
- {
- "content_type": "image/jpg",
- "file_name": "my-selfie.jpg",
- "file_size": 50000
}
]
}Response samples
- 200
- 400
- 401
{- "status": 200,
- "data": {
- "files": [
- {
- "content_type": "image/jpg",
- "file_name": "my-selfie.jpg",
- "file_id": "U8aqJbsXGT537jtGnEDFHqxdDXqh8+oTF/cSkLimzuvVwMP+Jb1XbjPsf7ZgUgLY",
- "requests": [
- {
- "headers": {
- "Content-Type": "image/jpg",
- "Content-Length": 50000
}, - "method": "PUT"
}
]
}
]
}
}Run an AI Skin Simulation task.
Once you start an AI task, you need to keep polling at given polling_interval to check its status until it shows either success or error because if you don't, the task will time out and when you try to check the status later, you'll get an InvalidTaskId error even if the task did finish successfully and your units will still be consumed.
Authorizations:
Request Body schema: application/jsonrequired
Simulation intensity cannot be all zero.
| src_file_url required | string Url of the file to run task. The url should be publicly accessible. |
| wrinkle | number [ 0 .. 1 ] 0.0 for original skin, 1.0 for most wrinkle removed skin. |
| radiance | number [ 0 .. 1 ] 0.0 for original skin luminosity, 1.0 for maximum radiant/glowing skin. |
| oiliness | number [ 0 .. 1 ] 0.0 for original skin, 1.0 for maximum oil/shine added to skin. |
| acne | number [ 0 .. 1 ] 0.0 for original skin, 1.0 for most acne/pimples removed. |
| eye_bags | number [ 0 .. 1 ] 0.0 for original under-eye appearance, 1.0 for most eye bags removed. |
| dark_circle | number [ 0 .. 1 ] 0.0 for original under-eye color, 1.0 for most dark circles removed. |
| spots | number [ 0 .. 1 ] 0.0 for original skin, 1.0 for most age spots/blemishes removed. |
| pores | number [ 0 .. 1 ] 0.0 for original pore visibility, 1.0 for most refined/invisible pores. |
| texture | number [ 0 .. 1 ] 0.0 for original skin texture, 1.0 for smoothest skin texture. |
| redness | number [ 0 .. 1 ] 0.0 for original skin tone, 1.0 for most redness/irritation removed. |
Responses
Request samples
- Payload
- curl
- Node.js
- JavaScript
- PHP
- Python
- Java
{- "wrinkle": 1,
- "radiance": 1,
- "oiliness": 1,
- "acne": 1,
- "eye_bags": 1,
- "dark_circle": 1,
- "spots": 1,
- "pores": 1,
- "texture": 1,
- "redness": 1
}Response samples
- 200
- 400
- 401
{- "status": 200,
- "data": {
- "task_id": "grH0CvsgXuAIHLUzD0V1Ol34hoet3R1tvdbtiVHrDb6_UqCLKIejAIajwxrhOAfe"
}
}Check the status of a AI Skin Simulation task.
Authorizations:
path Parameters
| task_id required | string Example: grH0CvsgXuAIHLUzD0V1Ol34hoet3R1tvdbtiVHrDb6_UqCLKIejAIajwxrhOAfe ID of task to check |
Responses
Request samples
- curl
- Node.js
- JavaScript
- PHP
- Python
- Java
curl --request GET \ --url https://yce-api-01.makeupar.com/s2s/v2.0/task/skin-simulation/grH0CvsgXuAIHLUzD0V1Ol34hoet3R1tvdbtiVHrDb6_UqCLKIejAIajwxrhOAfe \ --header 'Authorization: Bearer <access_token for v1, API Key for v2>'
Response samples
- 200
- 400
- 401
- 500
{- "status": 200,
- "data": {
- "task_status": "running",
- "error": "exceed_max_filesize",
- "error_message": "string",
}
}AI Face Skin Tone Analysis
The AI Face Skin Tone Analysis detects facial skin tone, eye, eyebrow, lip & hair colors. This inclusive technology ensures to a complete tailored shopping experience for all ethnicities.

How to Take Photos for AI Face Skin Tone Analysis
- Take a selfie facing forward
- Just one clear shot, looking straight into the camera. Leave your hair down so it falls over your chest, and make sure you're staring directly ahead for that front-on view.
- Instead, use the JS Camera Kit to take a photo. Just leave your hair down so it falls over your chest. Don't tie it up.
How to Detect Skin Concerns by AI
Resize your source image Resize your photo to fit the supported dimensions. See details in File Specs & Errors
Upload file using the File API Using the v2.0/file/face-attr-analysis API to upload a target user image.
Image Requirements
- See details in File Specs & Errors.
Important: Simply calling the File API does not upload your file. You must manually upload the file to the URL provided in the File API response. That URL is your upload destination, make sure the file is successfully transferred there before proceeding.
Before calling the AI API, ensure your file has been successfully uploaded. Use the File API to retrieve an upload URL, then upload your file to that location. Once the upload is complete, you'll receive a file_id in the response, this ID is what you'll use to access AI features related to that file.Warning: Please note that, you will get an 500 Server Error / unknown_internal_error or 404 Not Found error when using AI APIs if you do not upload the file to the URL provided in the File API response.
Run an AI Face Skin Tone Analysis task Once your upload is complete, the AI will use your file ID to examine the color tones of your lips, eyes, eyebrows, skin, and hair. Please refer to the Inputs & Outputs. Subsequently, calling POST 'task/face-attr-analysis' with the File ID executes the enhance task and obtains a task_id.
Polling to check the status of a task until it succeed or error This task_id is used to monitor the task's status through polling GET 'task/face-attr-analysis' to retrieve the current engine status. Until the engine completes the task, the status will remain 'running', and no units will be consumed during this stage.
Warning: Please note that, Polling to check the status of a task based on it's retention period is mandotary. A task will be timed out if there is no polling request within the retention period, even if the task is processed succefully(Your unit(s) will be consumed).
Warning: You will get a InvalidTaskId error once you check the status of a timed out task. So, once you run an AI task, you need to polling to check the status within the retention period until the status become either success or error.
Get the result of an AI task once success The task will change to the 'success' status after the engine successfully processes your input file and generates the resulting image. You will get an url of the processed image and a dst_id that allow you to chain another AI task without re-upload the result image. Your units will only be consumed in this case. If the engine fails to process the task, the task's status will change to 'error' and no unit will be consumed. When deducting units, the system will prioritize those nearing expiration. If the expiration date is the same, it will deduct the units obtained on the earliest date.
Real-world examples:

Inputs
The AI will analyse the color tones of your skin. You may adjust the face_angle_strictness_level to control the checking strictness of the input face angle, ranging from strict, high, medium, low to flexible. The strictness level applies to face angle detection, including pitch, yaw and roll. A stricter level ensures more accurate face attribute results. The default setting is high.
Outputs
{
"skin_color": "#b28e73"
}
Suggestions for How to Shoot:
Warning: The width of the face needs to be greater than 60% of the width of the image.
Supported Formats & Dimensions
| AI Feature | Supported Dimensions | Supported File Size | Supported Formats |
|---|---|---|---|
| AI Face Skin Tone Analysis | long side <= 4096, single person only. Images with a side longer than 1080px are automatically resized for analysis. | < 10MB | jpg/jpeg |
Error Codes
| Error Code | Description |
|---|---|
| error_below_min_image_size | Source image dimensions must be at least 100×100 pixels. |
| error_face_position_invalid | Face must be fully visible, forward-facing, and centered in the image. |
| error_face_position_too_small | Detected face is too small for analysis. |
| error_face_position_out_of_boundary | Face extends beyond image boundaries. |
| error_face_not_forward_facing | Face must be directly facing the camera. |
| error_face_angle_upward | Face is angled too far upward—slightly tilt head down. |
| error_face_angle_downward | Face is angled too far downward — slightly tilt head up. |
| error_face_angle_leftward | Face is turned too far left — slightly rotate head right. |
| error_face_angle_rightward | Face is turned too far right — slightly rotate head left. |
| error_face_angle_left_tilt | Face is tilted too far left — gently tilt head right. |
| error_face_angle_right_tilt | Face is tilted too far right — gently tilt head left. |
Environment & Dependency
| Sample Code Language / Tool | Recommended Runtime Versions |
|---|---|
| cURL | - bash >= 3.2 - curl >= 7.58 (modern TLS/HTTP support) - jq >= 1.6 (robust JSON parsing) |
| Node.js (JavaScript) | Node >= 18 (for global fetch) |
| JavaScript | - Chrome / Edge >= 80 - Firefox >= 74 - Safari >= 13.1 |
| PHP | PHP >= 7.4 (for modern TLS/compat), ext-curl (recommended) or allow_url_fopen=On + ext-openssl, ext-json |
| Python | Python >= 3.10 (for f-strings), requests >= 2.20.0 |
| Java | Java 11+ (for HttpClient), Jackson Databind >= 2.12.0 |
Overview
The JavaScript Camera Kit provides a complete in-browser camera solution designed for high-accuracy face-based imaging tasks. It includes:
- Camera permission handling
- Real-time face detection
- Automatic face quality validation (lighting, pose, angle, distance)
- Guided capture UI
- Multi-step capture flows for advanced hair/face tasks
- Support for both base64 and blob output formats
The module is particularly optimized for AI-driven image analysis, such as AI Skin Analysis (SD/HD), AI Face Tone Analysis, and hair-related analysis.
Download the JS Camera Kit
Include the JS Camera Kit SDK via CDN:
https://plugins-media.makeupar.com/v2.2-camera-kit/sdk.js
Once loaded, the SDK installs a global YMK object.
Quick Start Example
The following sample demonstrates:
- Loading the JS Camera Kit SDK
- Implementing
window.ymkAsyncInit - Initializing the module
- Opening the camera
- Receiving captured images
<!DOCTYPE html>
<html lang="en">
<head>
<meta charset="UTF-8" />
<meta name="viewport" content="width=device-width, initial-scale=1.0" />
<title>Camera Kit Sample</title>
</head>
<body>
<script>
window.ymkAsyncInit = function() {
YMK.addEventListener('loaded', function() {
/* Module fully loaded and ready */
});
YMK.addEventListener('faceDetectionCaptured', function(capturedResult) {
/* Display all captured images */
const container = document.getElementById('captured-results');
container.innerHTML = '';
for (const image of capturedResult.images) {
const img = document.createElement('img');
img.src = typeof image.image === 'string'
? image.image
: URL.createObjectURL(image.image);
container.appendChild(img);
}
});
};
function openCameraKit() {
YMK.init({
faceDetectionMode: 'shadefinder',
imageFormat: 'base64',
language: 'enu',
});
YMK.openCameraKit();
}
</script>
<!-- Load SDK -->
<script>
window.addEventListener('load', function() {
(function(d) {
const s = d.createElement('script');
s.type = 'text/javascript';
s.async = true;
s.src = 'https://plugins-media.makeupar.com/v2.2-camera-kit/sdk.js';
d.getElementsByTagName('script')[0].parentNode.insertBefore(s, null);
})(document);
});
</script>
<button onClick="openCameraKit()">Open Camera Kit</button>
<div id="YMK-module"></div>
<h3>Captured Results:</h3>
<div id="captured-results"></div>
</body>
</html>
Prerequisites
You must define the asynchronous initialization entry point:
<script>
window.ymkAsyncInit = function() {
YMK.init(); // default settings
};
</script>
Additional requirements:
| Requirement | Description |
|---|---|
| Browser | Must support getUserMedia |
| HTTPS | Required on most browsers for webcam access |
<div id="YMK-module"> |
Mandatory mount point for the UI |
Integration Guide
Step 1 — Initialize the Module
Call YMK.init() before calling YMK.openCameraKit():
YMK.init({
faceDetectionMode: 'shadefinder',
imageFormat: 'base64',
language: 'enu'
});
Supported Detection Modes
| Mode | Description |
|---|---|
makeup |
Standard camera mode for virtual cosmetic try-on |
skincare |
Standard skin analysis mode, close-up face capture |
hdskincare |
HD Skin capture using webcams with ≥ 2560px width |
shadefinder |
Skin Tone Analysis front-face capture |
facereshape |
AI Face Reshape capture |
hairlength |
Full hair-length capture (from a distance) |
hairfrizziness |
3-phase capture: front, right-turn, left-turn |
hairtype |
Same 3-phase multi-angle capture flow |
ring |
Hand capture for ring try‑on |
wrist |
Wrist capture for watch or bracelet try‑on |
necklace |
Selfie capture for necklace try-on |
earring |
Selfie capture for earring try-on |
Step 2 — Add Event Handlers
Event examples:
YMK.addEventListener('faceQualityChanged', function(q) {
console.log('Quality updated:', q);
});
See the full Events List below.
Step 3 — Open Camera Kit
YMK.openCameraKit();
This automatically:
- Shows the UI
- Opens webcam
- Begins real-time face quality monitoring
- Automatically captures when conditions are acceptable
Step 4 — Receiving Captured Result
Captured images arrive via:
YMK.addEventListener('faceDetectionCaptured', function(result) {
console.log(result.images);
});
Step 5 — Close Module
YMK.close();
API Reference
YMK.init(args)
Configures module appearance, detection mode, language, and capture format.
Arguments
args.faceDetectionMode
Detection flow to use.
Values:
"makeup" | "skincare" | "hdskincare" | "shadefinder" | "facereshape" | "hairlength" | "hairfrizziness" | "hairtype" | "ring" | "wrist" | "necklace" | "earring"
Default: "skincare"
args.width
Pixel width of module container. Default:
360(screens ≥ 500px)screen width(screens < 500px)
Allowed: 300–1920
args.height
Pixel height of module container. Default:
480(screens ≥ 500px)min(screen.height, innerHeight)for smaller screens
Allowed: 300–1920
args.language
UI language.
Available: "chs", "cht", "deu", "enu", "esp", "fra", "jpn", "kor", "ptb", "ita"
Default: "enu"
args.imageFormat
Format returned via faceDetectionCaptured.
"base64" or "blob"
Default: "base64"
args.disableCameraResolutionCheck
Allow running even if webcam does not meet required resolution.
Default: false
Other API Methods
YMK.openCameraKit()
Opens the module and begins detection.
YMK.addEventListener(eventName, callback)
Registers event callbacks.
Returns: EventListenerIdentifier
YMK.removeEventListener(id)
Removes listener by identifier.
YMK.isLoaded()
Returns whether livestream or photo is drawn on canvas.
Returns: boolean
YMK.pause()
Pauses the webcam stream.
YMK.resume(restartWebcam = false)
Resumes webcam after pause.
YMK.getInfo()
Returns current module info:
{
"fps": 30
}
YMK.close()
Closes module and camera.
Events Reference
Lifecycle Events
| Event | Description |
|---|---|
opened |
Module opened |
loading |
Loading progress (0–100) |
loaded |
Camera stream loaded onto canvas |
closed |
Module closed |
Camera Events
| Event | Description |
|---|---|
cameraOpened |
Webcam opened |
cameraClosed |
Webcam closed |
cameraFailed |
Permission denied or no webcam Error code:* "error_resolution_unsupported"* "error_permission_denied"* "error_access_failed" |
faceQualityChanged
Fires continuously during detection.
{
"hasFace": true,
"position": "good",
"frontal": "good",
"lighting": "ok"
}
- Field Descriptions
| Field | Values | Meaning |
|---|---|---|
hasFace |
true/false |
Whether face is detected |
position |
"good", "notgood", "toosmall", "outofboundary" |
Face distance/size quality |
frontal |
"good", "notgood" |
Whether user is facing forward |
lighting |
"good", "ok", "notgood" |
Lighting strength |
Necklace/Earring
| Field | Values | Meaning |
|---|---|---|
hasFace |
true/false |
Whether face is detected |
pose |
"good", "notgood" |
Face pose quality |
size |
"good", "notgood" |
Face size quality |
Wrist/Ring
| Field | Values | Meaning |
|---|---|---|
hasFace |
true/false |
Whether face is detected |
position |
"good", "notgood" |
Hand position quality |
pose |
"good", "notgood" |
Hand pose quality |
Minimum Recommended Quality
const minQuality = {
hasFace: true,
area: "good",
frontal: "good",
lighting: "ok"
};
faceDetectionStarted
User enters detection UI.
faceDetectionCaptured
This event is fired after all required face quality validation checks have passed and the Camera Kit has successfully completed the capture workflow.
Depending on the selected faceDetectionMode, the event may contain one or multiple captured images (e.g., multi-angle capture for hair modes).
Callback Arguments
capturedResult — Object
The result object containing all successfully captured images and metadata.
Field Definitions
mode — string
Indicates the active faceDetectionMode used for capturing.
Possible values include:
"makeup" | "skincare" | "hdskincare" | "shadefinder" | "facereshape" | "hairlength" | "hairfrizziness" | "hairtype" | "ring" | "wrist" | "necklace" | "earring"
This value corresponds directly to the configuration set in YMK.init({ faceDetectionMode }).
images — Array
ImageObject Structure
| Field | Type | Description |
|---|---|---|
phase |
integer | The zero-based index representing the capture step. Examples: • Skincare = 0 • Hair frizziness sequence = 0 (front), 1 (right turn), 2 (left turn) |
image |
string or Blob | The captured image. • Base64 string if args.imageFormat = "base64" • Binary Blob if args.imageFormat = "blob" |
width |
integer | Pixel width of the captured image. |
height |
integer | Pixel height of the captured image. |
Notes
- The number of images varies depending on
faceDetectionMode.- Example:
"hairfrizziness"and"hairtype"typically produce three images.
- Example:
- Image resolution may differ from device to device.
The actual pixel size depends on:
- The user's webcam maximum resolution
- The constraints and recommended settings for the selected mode
- All images are guaranteed to meet the minimum face quality requirements before this event is dispatched.
Configuration Notes
Quality Requirements
- Ensure correct distance
- Ensure frontal face angle
- Provide sufficient lighting (avoid shadows)
Multi-Phase Capture
Modes like hairtype or hairfrizziness require:
- Front face
- Turn right
- Turn left
Ensure event handling is in place.
Create a new file.
To upload a new file, you'll first need to use the File API. It will give you a URL – use that URL to upload your file. Once the upload is finished, you can use the file_id from the same response to start using our AI features.
Authorizations:
Request Body schema: application/jsonrequired
required | Array of objects |
Responses
Request samples
- Payload
- curl
- Node.js
- JavaScript
- PHP
- Python
- Java
{- "files": [
- {
- "content_type": "image/jpg",
- "file_name": "my-selfie.jpg",
- "file_size": 50000
}
]
}Response samples
- 200
- 400
- 401
{- "status": 200,
- "data": {
- "files": [
- {
- "content_type": "image/jpg",
- "file_name": "my-selfie.jpg",
- "file_id": "U8aqJbsXGT537jtGnEDFHqxdDXqh8+oTF/cSkLimzuvVwMP+Jb1XbjPsf7ZgUgLY",
- "requests": [
- {
- "headers": {
- "Content-Type": "image/jpg",
- "Content-Length": 50000
}, - "method": "PUT"
}
]
}
]
}
}Run an Skin Tone Analysis task.
Once you start an AI task, you need to keep polling at given polling_interval to check its status until it shows either success or error because if you don't, the task will time out and when you try to check the status later, you'll get an InvalidTaskId error even if the task did finish successfully and your units will still be consumed.
Authorizations:
Request Body schema: application/jsonrequired
| src_file_url required | string Url of the file to run task. The url should be publicly accessible. |
| face_angle_strictness_level | string (BasicFaceAttrReqFaceAngleStrictnessLevel) Enum: "strict" "high" "medium" "low" "flexible" The strictness level of face angle detection (pitch, yaw, roll). A stricter level ensures more accurate face attribute results. Default is 'high'. optoins:
|
Responses
Request samples
- Payload
- curl
- Node.js
- JavaScript
- PHP
- Python
- Java
{- "face_angle_strictness_level": "high"
}Response samples
- 200
- 400
- 401
{- "status": 200,
- "data": {
- "task_id": "grH0CvsgXuAIHLUzD0V1Ol34hoet3R1tvdbtiVHrDb6_UqCLKIejAIajwxrhOAfe"
}
}Check an Skin Tone Analysis task status.
Authorizations:
path Parameters
| task_id required | string Example: grH0CvsgXuAIHLUzD0V1Ol34hoet3R1tvdbtiVHrDb6_UqCLKIejAIajwxrhOAfe ID of task to check |
Responses
Request samples
- curl
- Node.js
- JavaScript
- PHP
- Python
- Java
curl --request GET \ --url https://yce-api-01.makeupar.com/s2s/v2.0/task/skin-tone-analysis/grH0CvsgXuAIHLUzD0V1Ol34hoet3R1tvdbtiVHrDb6_UqCLKIejAIajwxrhOAfe \ --header 'Authorization: Bearer <access_token for v1, API Key for v2>'
Response samples
- 200
- 400
- 401
- 500
{- "status": 200,
- "data": {
- "task_status": "running",
- "error": "exceed_max_filesize",
- "error_message": "string",
- "results": {
- "face_quality": {
- "has_face": true,
- "area": "good",
- "frontal": "good",
- "lighting": "good",
- "faceangle": "good"
}, - "color": {
- "eye_color": "string",
- "eye_color_name": "Amber",
- "lip_color": "string",
- "eyebrow_color": "string",
- "skin_color": "#b9947c",
- "hair_color": "#a0a0a0",
- "hair_color_name": "Auburn"
}
}
}
}AI Face Analyzer
The AI Face Analyzer examines face structure, identifying features like face, eye, eyebrow, lip, nose, cheekbone shapes, designed to provide personalized recommendations.
How to Take Photos for AI Face Analysis
- Take a selfie facing forward
- Just one clear photo, looking straight into the camera. It is best to let your hair fall naturally, with your entire face visible and nothing covering it. Brush your hair back to reveal your forehead, and make sure you are looking directly ahead to capture a proper front view.
- Instead, use the JS Camera Kit to take the photo. Follow the automatic face alignment, lighting guidance, and face size detection to ensure the photo meets the required standards for processing.
How to Detect Skin Concerns by AI
Resize your source image Resize your photo to fit the supported dimensions. See details in File Specs & Errors
Upload file using the File API Using the v2.0/file/face-attr-analysis API to upload a target user image.
Image Requirements
- See details in File Specs & Errors.
Important: Simply calling the File API does not upload your file. You must manually upload the file to the URL provided in the File API response. That URL is your upload destination, make sure the file is successfully transferred there before proceeding.
Before calling the AI API, ensure your file has been successfully uploaded. Use the File API to retrieve an upload URL, then upload your file to that location. Once the upload is complete, you'll receive a file_id in the response, this ID is what you'll use to access AI features related to that file.Warning: Please note that, you will get an 500 Server Error / unknown_internal_error or 404 Not Found error when using AI APIs if you do not upload the file to the URL provided in the File API response.
Run an AI Face Analysis task Once the upload is complete, you can select multiple face attributes to analyze using your file ID. Please refer to the Inputs & Outputs. Subsequently, calling POST 'task/face-attr-analysis' with the File ID executes the enhance task and obtains a task_id.
Polling to check the status of a task until it succeed or error This task_id is used to monitor the task's status through polling GET 'task/face-attr-analysis' to retrieve the current engine status. Until the engine completes the task, the status will remain 'running', and no units will be consumed during this stage.
Warning: Please note that, Polling to check the status of a task based on it's retention period is mandotary. A task will be timed out if there is no polling request within the retention period, even if the task is processed succefully(Your unit(s) will be consumed).
Warning: You will get a InvalidTaskId error once you check the status of a timed out task. So, once you run an AI task, you need to polling to check the status within the retention period until the status become either success or error.
Get the result of an AI task once success The task will change to the 'success' status after the engine successfully processes your input file and generates the resulting image. You will get an url of the processed image and a dst_id that allow you to chain another AI task without re-upload the result image. Your units will only be consumed in this case. If the engine fails to process the task, the task's status will change to 'error' and no unit will be consumed. When deducting units, the system will prioritize those nearing expiration. If the expiration date is the same, it will deduct the units obtained on the earliest date.
Real-world examples:
Face Attributes:

| Category | Subcategory | Request Parameter | Result Parameter | Result Types |
|---|---|---|---|---|
| FACE | Face Shape | faceShape |
faceshape |
Triangle, Diamond, Heart, InvTriangle, Oblong, Oval, Round, Square, Unknown |
| AGE & GENDER | Age | age |
agegender.age |
integer |
| Gender | gender |
agegender.gender |
female, male, unknown | |
| EYES | Eye Shape | eyeShape |
eyelid.left_shape, eyelid.right_shape |
Narrow, Round, Almond |
| Eye Size | eyeSize |
eyelid.size |
Big, Small, Average | |
| Eye Angle | eyeAngle |
eyelid.left_angle, eyelid.right_angle |
Downturned, Upturned, Average | |
| Eye Distance | eyeDistance |
eyelid.setting |
Close-set, Wide-Set, Average | |
| Eyelid | eyelid |
eyelid.left_eyelid, eyelid.right_eyelid |
Hooded-lid, Single-lid, Double-lid, Deep-Set | |
| BROWS | Eyebrow Shape | eyebrowShape |
eyebrow.left_shape, eyebrow.right_shape |
Hard Angled, Soft Angled, Straight, Rounded, Obscured |
| Eyebrow Thickness | eyebrowThickness |
eyebrow.left_body_thickness, eyebrow.right_body_thickness |
Dense, Sparse, Average, Unknown | |
| Eyebrow Distance | eyebrowDistance |
eyebrow.gap |
Far-Apart, Close, Average | |
| Eyebrow Shortness | eyebrowShortness |
eyebrow.left_shortness, eyebrow.right_shortness |
Short, Normal | |
| LIPS | Lip Shape | lipShape |
lipshape[] |
Bow, Downturned, Full, Heavy Lower Lip, Heavy Upper Lip, Narrow, Round, Thin, Wide, Average |
| NOSE | Nose Width | noseWidth |
nose.width |
Narrow, Broad, Average |
| Nose Length | noseLength |
nose.length |
Long, Short, Average | |
| CHEEKBONES | Cheekbones | cheekbones |
cheekbone.left, cheekbone.right, cheekbone.overrall |
Flat Cheekbone, High Cheekbone, Low Cheekbone, Round Cheeks |
| COLORS | Eye Color | eyeColor |
color.eye_color, color.eye_color_name |
Hex value Amber, Brown, Green, Blue, Gray, Other |
| Lip Color | lipColor |
color.lip_color |
Hex value | |
| Eyebrow Color | eyebrowColor |
color.eyebrow_color |
Hex value | |
| Hair Color | hairColor |
color.hair_color, color.hair_color_name |
Hex value Auburn, Black, Blonde, Brown, Grey/White, Red |
Face Ratios:

| Subcategory | Request Parameter | Result Parameter | Result Types | Description |
|---|---|---|---|---|
| Horizontal Third Ratio | horizontalThird |
horizontal_third |
Three-section percentages; Interpretation: Short / Balanced / Long; Golden Ratio: 33% : 33% : 33% | The Face Horizontal Ratio is based on dividing the face into three equal sections: from the hairline to the bottom of the eyebrows, from the bottom of eyebrows to the bottom of the nose, and from the bottom of the nose to the tip of the chin. The golden ratio, or ideal proportion, between the three is 1:1:1. |
| Vertical Fifth Ratio | verticalFifth |
vertical_fifth |
Five-section percentages; Interpretation (Eye Distance & Eye Width): Narrow / Balanced / Wide; Golden Ratio: 20% : 20% : 20% : 20% : 20% | The Face Vertical Ratio is determined by dividing the face into five sections: the width of one eye, the distance between the eyes, and the space between the outer corners of the eyes to the edges of the face. The golden ration for these proportions is 1:1:1:1:1. |
| Face Aspect Ratio | faceAspectRatio |
face_aspect_ratio |
[1, r]; Interpretation: Short / Balanced / Long; Golden Ratio: 1 : 1.46 |
The Face Aspect Ratio is the relationship between the width of the face and its height, ideally following the golden ratio of 1:1.46, thus creating a balanced and aesthetically pleasing appearance. |
| Eye Aspect Ratio | eyeAspectRatio |
left_eye_aspect_ratio right_eye_aspect_ratio |
[1, r]; Interpretation: Round / Balanced / Flat; Golden Ratio: 1 : 3 |
The Eye Aspect Ratio is the relationship between the height of the eye compared to its width, ideally aligning with the golden ratio of 1:3, ensuring the most aesthetically balanced look. |
| Eyebrow Arch Ratio | eyebrowArch |
left_eyebrow_arch_to_eyebrow_width right_eyebrow_arch_to_eyebrow_width |
[1, r]; Interpretation: Short Arch / Balanced / Long Arch; Golden Ratio: 1 : 1.618 |
The ideal proportion of the Eyebrow Arch is determined by the shape of the eyebrow itself, where the highest point (the arch) aligns with the golden ratio for an aesthetically pleasing look. |
| Eye Height to Eyebrow Distance | eyeHeightToEyebrowDistance |
left_eye_height_to_eyebrow_distance right_eye_height_to_eyebrow_distance overall_eye_height_to_eyebrow_distance |
[1, r]; Interpretation: Short / Balanced / Long; Golden Ratio: 1 : 1.618 |
The Eye to Eyebrow Distance is the vertical distance from the top of the upper eyelid to the highest point of the eyebrow. Ideally, it would follow the golden ratio of 1.618:1 when compared to the eye height, for the most harmonious balance between the eyes and the brows. |
| Nose Aspect Ratio | noseAspectRatio |
nose_aspect_ratio |
[1, r]; Interpretation: Wide / Balanced / Narrow; Golden Ratio: 1 : 1.618 |
The Nose Aspect Ratio is the relationship between the width of the nose and its height, ideally following the golden ratio of 1:1.618. |
| Nose Width to Mouth Width | noseWidthToMouthWidth |
nose_width_to_mouth_width |
[1, r]; Interpretation: Small / Balanced / Large; Golden Ratio: 1 : 1.618 |
The Nose Width to Mouth Width ratio is the relationship between the width of the nose and that of the mouth, ideally following the golden ratio of 1:1.618, creating a balanced and aesthetically pleasing appearance. |
| Nose to Lip to Chin | noseToLipToChin |
nose_to_lip_to_chin |
[1, r]; Interpretation: Short / Balanced / Long (lower face length); Golden Ratio: 1 : 1.618 |
The Nose to Lip to Chin ratio is a proportion where the distance from the base of the nose to the center of the lip is 1, and the ideal distance from the center of the lip to the chin is 1.618. This golden ratio creates a balanced and harmonious lower face, following the principles of facial symmetry. |
| Upper Lip to Lower Lip | upperLipToLowerLip |
upper_lip_to_lower_lip |
[1, r]; Interpretation: Full Upper / Balanced / Full Lower; Golden Ratio: 1 : 1.618 |
The golden ratio of the Upper Lip to the Lower Lip suggests that the thickness of the lower lip should be 1.618 times that of the upper lip. This proportion creates a balanced and aesthetically pleasing look, with the lower lip being slightly fuller than the upper lip. |
Suggestions for How to Shoot:
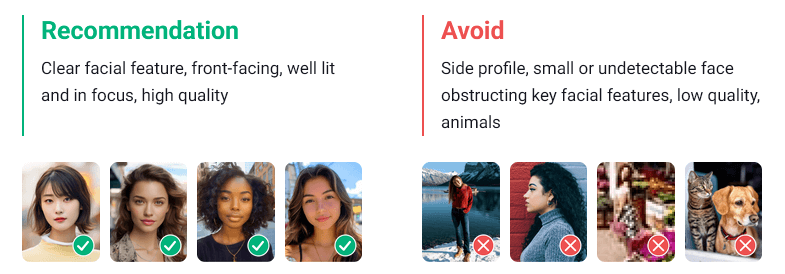
Warning: The width of the face needs to be greater than 60% of the width of the image.
Supported Formats & Dimensions
| AI Feature | Supported Dimensions | Supported File Size | Supported Formats |
|---|---|---|---|
| AI Face Analyzer | long side <= 4096, single person only. Images with a side longer than 1080px are automatically resized for analysis. | < 10MB | jpg/jpeg |
Error Codes
| Error Code | Description |
|---|---|
| error_below_min_image_size | Source image dimensions must be at least 100×100 pixels. |
| error_face_position_invalid | Face must be fully visible, forward-facing, and centered in the image. |
| error_face_position_too_small | Detected face is too small for analysis. |
| error_face_position_out_of_boundary | Face extends beyond image boundaries. |
| error_face_not_forward_facing | Face must be directly facing the camera. |
| error_face_angle_upward | Face is angled too far upward—slightly tilt head down. |
| error_face_angle_downward | Face is angled too far downward — slightly tilt head up. |
| error_face_angle_leftward | Face is turned too far left — slightly rotate head right. |
| error_face_angle_rightward | Face is turned too far right — slightly rotate head left. |
| error_face_angle_left_tilt | Face is tilted too far left — gently tilt head right. |
| error_face_angle_right_tilt | Face is tilted too far right — gently tilt head left. |
Environment & Dependency
| Sample Code Language / Tool | Recommended Runtime Versions |
|---|---|
| cURL | - bash >= 3.2 - curl >= 7.58 (modern TLS/HTTP support) - jq >= 1.6 (robust JSON parsing) |
| Node.js (JavaScript) | Node >= 18 (for global fetch) |
| JavaScript | - Chrome / Edge >= 80 - Firefox >= 74 - Safari >= 13.1 |
| PHP | PHP >= 7.4 (for modern TLS/compat), ext-curl (recommended) or allow_url_fopen=On + ext-openssl, ext-json |
| Python | Python >= 3.10 (for f-strings), requests >= 2.20.0 |
| Java | Java 11+ (for HttpClient), Jackson Databind >= 2.12.0 |
Overview
The JavaScript Camera Kit provides a complete in-browser camera solution designed for high-accuracy face-based imaging tasks. It includes:
- Camera permission handling
- Real-time face detection
- Automatic face quality validation (lighting, pose, angle, distance)
- Guided capture UI
- Multi-step capture flows for advanced hair/face tasks
- Support for both base64 and blob output formats
The module is particularly optimized for AI-driven image analysis, such as AI Skin Analysis (SD/HD), AI Face Tone Analysis, and hair-related analysis.
Download the JS Camera Kit
Include the JS Camera Kit SDK via CDN:
https://plugins-media.makeupar.com/v2.2-camera-kit/sdk.js
Once loaded, the SDK installs a global YMK object.
Quick Start Example
The following sample demonstrates:
- Loading the JS Camera Kit SDK
- Implementing
window.ymkAsyncInit - Initializing the module
- Opening the camera
- Receiving captured images
<!DOCTYPE html>
<html lang="en">
<head>
<meta charset="UTF-8" />
<meta name="viewport" content="width=device-width, initial-scale=1.0" />
<title>Camera Kit Sample</title>
</head>
<body>
<script>
window.ymkAsyncInit = function() {
YMK.addEventListener('loaded', function() {
/* Module fully loaded and ready */
});
YMK.addEventListener('faceDetectionCaptured', function(capturedResult) {
/* Display all captured images */
const container = document.getElementById('captured-results');
container.innerHTML = '';
for (const image of capturedResult.images) {
const img = document.createElement('img');
img.src = typeof image.image === 'string'
? image.image
: URL.createObjectURL(image.image);
container.appendChild(img);
}
});
};
function openCameraKit() {
YMK.init({
faceDetectionMode: 'shadefinder',
imageFormat: 'base64',
language: 'enu',
});
YMK.openCameraKit();
}
</script>
<!-- Load SDK -->
<script>
window.addEventListener('load', function() {
(function(d) {
const s = d.createElement('script');
s.type = 'text/javascript';
s.async = true;
s.src = 'https://plugins-media.makeupar.com/v2.2-camera-kit/sdk.js';
d.getElementsByTagName('script')[0].parentNode.insertBefore(s, null);
})(document);
});
</script>
<button onClick="openCameraKit()">Open Camera Kit</button>
<div id="YMK-module"></div>
<h3>Captured Results:</h3>
<div id="captured-results"></div>
</body>
</html>
Prerequisites
You must define the asynchronous initialization entry point:
<script>
window.ymkAsyncInit = function() {
YMK.init(); // default settings
};
</script>
Additional requirements:
| Requirement | Description |
|---|---|
| Browser | Must support getUserMedia |
| HTTPS | Required on most browsers for webcam access |
<div id="YMK-module"> |
Mandatory mount point for the UI |
Integration Guide
Step 1 — Initialize the Module
Call YMK.init() before calling YMK.openCameraKit():
YMK.init({
faceDetectionMode: 'shadefinder',
imageFormat: 'base64',
language: 'enu'
});
Supported Detection Modes
| Mode | Description |
|---|---|
makeup |
Standard camera mode for virtual cosmetic try-on |
skincare |
Standard skin analysis mode, close-up face capture |
hdskincare |
HD Skin capture using webcams with ≥ 2560px width |
shadefinder |
Skin Tone Analysis front-face capture |
facereshape |
AI Face Reshape capture |
hairlength |
Full hair-length capture (from a distance) |
hairfrizziness |
3-phase capture: front, right-turn, left-turn |
hairtype |
Same 3-phase multi-angle capture flow |
ring |
Hand capture for ring try‑on |
wrist |
Wrist capture for watch or bracelet try‑on |
necklace |
Selfie capture for necklace try-on |
earring |
Selfie capture for earring try-on |
Step 2 — Add Event Handlers
Event examples:
YMK.addEventListener('faceQualityChanged', function(q) {
console.log('Quality updated:', q);
});
See the full Events List below.
Step 3 — Open Camera Kit
YMK.openCameraKit();
This automatically:
- Shows the UI
- Opens webcam
- Begins real-time face quality monitoring
- Automatically captures when conditions are acceptable
Step 4 — Receiving Captured Result
Captured images arrive via:
YMK.addEventListener('faceDetectionCaptured', function(result) {
console.log(result.images);
});
Step 5 — Close Module
YMK.close();
API Reference
YMK.init(args)
Configures module appearance, detection mode, language, and capture format.
Arguments
args.faceDetectionMode
Detection flow to use.
Values:
"makeup" | "skincare" | "hdskincare" | "shadefinder" | "facereshape" | "hairlength" | "hairfrizziness" | "hairtype" | "ring" | "wrist" | "necklace" | "earring"
Default: "skincare"
args.width
Pixel width of module container. Default:
360(screens ≥ 500px)screen width(screens < 500px)
Allowed: 300–1920
args.height
Pixel height of module container. Default:
480(screens ≥ 500px)min(screen.height, innerHeight)for smaller screens
Allowed: 300–1920
args.language
UI language.
Available: "chs", "cht", "deu", "enu", "esp", "fra", "jpn", "kor", "ptb", "ita"
Default: "enu"
args.imageFormat
Format returned via faceDetectionCaptured.
"base64" or "blob"
Default: "base64"
args.disableCameraResolutionCheck
Allow running even if webcam does not meet required resolution.
Default: false
Other API Methods
YMK.openCameraKit()
Opens the module and begins detection.
YMK.addEventListener(eventName, callback)
Registers event callbacks.
Returns: EventListenerIdentifier
YMK.removeEventListener(id)
Removes listener by identifier.
YMK.isLoaded()
Returns whether livestream or photo is drawn on canvas.
Returns: boolean
YMK.pause()
Pauses the webcam stream.
YMK.resume(restartWebcam = false)
Resumes webcam after pause.
YMK.getInfo()
Returns current module info:
{
"fps": 30
}
YMK.close()
Closes module and camera.
Events Reference
Lifecycle Events
| Event | Description |
|---|---|
opened |
Module opened |
loading |
Loading progress (0–100) |
loaded |
Camera stream loaded onto canvas |
closed |
Module closed |
Camera Events
| Event | Description |
|---|---|
cameraOpened |
Webcam opened |
cameraClosed |
Webcam closed |
cameraFailed |
Permission denied or no webcam Error code:* "error_resolution_unsupported"* "error_permission_denied"* "error_access_failed" |
faceQualityChanged
Fires continuously during detection.
{
"hasFace": true,
"position": "good",
"frontal": "good",
"lighting": "ok"
}
- Field Descriptions
| Field | Values | Meaning |
|---|---|---|
hasFace |
true/false |
Whether face is detected |
position |
"good", "notgood", "toosmall", "outofboundary" |
Face distance/size quality |
frontal |
"good", "notgood" |
Whether user is facing forward |
lighting |
"good", "ok", "notgood" |
Lighting strength |
Necklace/Earring
| Field | Values | Meaning |
|---|---|---|
hasFace |
true/false |
Whether face is detected |
pose |
"good", "notgood" |
Face pose quality |
size |
"good", "notgood" |
Face size quality |
Wrist/Ring
| Field | Values | Meaning |
|---|---|---|
hasFace |
true/false |
Whether face is detected |
position |
"good", "notgood" |
Hand position quality |
pose |
"good", "notgood" |
Hand pose quality |
Minimum Recommended Quality
const minQuality = {
hasFace: true,
area: "good",
frontal: "good",
lighting: "ok"
};
faceDetectionStarted
User enters detection UI.
faceDetectionCaptured
This event is fired after all required face quality validation checks have passed and the Camera Kit has successfully completed the capture workflow.
Depending on the selected faceDetectionMode, the event may contain one or multiple captured images (e.g., multi-angle capture for hair modes).
Callback Arguments
capturedResult — Object
The result object containing all successfully captured images and metadata.
Field Definitions
mode — string
Indicates the active faceDetectionMode used for capturing.
Possible values include:
"makeup" | "skincare" | "hdskincare" | "shadefinder" | "facereshape" | "hairlength" | "hairfrizziness" | "hairtype" | "ring" | "wrist" | "necklace" | "earring"
This value corresponds directly to the configuration set in YMK.init({ faceDetectionMode }).
images — Array
ImageObject Structure
| Field | Type | Description |
|---|---|---|
phase |
integer | The zero-based index representing the capture step. Examples: • Skincare = 0 • Hair frizziness sequence = 0 (front), 1 (right turn), 2 (left turn) |
image |
string or Blob | The captured image. • Base64 string if args.imageFormat = "base64" • Binary Blob if args.imageFormat = "blob" |
width |
integer | Pixel width of the captured image. |
height |
integer | Pixel height of the captured image. |
Notes
- The number of images varies depending on
faceDetectionMode.- Example:
"hairfrizziness"and"hairtype"typically produce three images.
- Example:
- Image resolution may differ from device to device.
The actual pixel size depends on:
- The user's webcam maximum resolution
- The constraints and recommended settings for the selected mode
- All images are guaranteed to meet the minimum face quality requirements before this event is dispatched.
Configuration Notes
Quality Requirements
- Ensure correct distance
- Ensure frontal face angle
- Provide sufficient lighting (avoid shadows)
Multi-Phase Capture
Modes like hairtype or hairfrizziness require:
- Front face
- Turn right
- Turn left
Ensure event handling is in place.
Create a new file.
To upload a new file, you'll first need to use the File API. It will give you a URL – use that URL to upload your file. Once the upload is finished, you can use the file_id from the same response to start using our AI features.
Authorizations:
Request Body schema: application/jsonrequired
required | Array of objects |
Responses
Request samples
- Payload
- curl
- Node.js
- JavaScript
- PHP
- Python
- Java
{- "files": [
- {
- "content_type": "image/jpg",
- "file_name": "my-selfie.jpg",
- "file_size": 50000
}
]
}Response samples
- 200
- 400
- 401
{- "status": 200,
- "data": {
- "files": [
- {
- "content_type": "image/jpg",
- "file_name": "my-selfie.jpg",
- "file_id": "U8aqJbsXGT537jtGnEDFHqxdDXqh8+oTF/cSkLimzuvVwMP+Jb1XbjPsf7ZgUgLY",
- "requests": [
- {
- "headers": {
- "Content-Type": "image/jpg",
- "Content-Length": 50000
}, - "method": "PUT"
}
]
}
]
}
}Run an Face Attribute Analysis task.
Once you start an AI task, you need to keep polling at given polling_interval to check its status until it shows either success or error because if you don't, the task will time out and when you try to check the status later, you'll get an InvalidTaskId error even if the task did finish successfully and your units will still be consumed.
Authorizations:
Request Body schema: application/jsonrequired
| src_file_url required | string Url of the file to run task. The url should be publicly accessible. |
| face_angle_strictness_level | string (BasicFaceAttrReqFaceAngleStrictnessLevel) Enum: "strict" "high" "medium" "low" "flexible" The strictness level of face angle detection (pitch, yaw, roll). A stricter level ensures more accurate face attribute results. Default is 'high'. optoins:
|
| features required | Array of strings (BasicFaceAttrReqFeatures) Items Enum: "eyeShape" "eyeSize" "eyeAngle" "eyeDistance" "eyelid" "eyebrowShape" "eyebrowThickness" "eyebrowDistance" "eyebrowShortness" "cheekbones" "faceShape" "lipShape" "noseWidth" "noseLength" "age" "gender" "eyeColor" "lipColor" "eyebrowColor" "hairColor" "horizontalThird" "verticalFifth" "faceAspectRatio" "eyeAspectRatio" "eyebrowPosition" "eyebrowArch" "eyeHeightToEyebrowDistance" "noseAspectRatio" "noseWidthToMouthWidth" "noseToLipToChin" "upperLipToLowerLip" AI Face Analysis categories
|
Responses
Request samples
- Payload
- curl
- Node.js
- JavaScript
- PHP
- Python
- Java
{- "face_angle_strictness_level": "high",
- "features": [
- "eyeShape"
]
}Response samples
- 200
- 400
- 401
{- "status": 200,
- "data": {
- "task_id": "grH0CvsgXuAIHLUzD0V1Ol34hoet3R1tvdbtiVHrDb6_UqCLKIejAIajwxrhOAfe"
}
}Check an Face Attribute Analysis task status.
Authorizations:
path Parameters
| task_id required | string Example: grH0CvsgXuAIHLUzD0V1Ol34hoet3R1tvdbtiVHrDb6_UqCLKIejAIajwxrhOAfe ID of task to check |
Responses
Request samples
- curl
- Node.js
- JavaScript
- PHP
- Python
- Java
curl --request GET \ --url https://yce-api-01.makeupar.com/s2s/v2.0/task/face-attr-analysis/grH0CvsgXuAIHLUzD0V1Ol34hoet3R1tvdbtiVHrDb6_UqCLKIejAIajwxrhOAfe \ --header 'Authorization: Bearer <access_token for v1, API Key for v2>'
Response samples
- 200
- 400
- 401
- 500
{- "status": 200,
- "data": {
- "task_status": "running",
- "error": "exceed_max_filesize",
- "error_message": "string",
- "results": {
- "face_quality": {
- "has_face": true,
- "area": "good",
- "frontal": "good",
- "lighting": "good",
- "faceangle": "good"
}, - "facialratio": {
- "horizontal_third": [
- 33,
- 33,
- 33
], - "vertical_fifth": [
- 20,
- 20,
- 20,
- 20,
- 20
], - "face_aspect_ratio": [
- 1,
- 1.46
], - "left_eye_aspect_ratio": [
- 1,
- 3
], - "right_eye_aspect_ratio": [
- 1,
- 3
], - "left_eyebrow_arch_to_eyebrow_width": [
- 1,
- 1.476
], - "right_eyebrow_arch_to_eyebrow_width": [
- 1,
- 1.523
], - "left_eye_height_to_eyebrow_distance": [
- 1,
- 2.69
], - "right_eye_height_to_eyebrow_distance": [
- 1,
- 2.775
], - "overall_eye_height_to_eyebrow_distance": [
- 1,
- 2.733
], - "nose_aspect_ratio": [
- 1,
- 1.172
], - "nose_width_to_mouth_width": [
- 1,
- 1.475
], - "nose_to_lip_to_chin": [
- 1,
- 2.098
], - "upper_lip_to_lower_lip": [
- 1,
- 1.099
]
}, - "cheekbone": {
- "left": "Flat Cheekbone",
- "right": "Flat Cheekbone",
- "overrall": "Flat Cheekbone"
}, - "eyelid": {
- "left_eyelid": "Hooded-lid",
- "left_angle": "Downturned",
- "left_shape": "Narrow",
- "right_eyelid": "Hooded-lid",
- "right_angle": "Downturned",
- "right_shape": "Narrow",
- "setting": "Close-set",
- "size": "Big"
}, - "eyebrow": {
- "gap": "Far-Apart",
- "left_shape": "Hard Angled",
- "left_body_thickness": "Dense",
- "left_tail_thickness": "Dense",
- "left_thinness": "Thin",
- "left_shortness": "Short",
- "right_shape": "Hard Angled",
- "right_body_thickness": "Dense",
- "right_tail_thickness": "Dense",
- "right_thinness": "Thin",
- "right_shortness": "Short"
}, - "faceshape": "Triangle",
- "lipshape": [
- "Bow"
], - "nose": {
- "width": "Narrow",
- "length": "Long"
}, - "color": {
- "eye_color": "string",
- "eye_color_name": "Amber",
- "lip_color": "string",
- "eyebrow_color": "string",
- "hair_color": "#a0a0a0",
- "hair_color_name": "Auburn"
}, - "agegender": {
- "age": 0,
- "gender": "female"
}
}
}
}AI Aging Generator
AI aging generator utilizing generative AI model to generate a series of photos from youth to age from a single selfie image. With the help of AI technology, not only can it measure your current age, but it also lets you see yourself in the future or the past.

The AI aging generator can generate a series of photos based on one single input selfie image. A sample generated photos are shown below as a quick reference of this feature.

Create a new file.
To upload a new file, you'll first need to use the File API. It will give you a URL – use that URL to upload your file. Once the upload is finished, you can use the file_id from the same response to start using our AI features.
Authorizations:
Request Body schema: application/jsonrequired
required | Array of objects |
Responses
Request samples
- Payload
- curl
- Node.js
- JavaScript
- PHP
- Python
- Java
{- "files": [
- {
- "content_type": "image/jpg",
- "file_name": "my-selfie.jpg",
- "file_size": 50000
}
]
}Response samples
- 200
- 400
- 401
{- "status": 200,
- "data": {
- "files": [
- {
- "content_type": "image/jpg",
- "file_name": "my-selfie.jpg",
- "file_id": "U8aqJbsXGT537jtGnEDFHqxdDXqh8+oTF/cSkLimzuvVwMP+Jb1XbjPsf7ZgUgLY",
- "requests": [
- {
- "headers": {
- "Content-Type": "image/jpg",
- "Content-Length": 50000
}, - "method": "PUT"
}
]
}
]
}
}Run a AI Aging Generator task.
Once you start an AI task, you need to keep polling at given polling_interval to check its status until it shows either success or error because if you don't, the task will time out and when you try to check the status later, you'll get an InvalidTaskId error even if the task did finish successfully and your units will still be consumed.
Authorizations:
Request Body schema: application/jsonrequired
| src_file_url required | string Url of the file to run task. The url should be publicly accessible. |
Responses
Request samples
- Payload
- curl
- Node.js
- JavaScript
- PHP
- Python
- Java
{
}Response samples
- 200
- 400
- 401
{- "status": 200,
- "data": {
- "task_id": "grH0CvsgXuAIHLUzD0V1Ol34hoet3R1tvdbtiVHrDb6_UqCLKIejAIajwxrhOAfe"
}
}Check the status of a AI Aging Generator task.
Authorizations:
path Parameters
| task_id required | string Example: grH0CvsgXuAIHLUzD0V1Ol34hoet3R1tvdbtiVHrDb6_UqCLKIejAIajwxrhOAfe ID of task to check |
Responses
Request samples
- curl
- Node.js
- JavaScript
- PHP
- Python
- Java
curl --request GET \ --url https://yce-api-01.makeupar.com/s2s/v2.0/task/aging/grH0CvsgXuAIHLUzD0V1Ol34hoet3R1tvdbtiVHrDb6_UqCLKIejAIajwxrhOAfe \ --header 'Authorization: Bearer <access_token for v1, API Key for v2>'
Response samples
- 200
- 400
- 401
- 500
{- "status": 200,
- "data": {
- "task_status": "running",
- "error": "exceed_max_filesize",
- "error_message": "string",
- "results": {
- "age": 21,
- "agd_idx": 2,
- "age_min": 12,
- "age_max": 70,
- "num_of_photos": 16
}
}
}AI Breast Augmentation Simulator
AI Breast Augmentation Simulator provides a powerful, non-invasive solution for reshaping your body, no surgery, no recovery time required. With advanced AI technology, you can instantly visualize and explore your ideal appearance, preview before-and-after results, and achieve professional-quality enhancements with ease and simplicity.
Enhance your photos naturally by refining your silhouette or correcting perspective issues. For instance, if you’re seeking a more balanced or proportionate upper-body appearance, AI Breast Augmentation Simulator offers AI-powered bust contour enhancement. This feature uses intelligent algorithms to gently add definition and volume where desired, creating subtle, realistic improvements that maintain your natural features and proportions. The result is a confident, polished look without artificial-looking distortion.

Unlike traditional filters that often produce exaggerated or unrealistic effects, this tool delivers clean, authentic edits tailored to your unique anatomy. Whether you’re preparing images for social media, personal use, or creative projects, the enhancements remain true to life while highlighting your best qualities.
To begin exploring virtual body refinement, simply create an AI Breast Augmentation Simulator task and adjust the intensity gradually to achieve your desired look. From there, adjust parameters such as augmentation intensity to match your aesthetic preferences, all within a user-friendly API designed for both beginners and experienced users.

This guide walks you through:
Workflow for AI Breast Augmentation Simulator API:
Endpoint: /s2s/v2.0/file/breast-shape
Authentication Required: Authorization: Bearer YOUR_API_KEY
Workflow Steps:
Image Upload Preparation:
- The process begins with preparing a bust shot selfie.
AI Breast Augmentation Simulator Settings For AI Breast Augmentation Simulator, control the degree of enhancement by adjusting the intensity level, which ranges from 1 (subtle) to 3 (pronounced). Start with a lower setting and incrementally increase it to achieve a natural-looking result that aligns with your aesthetic preference. Gradual adjustment helps ensure realistic and proportionate outcomes.
Initiate AI Task and Obtain Task ID:
- Send the uploaded image along with the parameter configuration via an HTTP POST request to
/s2s/v2.0/file/breast-shape. - Await a unique task ID in the response, which identifies this interaction.
- Send the uploaded image along with the parameter configuration via an HTTP POST request to
Poll Task Status (Continuous Check):
- Use the obtained
task_idto periodically poll the task status using an HTTP GET request (e.g.,GET /task/${task_id}). - Continuously monitor for:
Task_status = "success"(process completed).Task_status = "error"(resolve or retry if applicable).
- Update the workflow accordingly once the status transitions to success.
- Use the obtained
This structured workflow ensures efficient integration with user inputs, automated monitoring of tasks, and seamless retrieval of results.
Authentication
- Include your API key in the request header using Bearer Token:
You can find your API Key at https://yce.makeupar.com/api-console/en/api-keys/.Authorization: Bearer YOUR_API_KEY
Upload an Image
You may upload a file directly to the server or provide a valid image URL in the AI task payload.
Upload Endpoint
POST /s2s/v2.0/file/breast-shape
Alternatively, skip this step if you already have a public image URL.
Adjust AI Breast Augmentation Simulator Intensity
AI Breast Augmentation Simulator Settings
For AI Breast Augmentation Simulator, control the degree of modification by setting the intensity level between 1 and 3, where:
- Level 1 provides subtle, natural-looking adjustments ideal for minor refinement.
- Level 2 offers moderate enhancement, balancing realism with noticeable improvement.
- Level 3 delivers the most pronounced effect, suitable for significant reshaping while preserving anatomical plausibility.
Select the intensity level that best aligns with your aesthetic goals and desired look.
Create a AI Breast Augmentation Simulator AI Task and Poll for Results
After uploading an image and selecting your preferred intensity level, you may proceed to start the enhancement task. The API processes the request asynchronously. You must poll the task status until it reaches success or error.
Create Task Endpoint
POST /s2s/v2.0/task/breast-shape
Polling Endpoint
GET /s2s/v2.0/task/breast-shape/{task_id}
AI Breast Augmentation Simulator Specification
Image Requirements and Recommendations for Optimal Results
Resolution Guidelines: The longest side of the input image must not exceed 4096 pixels. For best performance, ensure that the upper body region—defined as the area from the top of the head down to and including the chest—is rendered at a resolution of at least 1024 × 768 pixels.
Subject Requirements:
- The image must contain at least one fully detectable person. Both shoulders should be clearly visible in-frame.
- The chest area must be visible. This includes both clothed and unclothed scenarios, provided the subject is facing primarily forward (i.e., yaw angle between −90° and +90°). A frontal view is strongly preferred over angled or profile poses.
Recommended Practices for Enhanced Outcomes:
- Prioritize upper-body composition: the image should either focus specifically on the upper body, or—if the full figure is included—the upper body region should occupy a substantial portion of the frame and exceed 1024 pixels in its longest dimension.
- Use frontal poses exclusively; avoid side-facing or significantly rotated positions, as these reduce detection accuracy and result quality.
- For the most natural-looking enhancement of the chest contour, select attire that exposes some skin around the bust area—such as swimwear, low-cut tops, or V-neck garments. These styles allow the AI to better infer underlying structure and produce subtle, realistic cleavage effects.
- The system supports only single-subject images. In cases where multiple people appear in the frame, processing will automatically target the individual with the largest visible shoulder span (i.e., the person closest to or most centrally aligned with the camera).
- Avoid occlusions over the chest region. Objects such as bags, backpack straps, scarves, necklaces, or other accessories may be incorrectly removed or cause artifacts during editing.
- Clothing appearance may differ from the original image. The degree of modification depends on the intensity setting: higher enhancement levels produce more pronounced changes, including visible alterations to garment shape, fit, and drape around the chest area.
Following these guidelines ensures optimal input quality and maximizes the fidelity, realism, and consistency of the AI-generated enhancements.

Supported Formats & Dimensions
| AI Feature | Supported Dimensions | Supported File Size | Supported Formats |
|---|---|---|---|
| AI Breast Augmentation Simulator | minimum: 512x384 maximum: long side < 4096 |
< 10MB | jpg/jpeg/png |
Error Codes
| Error Code | Description |
|---|---|
invalid_parameter |
The provided parameters are invalid—specifically, one or more of the required fields (src_keys, dst_keys, or acts) are missing, malformed, or contain unsupported values. |
exceed_max_filesize |
The input image exceeds the maximum allowed file size (10 MB). Please compress or resize the image before submission. |
error_download_image |
The system failed to download the source image, likely due to network issues, an invalid URL, or inaccessible resource permissions. |
error_decode_image |
The downloaded image could not be decoded—this may result from file corruption, unsupported format, or invalid binary data. |
error_nsfw_content_detected |
Potential Not Safe For Work (NSFW) content has been detected either in the source image or in the generated output image. Processing was aborted for compliance and safety reasons. |
error_pose |
Human pose estimation failed; no full-body or upper-body skeleton could be reliably detected, preventing subsequent anatomical analysis. |
error_breast_region_detection |
The system attempted to detect the breast region based on pose and segmentation cues but was unable to locate a valid, identifiable chest area (e.g., due to occlusion, extreme angle, or insufficient visibility). |
Environment & Dependency
| Sample Code Language / Tool | Recommended Runtime Versions |
|---|---|
| cURL | - bash >= 3.2 - curl >= 7.58 (modern TLS/HTTP support) - jq >= 1.6 (robust JSON parsing) |
| Node.js (JavaScript) | Node >= 18 (for global fetch) |
| JavaScript | - Chrome / Edge >= 80 - Firefox >= 74 - Safari >= 13.1 |
| PHP | PHP >= 7.4 (for modern TLS/compat), ext-curl (recommended) or allow_url_fopen=On + ext-openssl, ext-json |
| Python | Python >= 3.10 (for f-strings), requests >= 2.20.0 |
| Java | Java 11+ (for HttpClient), Jackson Databind >= 2.12.0 |
Create a new file.
To upload a new file, you'll first need to use the File API. It will give you a URL – use that URL to upload your file. Once the upload is finished, you can use the file_id from the same response to start using our AI features.
Authorizations:
Request Body schema: application/jsonrequired
required | Array of objects |
Responses
Request samples
- Payload
- curl
- Node.js
- JavaScript
- PHP
- Python
- Java
{- "files": [
- {
- "content_type": "image/jpg",
- "file_name": "my-selfie.jpg",
- "file_size": 50000
}
]
}Response samples
- 200
- 400
- 401
{- "status": 200,
- "data": {
- "files": [
- {
- "content_type": "image/jpg",
- "file_name": "my-selfie.jpg",
- "file_id": "U8aqJbsXGT537jtGnEDFHqxdDXqh8+oTF/cSkLimzuvVwMP+Jb1XbjPsf7ZgUgLY",
- "requests": [
- {
- "headers": {
- "Content-Type": "image/jpg",
- "Content-Length": 50000
}, - "method": "PUT"
}
]
}
]
}
}Run an AI Breast Augmentation Simulator task.
Once you start an AI task, you need to keep polling at given polling_interval to check its status until it shows either success or error because if you don't, the task will time out and when you try to check the status later, you'll get an InvalidTaskId error even if the task did finish successfully and your units will still be consumed.
Authorizations:
Request Body schema: application/jsonrequired
| src_file_url required | string Url of the file to run task. The url should be publicly accessible. |
| intensity | integer Default: 2 Enum: 1 2 3 The intensity the users wish to adjust their breast, 3 is the strongest intensity. |
Responses
Request samples
- Payload
- curl
- Node.js
- JavaScript
- PHP
- Python
- Java
{- "intensity": 2
}Response samples
- 200
- 400
- 401
{- "status": 200,
- "data": {
- "task_id": "grH0CvsgXuAIHLUzD0V1Ol34hoet3R1tvdbtiVHrDb6_UqCLKIejAIajwxrhOAfe"
}
}Check the status of a AI Breast Augmentation Simulator task.
Authorizations:
path Parameters
| task_id required | string Example: grH0CvsgXuAIHLUzD0V1Ol34hoet3R1tvdbtiVHrDb6_UqCLKIejAIajwxrhOAfe ID of task to check |
Responses
Request samples
- curl
- Node.js
- JavaScript
- PHP
- Python
- Java
curl --request GET \ --url https://yce-api-01.makeupar.com/s2s/v2.0/task/breast-shape/grH0CvsgXuAIHLUzD0V1Ol34hoet3R1tvdbtiVHrDb6_UqCLKIejAIajwxrhOAfe \ --header 'Authorization: Bearer <access_token for v1, API Key for v2>'
Response samples
- 200
- 400
- 401
- 500
{- "status": 200,
- "data": {
- "task_status": "running",
- "error": "exceed_max_filesize",
- "error_message": "string",
}
}Create a new file.
To upload a new file, you'll first need to use the File API. It will give you a URL – use that URL to upload your file. Once the upload is finished, you can use the file_id from the same response to start using our AI features.
Authorizations:
Request Body schema: application/jsonrequired
required | Array of objects |
Responses
Request samples
- Payload
- curl
- Node.js
- JavaScript
- PHP
- Python
- Java
{- "files": [
- {
- "content_type": "image/jpg",
- "file_name": "my-selfie.jpg",
- "file_size": 50000
}
]
}Response samples
- 200
- 400
- 401
{- "status": 200,
- "data": {
- "files": [
- {
- "content_type": "image/jpg",
- "file_name": "my-selfie.jpg",
- "file_id": "U8aqJbsXGT537jtGnEDFHqxdDXqh8+oTF/cSkLimzuvVwMP+Jb1XbjPsf7ZgUgLY",
- "requests": [
- {
- "headers": {
- "Content-Type": "image/jpg",
- "Content-Length": 50000
}, - "method": "PUT"
}
]
}
]
}
}Run an AI Smile task.
Once you start an AI task, you need to keep polling at given polling_interval to check its status until it shows either success or error because if you don't, the task will time out and when you try to check the status later, you'll get an InvalidTaskId error even if the task did finish successfully and your units will still be consumed.
Authorizations:
Request Body schema: application/jsonrequired
| src_file_url required | string Url of the file to run task. The url should be publicly accessible. |
| expression_type required | string Enum: "smile_with_teeth_visible" "closed_mouth_smile" |
Responses
Request samples
- Payload
- curl
- Node.js
- JavaScript
- PHP
- Python
- Java
{- "expression_type": "smile_with_teeth_visible"
}Response samples
- 200
- 400
- 401
{- "status": 200,
- "data": {
- "task_id": "grH0CvsgXuAIHLUzD0V1Ol34hoet3R1tvdbtiVHrDb6_UqCLKIejAIajwxrhOAfe"
}
}Check the status of a AI Smile task.
Authorizations:
path Parameters
| task_id required | string Example: grH0CvsgXuAIHLUzD0V1Ol34hoet3R1tvdbtiVHrDb6_UqCLKIejAIajwxrhOAfe ID of task to check |
Responses
Request samples
- curl
- Node.js
- JavaScript
- PHP
- Python
- Java
curl --request GET \ --url https://yce-api-01.makeupar.com/s2s/v2.0/task/ai-smile/grH0CvsgXuAIHLUzD0V1Ol34hoet3R1tvdbtiVHrDb6_UqCLKIejAIajwxrhOAfe \ --header 'Authorization: Bearer <access_token for v1, API Key for v2>'
Response samples
- 200
- 400
- 401
- 500
{- "status": 200,
- "data": {
- "task_status": "running",
- "error": "exceed_max_filesize",
- "error_message": "string",
}
}Create a new file.
To upload a new file, you'll first need to use the File API. It will give you a URL – use that URL to upload your file. Once the upload is finished, you can use the file_id from the same response to start using our AI features.
Authorizations:
Request Body schema: application/jsonrequired
required | Array of objects |
Responses
Request samples
- Payload
- curl
- Node.js
- JavaScript
- PHP
- Python
- Java
{- "files": [
- {
- "content_type": "image/jpg",
- "file_name": "my-selfie.jpg",
- "file_size": 50000
}
]
}Response samples
- 200
- 400
- 401
{- "status": 200,
- "data": {
- "files": [
- {
- "content_type": "image/jpg",
- "file_name": "my-selfie.jpg",
- "file_id": "U8aqJbsXGT537jtGnEDFHqxdDXqh8+oTF/cSkLimzuvVwMP+Jb1XbjPsf7ZgUgLY",
- "requests": [
- {
- "headers": {
- "Content-Type": "image/jpg",
- "Content-Length": 50000
}, - "method": "PUT"
}
]
}
]
}
}Run an AI Fitzpatrick Scale Analyzer detection task.
Once you start an AI task, you need to keep polling at given polling_interval to check its status until it shows either success or error because if you don't, the task will time out and when you try to check the status later, you'll get an InvalidTaskId error even if the task did finish successfully and your units will still be consumed.
Authorizations:
Request Body schema: application/jsonrequired
| src_file_url required | string Url of the file to run task. The url should be publicly accessible. |
Responses
Request samples
- Payload
- curl
- Node.js
- JavaScript
- PHP
- Python
- Java
{
}Response samples
- 200
- 400
- 401
{- "status": 200,
- "data": {
- "task_id": "grH0CvsgXuAIHLUzD0V1Ol34hoet3R1tvdbtiVHrDb6_UqCLKIejAIajwxrhOAfe"
}
}Check the status of a AI Fitzpatrick Scale Analyzer detection task.
Authorizations:
path Parameters
| task_id required | string Example: grH0CvsgXuAIHLUzD0V1Ol34hoet3R1tvdbtiVHrDb6_UqCLKIejAIajwxrhOAfe ID of task to check |
Responses
Request samples
- curl
- Node.js
- JavaScript
- PHP
- Python
- Java
curl --request GET \ --url https://yce-api-01.makeupar.com/s2s/v2.0/task/fitzpatrick-scale-analyzer/pre-process/grH0CvsgXuAIHLUzD0V1Ol34hoet3R1tvdbtiVHrDb6_UqCLKIejAIajwxrhOAfe \ --header 'Authorization: Bearer <access_token for v1, API Key for v2>'
Response samples
- 200
- 400
- 401
- 500
{- "status": 200,
- "data": {
- "task_status": "running",
- "error": "exceed_max_filesize",
- "error_message": "string",
- "results": {
- "timed": 0,
- "result": [
- {
- "left": 0,
- "top": 0,
- "width": 0,
- "height": 0
}
]
}
}
}Run an AI Fitzpatrick Scale Analyzer task.
Once you start an AI task, you need to keep polling at given polling_interval to check its status until it shows either success or error because if you don't, the task will time out and when you try to check the status later, you'll get an InvalidTaskId error even if the task did finish successfully and your units will still be consumed.
Authorizations:
Request Body schema: application/jsonrequired
| src_file_url required | string Url of the file to run task. The url should be publicly accessible. |
| version required | string Value: "1.0" Version of the features specification. Defaults to |
| index | integer Default: 0 The index of the person from detection task result. |
Responses
Request samples
- Payload
- curl
- Node.js
- JavaScript
- PHP
- Python
- Java
{- "version": "1.0",
- "index": 0
}Response samples
- 200
- 400
- 401
{- "status": 200,
- "data": {
- "task_id": "grH0CvsgXuAIHLUzD0V1Ol34hoet3R1tvdbtiVHrDb6_UqCLKIejAIajwxrhOAfe"
}
}Check the status of a AI Fitzpatrick Scale Analyzer task.
Authorizations:
path Parameters
| task_id required | string Example: grH0CvsgXuAIHLUzD0V1Ol34hoet3R1tvdbtiVHrDb6_UqCLKIejAIajwxrhOAfe ID of task to check |
Responses
Request samples
- curl
- Node.js
- JavaScript
- PHP
- Python
- Java
curl --request GET \ --url https://yce-api-01.makeupar.com/s2s/v2.0/task/fitzpatrick-scale-analyzer/grH0CvsgXuAIHLUzD0V1Ol34hoet3R1tvdbtiVHrDb6_UqCLKIejAIajwxrhOAfe \ --header 'Authorization: Bearer <access_token for v1, API Key for v2>'
Response samples
- 200
- 400
- 401
- 500
{- "status": 200,
- "data": {
- "task_status": "running",
- "error": "exceed_max_filesize",
- "error_message": "string",
- "results": {
- "fitzpatrick_scale": "I",
- "timed": 0
}
}
}AI Makeup Virtual Try-On API Documentation
The AI Makeup API provides a powerful, hyper-realistic virtual makeover experience powered by our patented face-analyzing technology. This service enables your applications to apply true-to-life makeup effects onto user-provided selfie images with unprecedented customization capabilities.
Key Features:
- Hyper-realistic Rendering: Leverages revolutionary 3D face AI technology for the most realistic makeovers.
- Patented Technology: Powered by jitter-free, lag-free deep learning algorithms optimized for all ages and ethnicities.
- Real-time Precision: Ultra-precise facial tracking that adapts to various lighting conditions.
- True-to-life Matching: Accurately matches real-world product colors, textures (from matte to metallic), and finishes.
Core Concepts
Color Blending
Our AI accurately matches the color of real-life makeup products using deep learning. This ensures consumers are confident that the virtual color they see is the true color of the product they intend to purchase.
Texture & Finish Matching
The technology simulates realistic textures and finishes, providing a highly accurate makeover experience. From matte to metallic, shimmer to satin, the AI taps into advanced algorithms to render these effects seamlessly in real-time.
Light Balancing
The smart 3D AI engine detects lighting conditions in the user's photo or video feed. It corrects images for true-to-life makeup application, ensuring a consistent and high-quality result regardless of the environment.
The Makeup Virtual Try-On service operates as an asynchronous task. You must first initiate a makeup processing task by providing the image URL and a list of desired effects. The server responds with a task_id. You then periodically poll a status endpoint to retrieve the final result or any errors.
- Endpoint:
/v2.0/task/makeup-vto - Authentication: All requests require an
Authorization: Bearer <TOKEN> - Workflow:
- Prepare a selfie: Upload an image or use existing file url of a face image.
- Start Task (
POST): Submit your image id/URL and makeup configuration. - Retrieve Task ID: Capture the
task_idfrom the response. - Poll Status (
GET): Use thetask_idto check the status of the task. Continue polling untiltask_statusis"success"or"error".
API Playground
Interactively explore and test the API using our official playground:
API Playground: http://yce.makeupar.com/api-console/en/api-playground/ai-makeup-virtual-try-on/
Authentication
- Include your API key in the request header using Bearer Token:
You can find your API Key at https://yce.makeupar.com/api-console/en/api-keys/.Authorization: Bearer <API Key>
1. Upload a Selfie
You can provide the source image in one of two ways:
Use an Existing Public Image URL Instead of uploading, you may supply a publicly accessible image URL directly when initiating the AI task.
Upload via File API Use the endpoint:
POST /s2s/v2.0/file/makeup-vtoThis returns a
file_idfor subsequent task execution.Important: Simply calling the File API does not upload your file. You must manually upload the file to the URL provided in the File API response. That URL is your upload destination, make sure the file is successfully transferred there before proceeding.
Before calling the AI API, ensure your file has been successfully uploaded. Use the File API to retrieve an upload URL, then upload your file to that location. Once the upload is complete, you'll receive a file_id in the response, this ID is what you'll use to access AI features related to that file.Warning: Please note that, you will get an 500 Server Error / unknown_internal_error or 404 Not Found error when using AI APIs if you do not upload the file to the URL provided in the File API response.
2. Start Makeup Task
POST /s2s/v2.0/task/makeup-vto
Initiates a new virtual makeup task on the provided image. This endpoint is asynchronous and returns with a task_id.
Request Headers
| Header | Value |
|---|---|
| Content-Type | application/json |
| Authorization | Bearer YOUR_API_KEY |
Example Request Body
{
"src_file_url": "https://plugins-media.makeupar.com/strapi/assets/sample_Image_1_202b6bf6e6.jpg",
"effects": [
{
"category": "blush",
"pattern": { "name": "2colors6" },
"palettes": [
{ "color": "#FF0000", "texture": "matte", "colorIntensity": 50 },
{ "color": "#F2A53E", "texture": "matte", "colorIntensity": 50 }
]
},
{
"category": "eye_liner",
"pattern": { "name": "3colors5" },
"palettes": [
{ "color": "#000000", "texture": "matte", "colorIntensity": 50 },
{ "color": "#BA0656", "texture": "matte", "colorIntensity": 50 },
{ "color": "#089085", "texture": "matte", "colorIntensity": 50 }
]
}
],
"version": "1.0"
}
Request Body Schema
| Field | Type | Description |
|---|---|---|
src_file_url |
string (URL) | A publicly accessible URL to the selfie image to be processed. |
effects |
array |
An array of makeup effects objects to apply. See Makeup Effect Schemas for details. |
version |
string | The API version of the effect payload structure. Use "1.0". |
Successful Response (200 OK)
Returns a JSON object containing the task identifier.
Response Body Schema:
{
"status": 200,
"data": {
"task_id": "<string>"
}
}
Example Response:
{
"status": 200,
"data": {
"task_id": "grH0CvsgXuAIHLUzD0V1Ol34hoet3R1tvdbtiVHrDb6_UqCLKIejAIajwxrhOAfe"
}
}
Error Responses (400 Bad Request, 401 InvalidApiKey, etc.)
A standard error object will be returned with a message describing the failure.
Example Error Response:
{
"status": 400,
"error": "The operation could not be completed",
"error_code": "CreditInsufficiency"
}
3. Get Task Status & Results
GET /s2s/v2.0/task/makeup-vto/<task_id>
Retrieves the current status and results of an in-progress or completed task.
Request Headers
| Header | Value |
|---|---|
| Authorization | Bearer YOUR_API_KEY |
Path Parameters
| Parameter | Type | Description |
|---|---|---|
| task_id | string | The identifier returned from the start-task endpoint. |
Successful Response (200 OK)
A JSON object containing the status and, if completed, the results.
Response Body Schema:
{
"data": {
"task_status": "<string>", // 'success', 'error', or a processing state (e.g., 'queued', 'processing')
"results": [ // present only when task_status is 'success'
{
"download_url": "<string>" // URL to download the processed image
}
],
"failure_reason": "<string>" // present only when task_status is 'error'
}
}
Example Success Response:
{
"status": 200,
"data": {
"task_status": "success",
"results": {
"url": "https://s3.storage.prod/processed/image_123.jpg?token=..."
}
}
}
Example Engine Error Response: The API query was sent successfully; however, an error occurred while executing the AI task.
{
"status": 200,
"data": {
"task_status": "error",
"error": "exceed_max_filesize",
"error_message": "string",
}
}
Please note that no units will be consumed if an error occurs, whether it is a query error or an engine error.
Example In-Progress Response:
{
"status": 200,
"data": {
"task_status": "running"
}
}
Error Responses
404 InvalidTaskId: Thetask_iddoes not exist or is invalid.401 InvalidApiKey: The API key is invalid or missing.500 TaskTimeout: The task has either completed successfully or failed and has exceeded the retention period.
Example Query Error Response:
{
"status": 401,
"error_code": "InvalidApiKey"
}
Please note that no units will be consumed if an error occurs, whether it is a query error or an engine error.
Makeup Effect Schema
This section defines the complete structure and constraints for the request body of an AI Makeup task. Each effect is an object in the top-level effects array.
Effect Container (Top Level)
{
"version": "1.0",
"effects": [] // array<Effect> — Contains makeup effect objects
}
Makeup Effect Categories
skin_smooth
{
"category": "skin_smooth", // string, const "skin_smooth"
"skinSmoothStrength": 50, // integer, range: 0..100
"skinSmoothColorIntensity": 50 // integer, range: 0..100
}
Note! If no
skin_smootheffect is included in the request, the AI Makeup Engine will automatically apply a default Skin Smooth value of 50. Set allskinSmoothStrengthandskinSmoothColorIntensityparameters to 0 if you want makeup applied with no skin smoothing. However, for best results and highest-quality blending, it is recommended to leave the default skin smoothing enabled.
blush
{
"category": "blush", // string, const "blush"
"pattern": { // object
"name": "" // string — MUST equal a `label` from blush.json
},
"palettes": [ // array<BlushPalette>, minItems: (see colorNum in pattern)
{
"color": "#ff0000", // string, hex color "#RRGGBB"
"texture": "matte", // string, enum ["matte","satin","shimmer"]
"glowStrength": 50, // integer, range: 0..100 — REQUIRED if texture="satin"
"shimmerColor": "#fc288f", // string, hex color "#RRGGBB" — REQUIRED if texture="shimmer"
"shimmerDensity": 50, // integer, range: 0..100 — REQUIRED if texture="shimmer"
"colorIntensity": 50 // integer, range: 0..100
}
]
}
Full Pattern Catalog: https://plugins-media.makeupar.com/wcm-saas/patterns/blush.json
Distinct Makeup Pattern Categories:
[
{
"category": "1 color",
"label": "1color1",
"thumbnail": "https://app-cdn-01.makeupar.com/console/customer/guest/SkuCustomImage/483/a53cd4f4-43b6-4e19-b85a-ec7a95c6a47f.jpg",
"tags": [
{ "id": 100, "name": "Blush 3D" },
{ "id": 103, "name": "Oblong" }
],
"colorNum": 1
},
{
"category": "2 colors",
"label": "2colors1",
"thumbnail": "https://app-cdn-01.makeupar.com/console/customer/guest/SkuCustomImage/147/a8d86a4b-8aa0-48d7-a716-63ec78dfb30b.jpg",
"tags": [
{ "id": 100, "name": "Blush 3D" }
],
"colorNum": 2
},
{
"category": "3 colors",
"label": "3colors1",
"thumbnail": "https://app-cdn-01.makeupar.com/console/customer/guest/SkuCustomImage/734/af8b625b-ae3a-4211-9413-f22c16a5f174.jpg",
"tags": [
{ "id": 100, "name": "Blush 3D" },
{ "id": 104, "name": "Round" }
],
"colorNum": 3
}
]
bronzer
{
"category": "bronzer", // string, const "bronzer"
"pattern": { "name": "" }, // object — name MUST equal a `label` from bronzer.json
"palettes": [
{ "color": "#ff0000", "colorIntensity": 50 } // hex color, int range: 0..100
]
}
Full Pattern Catalog: https://plugins-media.makeupar.com/wcm-saas/patterns/bronzer.json
Distinct Makeup Pattern Categories:
[
{
"category": "Bronzer",
"label": "Bronzer1",
"thumbnail": "https://app-cdn-01.makeupar.com/console/SkuCustomImage/guest/973/22ff2c07-d584-4ae6-8281-c095cd121a52.jpg",
"tags": [],
"colorNum": 1
}
]
concealer
{
"category": "concealer", // string, const "concealer"
"palettes": [
{
"color": "#ff0000", // string, hex color "#RRGGBB"
"colorIntensity": 50, // integer, range: 0..100
"colorUnderEyeIntensity": 50, // integer, range: 0..100
"coverageLevel": 50 // integer, range: 0..100
}
]
}
contour
{
"category": "contour", // string, const "contour"
"pattern": { "name": "" }, // object — name MUST equal a `label` from contour.json
"palettes": [
{ "color": "#ff0000", "colorIntensity": 50 } // hex color, int range: 0..100
]
}
Full Pattern Catalog: https://plugins-media.makeupar.com/wcm-saas/patterns/contour.json
Distinct Makeup Pattern Categories:
[
{
"category": "Heart face",
"label": "HeartFace2",
"thumbnail": "https://app-cdn-01.makeupar.com/console/customer/guest/SkuCustomImage/731/49a1b3b9-b393-4bf4-b486-1493fe468436.jpg",
"tags": []
},
{
"category": "Invtriangle",
"label": "Invtriangle1",
"thumbnail": "https://app-cdn-01.makeupar.com/console/customer/guest/SkuCustomImage/858/a94c8cca-5f8c-4b8b-a02d-94edb6a4ad7f.jpg",
"tags": []
},
{
"category": "Oval face",
"label": "OvalFace6",
"thumbnail": "https://app-cdn-01.makeupar.com/console/SkuCustomImage/guest/906/644368a3-7eee-4ad9-829e-e2b3d4320fec.jpg",
"tags": []
},
{
"category": "Round face",
"label": "RoundFace4",
"thumbnail": "https://app-cdn-01.makeupar.com/console/customer/guest/SkuCustomImage/106/3e455b5f-7e2d-46f7-8627-dc137051c144.jpg",
"tags": []
},
{
"category": "Triangle face",
"label": "TriangleFace2",
"thumbnail": "https://app-cdn-01.makeupar.com/console/customer/guest/SkuCustomImage/528/18765180-c254-4411-a25c-c1d78f5c3d77.jpg",
"tags": []
}
]
eyebrows
{
"category": "eyebrows", // string, const "eyebrows"
"pattern": {
"type": "shape", // string, enum ["shape","color"], default: "shape"
"name": "", // string, required when type="shape" — label from eyebrows.json
"curvature": 0, // integer, range: -100..100 (shape only)
"thickness": 0, // integer, range: -100..100 (shape only)
"definition": 0 // integer, range: 0..100 (shape only)
},
"palettes": [
{
"color": "#ff0000", // string, hex color "#RRGGBB"
"colorIntensity": 50, // integer, range: 0..100
"texture": "matte", // string, enum ["matte","shimmer"]
"shimmerColor": "#fc288f", // string, hex color "#RRGGBB" — REQUIRED if texture="shimmer"
"shimmerIntensity": 50, // integer, range: 0..100 — REQUIRED if texture="shimmer"
"shimmerSize": 50, // integer, range: 0..100 — REQUIRED if texture="shimmer"
"shimmerDensity": 50 // integer, range: 0..100 — REQUIRED if texture="shimmer"
}
]
}
Full Pattern Catalog: https://plugins-media.makeupar.com/wcm-saas/patterns/eyebrows.json
Distinct Makeup Pattern Categories:
[
{
"category": "Arrow",
"label": "Arrow1",
"thumbnail": "https://app-cdn-01.makeupar.com/console/SkuCustomImage/guest/490/1fb96bf9-979e-4327-a8c4-8c503f541f1a.jpg",
"tags": []
},
{
"category": "Curved",
"label": "Curved1",
"thumbnail": "https://app-cdn-01.makeupar.com/console/SkuCustomImage/guest/389/1ccb300e-c7ed-4995-920e-7d1bf8da1fad.jpg",
"tags": []
},
{
"category": "Drama",
"label": "Drama2",
"thumbnail": "https://app-cdn-01.makeupar.com/console/SkuCustomImage/guest/196/5fb14bec-553d-4841-bba7-ca7e5e27c12e.jpg",
"tags": []
},
{
"category": "High Arch",
"label": "HighArch1",
"thumbnail": "https://app-cdn-01.makeupar.com/console/SkuCustomImage/guest/609/7a8676dc-6f6a-4b12-aab0-c50328e448c5.jpg",
"tags": []
},
{
"category": "Original",
"label": "Original2",
"thumbnail": "https://app-cdn-01.makeupar.com/console/customer/guest/SkuCustomImage/300/123551e9-ca94-4732-89ed-5b3866678555.jpg",
"tags": []
},
{
"category": "Soft Arch",
"label": "SoftArch1",
"thumbnail": "https://app-cdn-01.makeupar.com/console/customer/guest/SkuCustomImage/121/2552ebf0-2705-43f7-b295-4fac21e18009.jpg",
"tags": []
},
{
"category": "Straight",
"label": "Straight1",
"thumbnail": "https://app-cdn-01.makeupar.com/console/customer/guest/SkuCustomImage/1/7734e777-8e51-41f1-abaf-205f0ed5e3b4.jpg",
"tags": []
},
{
"category": "Thin",
"label": "Thin1",
"thumbnail": "https://app-cdn-01.makeupar.com/console/customer/guest/SkuCustomImage/734/6ee10843-a251-4aa0-9183-db7f981d714d.jpg",
"tags": []
},
{
"category": "Upward",
"label": "Upward4",
"thumbnail": "https://app-cdn-01.makeupar.com/console/customer/guest/SkuCustomImage/751/76578317-f475-49c7-bd96-910ccad617ef.jpg",
"tags": []
}
]
eye_liner
{
"category": "eye_liner", // string, const "eye_liner"
"pattern": { "name": "" }, // object — name MUST equal a label from eyeliner.json
"palettes": [
{
"color": "#ff0000", // string, hex color "#RRGGBB"
"texture": "matte", // string, enum ["matte","shimmer","metallic"]
"shimmerColor": "#fc288f", // string, hex color "#RRGGBB" — REQUIRED if texture in ["shimmer","metallic"]
"shimmerIntensity": 50, // integer, range: 0..100 — REQUIRED if texture in ["shimmer","metallic"]
"metallicIntensity": 50, // integer, range: 0..100 — REQUIRED if texture="metallic"
"colorIntensity": 50 // integer, range: 0..100
}
]
}
Full Pattern Catalog: https://plugins-media.makeupar.com/wcm-saas/patterns/eyeliner.json
Distinct Makeup Pattern Categories:
[
{
"category": "2 colors",
"label": "2colors1",
"thumbnail": "https://app-cdn-01.makeupar.com/console/customer/guest/SkuCustomImage/419/71d9429a-dc08-4e80-9c46-6e55631ef766.jpg",
"tags": [
{
"id": 28,
"name": "Drama"
}
],
"colorNum": 2
},
{
"category": "3 colors",
"label": "3colors2",
"thumbnail": "https://app-cdn-01.makeupar.com/console/customer/guest/SkuCustomImage/208/056aa6cd-8678-470c-b111-b7653d7ddf93.jpg",
"tags": [
{
"id": 28,
"name": "Drama"
}
],
"colorNum": 3
},
{
"category": "1 color",
"label": "Arabic3",
"thumbnail": "https://app-cdn-01.makeupar.com/console/SkuCustomImage/guest/726/1919aad4-21a2-493a-a5f8-48bc99a61ba5.jpg",
"tags": [
{
"id": 26,
"name": "Arabic"
}
],
"colorNum": 1
}
]
eye_shadow
{
"category": "eye_shadow", // string, const "eye_shadow"
"pattern": { "name": "" }, // object — name MUST equal a label from eyeshadow.json
"palettes": [
{
"color": "#ff0000", // string, hex color "#RRGGBB"
"texture": "matte", // string, enum ["matte","shimmer","metallic"]
"shimmerColor": "#fc288f", // string, hex color "#RRGGBB" — REQUIRED if texture in ["shimmer","metallic"]
"shimmerIntensity": 50, // integer, range: 0..100 — REQUIRED if texture in ["shimmer","metallic"]
"metallicIntensity": 50, // integer, range: 0..100 — REQUIRED if texture="metallic"
"colorIntensity": 50 // integer, range: 0..100
}
] // minItems: (see colorNum in pattern)
}
Full Pattern Catalog: https://plugins-media.makeupar.com/wcm-saas/patterns/eyeshadow.json
Distinct Makeup Pattern Categories:
[
{
"category": "1 color",
"label": "1color1",
"thumbnail": "https://app-cdn-01.makeupar.com/console/customer/guest/SkuCustomImage/188/0322c4f9-e54d-4a6b-8072-6bb76560121a.jpg",
"tags": [
{
"id": 12,
"name": "Artistic"
},
{
"id": 14,
"name": "Dream"
},
{
"id": 15,
"name": "Trend"
}
],
"colorNum": 1
},
{
"category": "2 colors",
"label": "2colors1",
"thumbnail": "https://app-cdn-01.makeupar.com/console/customer/guest/SkuCustomImage/938/3348211c-1b83-4ab2-9c6a-ce06e4aa3528.jpg",
"tags": [
{
"id": 1,
"name": "Fan shape"
},
{
"id": 8,
"name": "Only upper lid"
}
],
"colorNum": 2
},
{
"category": "3 colors",
"label": "3colors1",
"thumbnail": "https://app-cdn-01.makeupar.com/console/customer/guest/SkuCustomImage/542/55e1b0fd-b888-47ff-bd3a-3dc1af2a7b69.jpg",
"tags": [
{
"id": 1,
"name": "Fan shape"
},
{
"id": 8,
"name": "Only upper lid"
}
],
"colorNum": 3
},
{
"category": "4 colors",
"label": "4colors1",
"thumbnail": "https://app-cdn-01.makeupar.com/console/customer/guest/SkuCustomImage/429/29cd5839-464b-4a7a-a5c1-c7b40e9464d7.jpg",
"tags": [
{
"id": 4,
"name": "Closed banana"
},
{
"id": 10,
"name": "Whole eye"
}
],
"colorNum": 4
},
{
"category": "5 colors",
"label": "5colors1",
"thumbnail": "https://app-cdn-01.makeupar.com/console/customer/guest/SkuCustomImage/2/824dcf7c-1273-4a30-8f1f-2137926057d6.jpg",
"tags": [
{
"id": 4,
"name": "Closed banana"
},
{
"id": 10,
"name": "Whole eye"
}
],
"colorNum": 5
}
]
eyelashes
{
"category": "eyelashes", // string, const "eyelashes"
"pattern": { "name": "" }, // object — name MUST equal a label from eyelashes.json
"palettes": [
{ "color": "#ff0000", "colorIntensity": 50 } // hex color, int range: 0..100
]
}
Full Pattern Catalog: https://plugins-media.makeupar.com/wcm-saas/patterns/eyelashes.json
Distinct Makeup Pattern Categories:
[
{
"category": "Artistic",
"label": "Artistic1",
"thumbnail": "https://app-cdn-01.makeupar.com/console/customer/guest/SkuCustomImage/146/7a8ed606-1c27-4d91-9320-c40a904f621f.jpg",
"tags": []
},
{
"category": "Natural",
"label": "Natural1",
"thumbnail": "https://app-cdn-01.makeupar.com/console/SkuCustomImage/guest/287/cd5cae75-a1b3-48f8-8537-e6e259213901.png",
"tags": []
},
{
"category": "Upper&Lower",
"label": "Upper&Lower1",
"thumbnail": "https://app-cdn-01.makeupar.com/console/customer/guest/SkuCustomImage/18/2689ea2d-725e-4fa0-8563-df874ae1a83f.jpg",
"tags": []
},
{
"category": "Upper",
"label": "Upper1",
"thumbnail": "https://app-cdn-01.makeupar.com/console/customer/guest/SkuCustomImage/982/c99bf74e-545f-4da7-a314-f3bd84b82156.jpg",
"tags": []
},
{
"category": "UpperDense",
"label": "UpperDense1",
"thumbnail": "https://app-cdn-01.makeupar.com/console/SkuCustomImage/guest/888/452ec863-f0a8-40e7-aa33-31c0c39f57e2.jpg",
"tags": []
},
{
"category": "Winged",
"label": "Winged1",
"thumbnail": "https://app-cdn-01.makeupar.com/console/SkuCustomImage/guest/825/36ab3859-eae5-49e4-9d97-161698bbb8bb.jpg",
"tags": []
},
{
"category": "Wispies",
"label": "Wispies1",
"thumbnail": "https://app-cdn-01.makeupar.com/console/SkuCustomImage/guest/722/a2a727f6-748c-41e7-8ac0-c9c57c18c05a.png",
"tags": []
}
]
foundation
{
"category": "foundation", // string, const "foundation"
"palettes": [
{
"color": "#ff0000", // string, hex color "#RRGGBB"
"colorIntensity": 50, // integer, range: 0..100
"glowIntensity": 50, // integer, range: 0..100
"coverageIntensity": 50 // integer, range: 0..100
}
]
}
highlighter
{
"category": "highlighter", // string, const "highlighter"
"pattern": { "name": "" }, // object — name MUST equal a label from highlighter.json
"palettes": [
{
"color": "#ff0000", // string, hex color "#RRGGBB"
"glowIntensity": 50, // integer, range: 0..100
"shimmerIntensity": 50, // integer, range: 0..100
"shimmerDensity": 50, // integer, range: 0..100
"shimmerSize": 50, // integer, range: 0..100
"colorIntensity": 50 // integer, range: 0..100
}
]
}
Full Pattern Catalog: https://plugins-media.makeupar.com/wcm-saas/patterns/highlighter.json
Distinct Makeup Pattern Categories:
[
{
"category": "Heart face",
"label": "HeartFace4",
"thumbnail": "https://app-cdn-01.makeupar.com/console/customer/guest/SkuCustomImage/246/6ca40279-79cc-4918-b48a-64306009b365.jpg",
"tags": []
},
{
"category": "Invtriangle",
"label": "Invtriangle2",
"thumbnail": "https://app-cdn-01.makeupar.com/console/customer/guest/SkuCustomImage/7/6b0b9760-612c-4319-bd81-855d262d8e89.jpg",
"tags": []
},
{
"category": "Oblong",
"label": "Oblong11",
"thumbnail": "https://app-cdn-01.makeupar.com/console/customer/guest/SkuCustomImage/862/b7279f4e-edf2-43f3-8156-561fe5a52ec3.jpg",
"tags": []
},
{
"category": "Oval face",
"label": "OvalFace2",
"thumbnail": "https://app-cdn-01.makeupar.com/console/customer/guest/SkuCustomImage/369/91097a05-9fd2-43cb-82e9-dd45e72b613b.jpg",
"tags": []
},
{
"category": "Round face",
"label": "RoundFace3",
"thumbnail": "https://app-cdn-01.makeupar.com/console/customer/guest/SkuCustomImage/520/2d3ccbe2-36c3-43df-9e78-4c2c931fa431.jpg",
"tags": []
},
{
"category": "Square face",
"label": "SquareFace3",
"thumbnail": "https://app-cdn-01.makeupar.com/console/customer/guest/SkuCustomImage/989/2959777b-19ca-4f4a-a023-3c8927191497.jpg",
"tags": []
},
{
"category": "Triangle face",
"label": "TriangleFace3",
"thumbnail": "https://app-cdn-01.makeupar.com/console/customer/guest/SkuCustomImage/765/221c1f12-c621-4567-a8ee-1433038ee8a2.jpg",
"tags": []
}
]
lip_color
{
"category": "lip_color", // string, const "lip_color"
"shape": { // object — driven by lipshape.json
"name": "original" // string — MUST equal a `label` from lipshape.json
},
"morphology": { // optional object
"fullness": 50, // integer, range: 0..100 (default: 0)
"wrinkless": 50 // integer, range: 0..100 (default: 0)
},
"palettes": [ // minItems depends on style; often ≥1
{
"color": "#ff0000", // string, hex color "#RRGGBB"
"texture": "matte", // string, enum ["matte","gloss","holographic","metallic","satin","sheer","shimmer"]
"colorIntensity": 50, // integer, range: 0..100
"gloss": 50, // int, range: 0..100 — REQUIRED if texture in ["gloss","holographic","metallic","sheer","shimmer"]
"shimmerColor": "#ff0000", // string, hex color "#RRGGBB" — REQUIRED if texture in ["holographic","metallic","shimmer"]
"shimmerIntensity": 50, // integer, range: 0..100 — REQUIRED if texture in ["holographic","metallic","shimmer"]
"shimmerDensity": 50, // integer, range: 0..100 — REQUIRED if texture in ["holographic","metallic","shimmer"]
"shimmerSize": 50, // integer, range: 0..100 — REQUIRED if texture in ["holographic","metallic","shimmer"]
"transparencyIntensity": 50 // integer, range: 0..100 — REQUIRED if texture in ["gloss","sheer","shimmer"]
}
],
"style": {
"type": "full", // string, enum ["full","ombre","twoTone"]
"innerRatio": 50, // int, range: 0..100 — REQUIRED if type="ombre"
"featherStrength": 50 // int, range: 0..100 — REQUIRED if type="ombre"
}
}
Full Pattern Catalog: https://plugins-media.makeupar.com/wcm-saas/shapes/lipshape.json
Distinct Makeup Pattern Categories:
[{
"category": "general",
"label": "original",
"thumbnail": "https://plugins-media.makeupar.com/wcm-saas/images/lipshapes/original.png",
"tags": [
]
}, {
"category": "general",
"label": "heart-shaped",
"thumbnail": "https://plugins-media.makeupar.com/wcm-saas/images/lipshapes/heart-shaped.jpg",
"tags": [
]
}, {
"category": "general",
"label": "m-shaped",
"thumbnail": "https://plugins-media.makeupar.com/wcm-saas/images/lipshapes/m-shaped.jpg",
"tags": [
]
}, {
"category": "general",
"label": "petal",
"thumbnail": "https://plugins-media.makeupar.com/wcm-saas/images/lipshapes/petal.jpg",
"tags": [
]
}, {
"category": "general",
"label": "plump",
"thumbnail": "https://plugins-media.makeupar.com/wcm-saas/images/lipshapes/plump.jpg",
"tags": [
]
}, {
"category": "general",
"label": "pouty",
"thumbnail": "https://plugins-media.makeupar.com/wcm-saas/images/lipshapes/pouty.jpg",
"tags": [
]
}, {
"category": "general",
"label": "smile",
"thumbnail": "https://plugins-media.makeupar.com/wcm-saas/images/lipshapes/smile.jpg",
"tags": [
]
}, {
"category": "general",
"label": "vintage",
"thumbnail": "https://plugins-media.makeupar.com/wcm-saas/images/lipshapes/vintage.jpg",
"tags": [
]
}
]
lip_liner
{
"category": "lip_liner", // string, const "lip_liner"
"pattern": { "name": "" }, // object — name MUST equal a label from lipliner.json
"palettes": [
{
"color": "#ff0000", // string, hex color "#RRGGBB"
"texture": "matte", // string, enum ["matte","satin"]
"colorIntensity": 50, // integer, range: 0..100
"thickness": 50, // integer, range: 0..100
"smoothness": 50 // integer, range: 0..100
}
]
}
Full Pattern Catalog: https://plugins-media.makeupar.com/wcm-saas/patterns/lipliner.json
Distinct Makeup Pattern Categories:
[
{
"category": "Large & Full",
"label": "Large&Full1",
"thumbnail": "https://app-cdn-01.makeupar.com/console/SkuCustomImage/guest/417/7ac66cb2-2c7b-451c-8284-cc77791b7001.jpg",
"tags": []
},
{
"category": "Larger Lower",
"label": "LargerLower1",
"thumbnail": "https://app-cdn-01.makeupar.com/console/SkuCustomImage/guest/878/84b2ef48-3af4-4851-86d2-b01d10db82b2.jpg",
"tags": []
},
{
"category": "Larger Upper",
"label": "LargerUpper1",
"thumbnail": "https://app-cdn-01.makeupar.com/console/SkuCustomImage/guest/867/674f9f4c-7961-462e-8cc9-9a8acaad4168.jpg",
"tags": []
},
{
"category": "Natural",
"label": "Natural1",
"thumbnail": "https://app-cdn-01.makeupar.com/console/SkuCustomImage/guest/258/7533c08a-cc9c-45ab-9294-5d5a8114037d.jpg",
"tags": []
},
{
"category": "Rosebud",
"label": "Rosebud1",
"thumbnail": "https://app-cdn-01.makeupar.com/console/SkuCustomImage/guest/47/eb95e91f-6ef1-41f7-bc4f-aecd7d780c42.jpg",
"tags": []
},
{
"category": "Small",
"label": "Small1",
"thumbnail": "https://app-cdn-01.makeupar.com/console/SkuCustomImage/guest/396/6b78e461-24a6-4c6d-afb4-88beb71f1732.jpg",
"tags": []
},
{
"category": "Wider",
"label": "Wider1",
"thumbnail": "https://app-cdn-01.makeupar.com/console/SkuCustomImage/guest/867/21f92b70-72b5-4a57-b4d7-81c5cce757a6.jpg",
"tags": []
}
]
Here is a full example of a valid effectJson payload applying multiple effects.
{
"version": "1.0",
"effects": [
{
"category": "skin_smooth",
"skinSmoothStrength": 55,
"skinSmoothColorIntensity": 45
},
{
"category": "blush",
"pattern": { "name": "2colors1" },
"palettes": [
{
"color": "#e19f9f",
"texture": "matte",
"colorIntensity": 60,
"shimmerColor": "#d63252",
"shimmerDensity": 50
},
{
"color": "#c98a8a",
"texture": "satin",
"glowStrength": 40,
"colorIntensity": 70
}
]
},
{
"category": "lip_color",
"shape": { "name": "plump" },
"morphology": { "fullness": 30, "wrinkless": 25 },
"style": { "type": "full" },
"palettes": [
{
"color": "#e11c43",
"texture": "gloss",
"colorIntensity": 80,
"gloss": 75
}
]
}
]
}
In this example, blush uses the the 2colors1 pattern from the blush.json, which requires exactly two palettes. The lip_color effect uses the the plump shape from lipshape.json.
Supported Formats & Dimensions
| AI Feature | Supported Dimensions | Supported File Size | Supported Formats |
|---|---|---|---|
| AI Makeup Virtual Try-On | long side < 1920, face width >= 100 | < 10MB | jpg/jpeg/png |
Error Codes
| Error Code | Description |
|---|---|
| error_below_min_image_size | the size of the source image is smaller than minimum (expect: width >= 100px, height >= 100px) |
| error_exceed_max_image_size | the size of the source image is larger than maximum (expect: width < 1920px, height < 1080px) |
| error_face_position_invalid | Please ensure your entire face is fully visible within the image |
| error_face_position_too_small | The detected face is too small. Move closer to the camera |
| error_face_position_out_of_boundary | The face is too large or partially outside the image frame. Adjust your position |
| error_face_angle_invalid | The face angle is incorrect. For front-facing photos, keep your head within 10°. For side-facing photos, ensure more than 15°. |
Environment & Dependency
| Sample Code Language / Tool | Recommended Runtime Versions |
|---|---|
| cURL | - bash >= 3.2 - curl >= 7.58 (modern TLS/HTTP support) - jq >= 1.6 (robust JSON parsing) |
| Node.js (JavaScript) | Node >= 18 (for global fetch) |
| JavaScript | - Chrome / Edge >= 80 - Firefox >= 74 - Safari >= 13.1 |
| PHP | PHP >= 7.4 (for modern TLS/compat), ext-curl (recommended) or allow_url_fopen=On + ext-openssl, ext-json |
| Python | Python >= 3.10 (for f-strings), requests >= 2.20.0 |
| Java | Java 11+ (for HttpClient), Jackson Databind >= 2.12.0 |
Overview
The JavaScript Camera Kit provides a complete in-browser camera solution designed for high-accuracy face-based imaging tasks. It includes:
- Camera permission handling
- Real-time face detection
- Automatic face quality validation (lighting, pose, angle, distance)
- Guided capture UI
- Multi-step capture flows for advanced hair/face tasks
- Support for both base64 and blob output formats
The module is particularly optimized for AI-driven image analysis, such as AI Skin Analysis (SD/HD), AI Face Tone Analysis, and hair-related analysis.
Download the JS Camera Kit
Include the JS Camera Kit SDK via CDN:
https://plugins-media.makeupar.com/v2.1-camera-kit/sdk.js
Once loaded, the SDK installs a global YMK object.
Quick Start Example
The following sample demonstrates:
- Loading the JS Camera Kit SDK
- Implementing
window.ymkAsyncInit - Initializing the module
- Opening the camera
- Receiving captured images
<!DOCTYPE html>
<html lang="en">
<head>
<meta charset="UTF-8" />
<meta name="viewport" content="width=device-width, initial-scale=1.0" />
<title>Camera Kit Sample</title>
</head>
<body>
<script>
window.ymkAsyncInit = function() {
YMK.addEventListener('loaded', function() {
/* Module fully loaded and ready */
});
YMK.addEventListener('faceDetectionCaptured', function(capturedResult) {
/* Display all captured images */
const container = document.getElementById('captured-results');
container.innerHTML = '';
for (const image of capturedResult.images) {
const img = document.createElement('img');
img.src = typeof image.image === 'string'
? image.image
: URL.createObjectURL(image.image);
container.appendChild(img);
}
});
};
function openCameraKit() {
YMK.init({
faceDetectionMode: 'skincare',
imageFormat: 'base64',
language: 'enu',
});
YMK.openCameraKit();
}
</script>
<!-- Load SDK -->
<script>
window.addEventListener('load', function() {
(function(d) {
const s = d.createElement('script');
s.type = 'text/javascript';
s.async = true;
s.src = 'https://plugins-media.makeupar.com/v2.1-camera-kit/sdk.js';
d.getElementsByTagName('script')[0].parentNode.insertBefore(s, null);
})(document);
});
</script>
<button onClick="openCameraKit()">Open Camera Kit</button>
<div id="YMK-module"></div>
<h3>Captured Results:</h3>
<div id="captured-results"></div>
</body>
</html>
Prerequisites
You must define the asynchronous initialization entry point:
<script>
window.ymkAsyncInit = function() {
YMK.init(); // default settings
};
</script>
Additional requirements:
| Requirement | Description |
|---|---|
| Browser | Must support getUserMedia |
| HTTPS | Required on most browsers for webcam access |
<div id="YMK-module"> |
Mandatory mount point for the UI |
Integration Guide
Step 1 — Initialize the Module
Call YMK.init() before calling YMK.openCameraKit():
YMK.init({
faceDetectionMode: 'skincare',
imageFormat: 'base64',
language: 'enu'
});
Supported Detection Modes
| Mode | Description |
|---|---|
makeup |
Standard camera mode for virtual cosmetic try-on |
skincare |
Standard skin analysis mode, close-up face capture |
hdskincare |
HD Skin capture using webcams with ≥ 2560px width |
shadefinder |
Skin Tone Analysis front-face capture |
hairlength |
Full hair-length capture (from a distance) |
hairfrizziness |
3-phase capture: front, right-turn, left-turn |
hairtype |
Same 3-phase multi-angle capture flow |
Step 2 — Add Event Handlers
Event examples:
YMK.addEventListener('faceQualityChanged', function(q) {
console.log('Quality updated:', q);
});
See the full Events List below.
Step 3 — Open Camera Kit
YMK.openCameraKit();
This automatically:
- Shows the UI
- Opens webcam
- Begins real-time face quality monitoring
- Automatically captures when conditions are acceptable
Step 4 — Receiving Captured Result
Captured images arrive via:
YMK.addEventListener('faceDetectionCaptured', function(result) {
console.log(result.images);
});
Step 5 — Close Module
YMK.close();
API Reference
YMK.init(args)
Configures module appearance, detection mode, language, and capture format.
Arguments
args.faceDetectionMode
Detection flow to use.
Values:
"skincare" | "hdskincare" | "shadefinder" | "hairlength" | "hairfrizziness" | "hairtype"
Default: "skincare"
args.width
Pixel width of module container. Default:
360(screens ≥ 500px)screen width(screens < 500px)
Allowed: 300–1920
args.height
Pixel height of module container. Default:
480(screens ≥ 500px)min(screen.height, innerHeight)for smaller screens
Allowed: 300–1920
args.language
UI language.
Available: "chs", "cht", "deu", "enu", "esp", "fra", "jpn", "kor", "ptb", "ita"
Default: "enu"
args.imageFormat
Format returned via faceDetectionCaptured.
"base64" or "blob"
Default: "base64"
args.disableCameraResolutionCheck
Allow running even if webcam does not meet required resolution.
Default: false
Other API Methods
YMK.openCameraKit()
Opens the module and begins detection.
YMK.addEventListener(eventName, callback)
Registers event callbacks.
Returns: EventListenerIdentifier
YMK.removeEventListener(id)
Removes listener by identifier.
YMK.isLoaded()
Returns whether livestream or photo is drawn on canvas.
Returns: boolean
YMK.pause()
Pauses the webcam stream.
YMK.resume(restartWebcam = false)
Resumes webcam after pause.
YMK.getInfo()
Returns current module info:
{
"fps": 30
}
YMK.close()
Closes module and camera.
Events Reference
Lifecycle Events
| Event | Description |
|---|---|
opened |
Module opened |
loading |
Loading progress (0–100) |
loaded |
Camera stream loaded onto canvas |
closed |
Module closed |
Camera Events
| Event | Description |
|---|---|
cameraOpened |
Webcam opened |
cameraClosed |
Webcam closed |
cameraFailed |
Permission denied or no webcam Error code:* "error_resolution_unsupported"* "error_permission_denied"* "error_access_failed" |
faceQualityChanged
Fires continuously during detection.
{
"hasFace": true,
"area": "good",
"frontal": "good",
"lighting": "ok",
"nakedeye": "good",
"faceangle": "good"
}
- Field Descriptions
| Field | Values | Meaning |
|---|---|---|
hasFace |
true/false |
Whether face is detected |
area |
"good", "notgood", "toosmall", "outofboundary" |
Face distance/size quality |
frontal |
"good", "notgood" |
Whether user is facing forward |
lighting |
"good", "ok", "notgood" |
Lighting strength |
nakedeye |
"good", "notgood" |
Eyewear detection |
faceangle |
"good", "upward", "downward", "leftward", "rightward", "lefttilt", "righttilt" |
Face orientation |
Minimum Recommended Quality
const minQuality = {
hasFace: true,
area: "good",
frontal: "good",
lighting: "ok"
};
faceDetectionStarted
User enters detection UI.
faceDetectionCaptured
This event is fired after all required face quality validation checks have passed and the Camera Kit has successfully completed the capture workflow.
Depending on the selected faceDetectionMode, the event may contain one or multiple captured images (e.g., multi-angle capture for hair modes).
Callback Arguments
capturedResult — Object
The result object containing all successfully captured images and metadata.
Field Definitions
mode — string
Indicates the active faceDetectionMode used for capturing.
Possible values include:
"skincare" | "hdskincare" | "shadefinder" | "hairlength" | "hairfrizziness" | "hairtype"
This value corresponds directly to the configuration set in YMK.init({ faceDetectionMode }).
images — Array
ImageObject Structure
| Field | Type | Description |
|---|---|---|
phase |
integer | The zero-based index representing the capture step. Examples: • Skincare = 0 • Hair frizziness sequence = 0 (front), 1 (right turn), 2 (left turn) |
image |
string or Blob | The captured image. • Base64 string if args.imageFormat = "base64" • Binary Blob if args.imageFormat = "blob" |
width |
integer | Pixel width of the captured image. |
height |
integer | Pixel height of the captured image. |
Notes
- The number of images varies depending on
faceDetectionMode.- Example:
"hairfrizziness"and"hairtype"typically produce three images.
- Example:
- Image resolution may differ from device to device.
The actual pixel size depends on:
- The user's webcam maximum resolution
- The constraints and recommended settings for the selected mode
- All images are guaranteed to meet the minimum face quality requirements before this event is dispatched.
Configuration Notes
Quality Requirements
- Ensure correct distance
- Ensure frontal face angle
- Provide sufficient lighting (avoid shadows)
Multi-Phase Capture
Modes like hairtype or hairfrizziness require:
- Front face
- Turn right
- Turn left
Ensure event handling is in place.
Create a new file.
To upload a new file, you'll first need to use the File API. It will give you a URL – use that URL to upload your file. Once the upload is finished, you can use the file_id from the same response to start using our AI features.
Authorizations:
Request Body schema: application/jsonrequired
required | Array of objects |
Responses
Request samples
- Payload
- curl
- Node.js
- JavaScript
- PHP
- Python
- Java
{- "files": [
- {
- "content_type": "image/jpg",
- "file_name": "my-selfie.jpg",
- "file_size": 50000
}
]
}Response samples
- 200
- 400
- 401
{- "status": 200,
- "data": {
- "files": [
- {
- "content_type": "image/jpg",
- "file_name": "my-selfie.jpg",
- "file_id": "U8aqJbsXGT537jtGnEDFHqxdDXqh8+oTF/cSkLimzuvVwMP+Jb1XbjPsf7ZgUgLY",
- "requests": [
- {
- "headers": {
- "Content-Type": "image/jpg",
- "Content-Length": 50000
}, - "method": "PUT"
}
]
}
]
}
}Run an AI Makeup Virtual Try On task.
Once you start an AI task, you need to keep polling at given polling_interval to check its status until it shows either success or error because if you don't, the task will time out and when you try to check the status later, you'll get an InvalidTaskId error even if the task did finish successfully and your units will still be consumed.
Authorizations:
Request Body schema: application/jsonrequired
| src_file_url required | string Url of the file to run task. The url should be publicly accessible. |
| version | string Default: "1.0" Version of the makeup effect specification. Defaults to |
required | Array of SkinSmoothEffect (object) or BlushEffect (object) or BronzerEffect (object) or ConcealerEffect (object) or ContourEffect (object) or EyebrowsEffect (object) or EyelinerEffect (object) or EyeshadowEffect (object) or EyelashesEffect (object) or FoundationEffect (object) or HighlighterEffect (object) or LipColorEffect (object) or LipLinerEffect (object) Array of makeup effects to apply. Each effect object MUST specify a |
Responses
Request samples
- Payload
- curl
- Node.js
- JavaScript
- PHP
- Python
- Java
{- "version": "1.0",
- "effects": [
- {
- "category": "skin_smooth",
- "skinSmoothStrength": 55,
- "skinSmoothColorIntensity": 45
}, - {
- "category": "blush",
- "pattern": {
- "name": "2colors1"
}, - "palettes": [
- {
- "color": "#e19f9f",
- "texture": "matte",
- "colorIntensity": 60
}, - {
- "color": "#c98a8a",
- "texture": "satin",
- "glowStrength": 40,
- "colorIntensity": 70
}
]
}, - {
- "category": "lip_color",
- "shape": {
- "name": "plump"
}, - "morphology": {
- "fullness": 30,
- "wrinkless": 25
}, - "style": {
- "type": "full"
}, - "palettes": [
- {
- "color": "#e11c43",
- "texture": "gloss",
- "colorIntensity": 80,
- "gloss": 75
}
]
}
]
}Response samples
- 200
- 400
- 401
{- "status": 200,
- "data": {
- "task_id": "grH0CvsgXuAIHLUzD0V1Ol34hoet3R1tvdbtiVHrDb6_UqCLKIejAIajwxrhOAfe"
}
}Check the status of a AI Makeup Virtual Try On task.
Authorizations:
path Parameters
| task_id required | string Example: grH0CvsgXuAIHLUzD0V1Ol34hoet3R1tvdbtiVHrDb6_UqCLKIejAIajwxrhOAfe ID of task to check |
Responses
Request samples
- curl
- Node.js
- JavaScript
- PHP
- Python
- Java
curl --request GET \ --url https://yce-api-01.makeupar.com/s2s/v2.0/task/makeup-vto/grH0CvsgXuAIHLUzD0V1Ol34hoet3R1tvdbtiVHrDb6_UqCLKIejAIajwxrhOAfe \ --header 'Authorization: Bearer <access_token for v1, API Key for v2>'
Response samples
- 200
- 400
- 401
- 500
{- "status": 200,
- "data": {
- "task_status": "running",
- "error": "exceed_max_filesize",
- "error_message": "string",
}
}AI Look Vto
The AI Look Virtual Try-On API provides a complete workflow for applying professionally designed facial looks to user photos. Each look is crafted by beauty experts and can be applied instantly via API.
This guide walks you through:
- Endpoint:
/s2s/v2.0/task/look-vto - Authentication: All requests require an
Authorization: Bearer <TOKEN> - Workflow:
- Prepare a selfie: Uploading an image or provide a valid image URL
- List look templates: Listing available AI look templates
- Start Task (
POST): Submit your image id/URL and a looktemplate_id. - Retrieve Task ID: Capture the
task_idfrom the response. - Poll Status (
GET): Use thetask_idto check the status of the task. Continue polling untiltask_statusis"success"or"error".
API Playground
Interactively explore and test the API using our official playground:
API Playground: http://yce.makeupar.com/api-console/en/api-playground/ai-look-virtual-try-on/
Authentication
- Include your API key in the request header using Bearer Token:
You can find your API Key at https://yce.makeupar.com/api-console/en/api-keys/.Authorization: Bearer <API Key>
1. Upload an Image
You may upload a file directly to the server or provide a valid image URL in the VTO task payload.
Upload Endpoint
POST /s2s/v2.0/file/look-vto
Alternatively, skip this step if you already have a public image URL.
2. List Available Look Styles
Retrieve all AI makeup look templates available for virtual try-on.
Endpoint
GET /s2s/v2.0/task/template/look-vto
Query Parameters
| Parameter | Description |
|---|---|
page_size |
Number of items per page |
starting_token |
Token for pagination (optional) |
Sample Javascript Request
const data = null;
const xhr = new XMLHttpRequest();
xhr.withCredentials = true;
xhr.addEventListener('readystatechange', function () {
if (this.readyState === this.DONE) {
console.log(this.responseText);
}
});
xhr.open('GET', 'https://yce-api-01.makeupar.com/s2s/v2.0/task/template/look-vto?page_size=20&starting_token=13045969587275114');
xhr.setRequestHeader('Authorization', 'Bearer <access_token for v1, API Key for v2>');
xhr.send(data);
Sample Successful Response
{
"status": 200,
"data": {
"templates": [
{
"id": "good_template_001",
"thumb": "thumbnail preview image URL",
"title": "Berry Smooth",
"category_name": "Daily"
}
],
"next_token": 13045969587275114
}
}
Note: Use the
idvalue (template_id) when creating the Look VTO task.
3. Create a Look VTO Task and Poll for Results
Once you have an image and a template ID, create a task. The API processes the request asynchronously. You must poll the task status until it reaches success or error.
Create Task Endpoint
POST /s2s/v2.0/task/look-vto
Polling Endpoint
GET /s2s/v2.0/task/look-vto/{task_id}
Sample JavaScript Implementation
const BASE_URL = 'https://yce-api-01.makeupar.com/s2s/v2.0/task/look-vto';
const START_METHOD = 'POST';
const HEADERS = {
"Content-Type": "application/json",
"Authorization": "Bearer FT6Xa7xuU1SBU2ZW6pdAAUh9D093kuX3"
};
const sleep = (ms) => new Promise((resolve) => setTimeout(resolve, ms));
async function startTask() {
const init = {
method: START_METHOD,
headers: HEADERS,
body: JSON.stringify({
"src_file_url": "https://plugins-media.makeupar.com/strapi/assets/sample_Image_7_fa28b2618a.jpg",
"template_id": "all_rosy_chic"
})
};
const res = await fetch(BASE_URL, init);
if (!res.ok) throw new Error(`Start request failed: ${res.status} ${res.statusText}`);
const payload = await res.json().catch(() => ({}));
const taskId = payload?.data?.task_id;
if (!taskId) throw new Error('task_id missing: ' + JSON.stringify(payload));
console.log('[startTask] Task started, id =', taskId);
return taskId;
}
async function pollTask(taskId, { intervalMs = 2000, maxAttempts = 300 } = {}) {
for (let attempt = 1; attempt <= maxAttempts; attempt++) {
const pollUrl = `${BASE_URL}/${taskId}`;
const res = await fetch(pollUrl, { method: 'GET', headers: HEADERS });
if (!res.ok) throw new Error(`Polling failed: ${res.status} ${res.statusText}`);
const payload = await res.json().catch(() => ({}));
const status = payload?.data?.task_status;
console.log(`[pollTask] Attempt ${attempt} status = ${status}`);
if (status === 'success') {
console.log('[pollTask] Success results:', payload?.data?.results);
return payload;
}
if (status === 'error') {
throw new Error('Task failed: ' + JSON.stringify(payload));
}
await sleep(intervalMs);
}
throw new Error('Polling timeout: Max attempts exceeded');
}
(async () => {
try {
const taskId = await startTask();
const final = await pollTask(taskId);
console.log('[main] Final response:', final);
} catch (e) {
console.error('[main] Flow error:', e);
}
})();
Sample Success Response
{
"status": 200,
"data": {
"results": {
"url": "https://yce-us.s3-accelerate.amazonaws.com/demo/.../result.jpg?..."
},
"task_status": "success"
}
}
The results.url field contains the final rendered virtual makeup image.
Summary
| Step | Description |
|---|---|
| 1. Upload Image | Upload directly or provide an image URL. |
| 2. List Look Templates | Retrieve available look styles with IDs. |
| 3. Create VTO Task | Submit image URL + template ID. |
| 4. Poll for Completion | Retrieve the final result image URL. |
This workflow ensures a reliable, developer-friendly integration for real-time virtual makeup try-on experiences.
Supported Formats & Dimensions
| AI Feature | Supported Dimensions | Supported File Size | Supported Formats |
|---|---|---|---|
| AI Look Virtual Try-On | long side < 1920, face width >= 100 | < 10MB | jpg/jpeg/png |
Error Codes
| Error Code | Description |
|---|---|
| error_below_min_image_size | the size of the source image is smaller than minimum (expect: width >= 100px, height >= 100px) |
| error_exceed_max_image_size | the size of the source image is larger than maximum (expect: width < 1920px, height < 1080px) |
| error_face_position_invalid | Please ensure your entire face is fully visible within the image |
| error_face_position_too_small | The detected face is too small. Move closer to the camera |
| error_face_position_out_of_boundary | The face is too large or partially outside the image frame. Adjust your position |
| error_face_angle_invalid | The face angle is incorrect. For front-facing photos, keep your head within 10°. For side-facing photos, ensure more than 15°. |
Environment & Dependency
| Sample Code Language / Tool | Recommended Runtime Versions |
|---|---|
| cURL | - bash >= 3.2 - curl >= 7.58 (modern TLS/HTTP support) - jq >= 1.6 (robust JSON parsing) |
| Node.js (JavaScript) | Node >= 18 (for global fetch) |
| JavaScript | - Chrome / Edge >= 80 - Firefox >= 74 - Safari >= 13.1 |
| PHP | PHP >= 7.4 (for modern TLS/compat), ext-curl (recommended) or allow_url_fopen=On + ext-openssl, ext-json |
| Python | Python >= 3.10 (for f-strings), requests >= 2.20.0 |
| Java | Java 11+ (for HttpClient), Jackson Databind >= 2.12.0 |
Create a new file.
To upload a new file, you'll first need to use the File API. It will give you a URL – use that URL to upload your file. Once the upload is finished, you can use the file_id from the same response to start using our AI features.
Authorizations:
Request Body schema: application/jsonrequired
required | Array of objects |
Responses
Request samples
- Payload
- curl
- Node.js
- JavaScript
- PHP
- Python
- Java
{- "files": [
- {
- "content_type": "image/jpg",
- "file_name": "my-selfie.jpg",
- "file_size": 50000
}
]
}Response samples
- 200
- 400
- 401
{- "status": 200,
- "data": {
- "files": [
- {
- "content_type": "image/jpg",
- "file_name": "my-selfie.jpg",
- "file_id": "U8aqJbsXGT537jtGnEDFHqxdDXqh8+oTF/cSkLimzuvVwMP+Jb1XbjPsf7ZgUgLY",
- "requests": [
- {
- "headers": {
- "Content-Type": "image/jpg",
- "Content-Length": 50000
}, - "method": "PUT"
}
]
}
]
}
}List predefined templates.
Authorizations:
query Parameters
| page_size | integer Example: page_size=20 Number of results to return in this page. Valid value should be between 1 and 20. Default 20. |
| starting_token | string Example: starting_token=13045969587275114 Token for current page. Start with |
Responses
Request samples
- curl
- Node.js
- JavaScript
- PHP
- Python
- Java
curl --request GET \ --url 'https://yce-api-01.makeupar.com/s2s/v2.0/task/template/look-vto?page_size=20&starting_token=13045969587275114' \ --header 'Authorization: Bearer <access_token for v1, API Key for v2>'
Response samples
- 200
- 400
- 401
{- "status": 200,
- "data": {
- "templates": [
- {
- "id": "good_template_001",
- "thumb": "string",
- "title": "string",
- "category_name": "string"
}
], - "next_token": 13045969587275114
}
}Run an AI Look Virtual Try On task.
Once you start an AI task, you need to keep polling at given polling_interval to check its status until it shows either success or error because if you don't, the task will time out and when you try to check the status later, you'll get an InvalidTaskId error even if the task did finish successfully and your units will still be consumed.
Authorizations:
Request Body schema: application/jsonrequired
| src_file_url required | string Url of the file to run task. The url should be publicly accessible. |
| template_id required | string ID of the template. List predefined templates first, and use the id of a template. |
Responses
Request samples
- Payload
- curl
- Node.js
- JavaScript
- PHP
- Python
- Java
{- "template_id": "good_template_001"
}Response samples
- 200
- 400
- 401
{- "status": 200,
- "data": {
- "task_id": "grH0CvsgXuAIHLUzD0V1Ol34hoet3R1tvdbtiVHrDb6_UqCLKIejAIajwxrhOAfe"
}
}Check the status of a AI Look Virtual Try On task.
Authorizations:
path Parameters
| task_id required | string Example: grH0CvsgXuAIHLUzD0V1Ol34hoet3R1tvdbtiVHrDb6_UqCLKIejAIajwxrhOAfe ID of task to check |
Responses
Request samples
- curl
- Node.js
- JavaScript
- PHP
- Python
- Java
curl --request GET \ --url https://yce-api-01.makeupar.com/s2s/v2.0/task/look-vto/grH0CvsgXuAIHLUzD0V1Ol34hoet3R1tvdbtiVHrDb6_UqCLKIejAIajwxrhOAfe \ --header 'Authorization: Bearer <access_token for v1, API Key for v2>'
Response samples
- 200
- 400
- 401
- 500
{- "status": 200,
- "data": {
- "task_status": "running",
- "error": "exceed_max_filesize",
- "error_message": "string",
}
}AI Nail Virtual Try-On
The AI Nail Virtual Try On API offers an innovative way to enhance the online experience for customers interested in nail art. It allows shoppers to visualize a variety of nail styles virtually, from artificial and acrylic nails to press-on options and gel designs. With unlimited color and texture options, users can effortlessly explore different looks on both natural and synthetic nails. The platform enables personalized try-ons, letting individuals switch between styles and see before-and-after comparisons easily. This seamless integration streamlines product discovery and increases customer confidence by providing accurate, interactive previews before purchasing.
This guide walks you through:
Workflow for AI Nail Virtual Try On API:
Endpoint: /s2s/v2.0/file/nail-vto
Authentication Required: Authorization: Bearer YOUR_API_KEY
Workflow Steps:
Image Upload Preparation:
- The process begins with preparing a back of the hand image.
Nail Design Setup Options:
- Begin by selecting a suitable nail color. You can also choose a custom shape according to your taste.
Initiate AI Task and Obtain Task ID:
- Send the uploaded image(s) along with the chosen effect configuration via an HTTP POST request to
/s2s/v2.0/file/nail-vto. - Await a unique task ID in the response, which identifies this interaction.
- Send the uploaded image(s) along with the chosen effect configuration via an HTTP POST request to
Poll Task Status (Continuous Check):
- Use the obtained
task_idto periodically poll the task status using an HTTP GET request (e.g.,GET /task/${task_id}). - Continuously monitor for:
Task_status = "success"(process completed).Task_status = "error"(resolve or retry if applicable).
- Update the workflow accordingly once the status transitions to success.
- Use the obtained
This structured workflow ensures efficient integration with user inputs, automated monitoring of tasks, and seamless retrieval of results.
API Playground
Interactively explore and test the API using our official playground:
API Playground: http://yce.makeupar.com/api-console/en/api-playground/ai-nail-virtual-try-on/
Authentication
- Include your API key in the request header using Bearer Token:
You can find your API Key at https://yce.makeupar.com/api-console/en/api-keys/.Authorization: Bearer YOUR_API_KEY
1. Upload an Image
You may upload a file directly to the server or provide a valid image URL in the VTO task payload.
Upload Endpoint
POST /s2s/v2.0/file/nail-vto
Alternatively, skip this step if you already have a public image URL.
2. Prepare an effect template
There are four distinct setup modes available for this purpose:
- Customizing the color and aligning it with your current nail look
- Utilizing a preset design and a specific shape to create your vision
- Adding pressed-on nails and linking them with your existing original nail image
- Providing image links for pressing-on nail products that match your preferences.
Effect Template JSON Schemas
{
"version": "1.0",
"effect_type": "nail_polish", // valid values: ['nail_polish', 'press_on_nails']
"effects": [],
"ref_file_ids": []
}
Effect Format
- Nail Polish - Color
{
"sub_type": "color",
"finger": "index", // valid values: ['thumb', 'index', 'middle', 'ring', 'pinky']
"color": "#ff0000",
"texture": "cream", // valid values: ['matte', 'cream', 'metallic', 'jelly', 'sheer', 'pearl', 'textured', 'shimmer_coarse', 'shimmer_fine']
"transparency": 0, // 0-100, for textures except metallic
"reflection": 0, // 0-100
"contrast": 0, // 0-100
"roughness": 0, // 0-100
"shimmer_opacity": 0, // 0-100, for texture pearl
"shimmer_size": 0, // 0-100, for texture shimmer_coarse and shimmer_fine
"textured_size": 0, // 0-100, for texture textured
}
- Nail Polish - Design
{
"sub_type": "design",
"finger": "index", // valid values: ['thumb', 'index', 'middle', 'ring', 'pinky']
"ref_file_url": "", // Optional; Either ref_file_id or ref_file_url must be filled, but only one can be selected.
"ref_file_index": 0, // This field is optional unless uploading is selected. Index corresponding to ref_file_ids under the root node
"texture": "cream", // valid values: ['matte', 'cream', 'metallic', 'jelly', 'sheer', 'pearl', 'textured', 'shimmer_coarse', 'shimmer_fine']
"transparency": 0, // 0-100, only for textures except metallic
"reflection": 0, // 0-100
"contrast": 0, // 0-100
"roughness": 0, // 0-100
"shimmer_opacity": 0, // 0-100, for texture pearl
"shimmer_size": 0, // 0-100, for texture shimmer_coarse and shimmer_fine
"textured_size": 0, // 0-100, for texture textured
}
- Press On Nails - Color
- You can find the latest shape values at: https://plugins-media.makeupar.com/wcm-saas/shapes/nails.json
{
"sub_type": "color",
"finger": "index", // valid values: ['thumb', 'index', 'middle', 'ring', 'pinky']
"shape": "square_oval", // Please check the nails.json. valid values: ['square_oval','square_square','square_squoval','squoval_oval','squoval_square','squoval_squoval','oval_oval','oval_square','oval_squoval','almond_oval','almond_square','almond_squoval','stiletto_oval','stiletto_square','stiletto_squoval],
"length": 1.0, // 0.8-2.15, for shapes except original
"color": "#ff0000",
"texture": "cream", // valid values for other shapes: ['matte', 'cream', 'metallic']
"reflection": 0, // 0-100
"contrast": 0, // 0-100
"roughness": 0 // 0-100
}
- Press on Nails - Design
{
"sub_type": "design",
"finger": "index", // valid values: ['thumb', 'index', 'middle', 'ring', 'pinky']
"ref_file_url": "", // Optional; Either ref_file_id or ref_file_url must be filled, but only one can be selected.
"ref_file_index": 0, // This field is optional unless uploading is selected. Index corresponding to ref_file_ids under the root node
"texture": "cream", // valid values: ['matte', 'cream', 'metallic']
"reflection": 0, // 0-100
"contrast": 0, // 0-100
"roughness": 0, // 0-100
}
Effect Template Design Logic
Detect effect type (
press_on_nailsvsnail_polish).Iterate over each entry in
effects:If
sub_type === "color"→ map fields directly, fill missing texture‑related keys with defaults. Ifsub_type === "design"→- If the user gave a
ref_file_url, keep it and omitref_file_index. - If the user supplied an index (
ref_file_index), ensureref_file_idsexists and the index is valid; then set"ref_file_id": ref_file_ids[index](optional – some back‑ends expect the raw index, not id).
- If the user gave a
Normalize numeric ranges – clamp any out‑of‑range values to 0‑100 or length limits.
Add missing optional keys with defaults so the schema validator passes.
Serialize the final object as JSON (compact or pretty for debugging).
Example Payload (ready to send)
{
"version": "1.0",
"src_file_url": "https://plugins-media.makeupar.com/strapi/assets/nail_user_photo_01_27d4260646.jpg",
"effect_type": "press_on_nails",
"ref_file_ids": [
"Ks3kh+1nPpVNm8iJb5374CWtBzkT4B44NPJwXbBKqVxfjK3xgCQ+hRt9MJXBFaud",
"+Z7PSjuzigvsc3S/Yli1A4WN7c3J6NJHFqK2iUlqD2BfjK3xgCQ+hRt9MJXBFaud"
],
"effects": [
{
"sub_type": "design",
"finger": "thumb",
"texture": "cream",
"reflection": 100,
"contrast": 50,
"roughness": 0,
"ref_file_index": 0
},
{
"sub_type": "design",
"finger": "index",
"texture": "cream",
"reflection": 100,
"contrast": 50,
"roughness": 0,
"ref_file_index": 1
},
{
"sub_type": "design",
"finger": "middle",
"texture": "cream",
"reflection": 100,
"contrast": 50,
"roughness": 0,
"ref_file_url": "https://plugins-media.makeupar.com/strapi/assets/press_on_nail_06_3_9ce2ddc47a.png"
},
{
"sub_type": "design",
"finger": "pinky",
"texture": "cream",
"reflection": 100,
"contrast": 50,
"roughness": 0,
"ref_file_url": "https://plugins-media.makeupar.com/strapi/assets/press_on_nail_06_5_f6e46dd56f.png"
},
{
"sub_type": "design",
"finger": "ring",
"texture": "cream",
"reflection": 100,
"contrast": 50,
"roughness": 0,
"ref_file_url": "https://plugins-media.makeupar.com/strapi/assets/press_on_nail_06_4_2103ca8cac.png"
}
]
}
3. Create a Nail VTO Task and Poll for Results
Once you have an image and a complete effect payload, create a task. The API processes the request asynchronously. You must poll the task status until it reaches success or error.
Create Task Endpoint
POST /s2s/v2.0/task/nail-vto
Polling Endpoint
GET /s2s/v2.0/task/nail-vto/{task_id}
AI Nail Virtual Try-On Specification
Supported Nail View A single nail image in a clear front view without obstruction.
| Item | Supported Dimensions | Supported File Size | Supported Formats |
|---|---|---|---|
| Nail Design Image - Nail Polish | * 271 px ≤ Width ≤ 542 px * 522 px ≤ Height ≤ 1044 px * At least 72ppi The image will be applied from the center, and the virtual try-on effect will vary according to the length of user’s fingernails. |
≤ 1MB | png |
| Nail Design Image - Press-On Nail | * 271 px ≤ Width ≤ 542 px * 522 px ≤ Height ≤ 1044 px * 0.5 ≤ Image aspect ratio (H/W) ≤ 3.5 * At least 72ppi The image’s content, shape, and length settings are all used to generate the virtual try-on effect. Since the user’s fingernail width is detected to ensure proper image scaling, it is recommended to create separate images for each fingernail with the correct aspect ratio. Please download a press-on nail design image sample, and refer to the image guidelines for further details. Download: Nail_Design_Image_Guidelines.pdf |
≤ 1MB | png (with transparent background) |
Press-on nail design image sample:


Supported Hand View
| Item | Supported Dimensions | Supported File Size | Supported Formats |
|---|---|---|---|
| User Photo | * Long side ≤ 2048 * Short side ≥ 256 |
≤ 10MB | jpg/jpeg/png |
- Support only one hand in the input image
- The area of hand palm is better to be at least half of that of input image
- The aspect ratio of the input image is better to be 1:1, 3:4, 4:3
- The nails of fingers should not be occluded
- It is better that there is no nail tip and nail polish on the nail

Error Codes
| Error Code | Description |
|---|---|
| RUNTIME_ERROR | An unexpected error occurred dunail runtime |
| PHOTO_DETECTION_FAIL | The user photo could not be processed correctly, for example no hand detected |
| OBJECT_DETECTION_FAIL | The object photo could not be processed correctly, for example no product detected |
| PHOTO_CHECK_INVALID | The pose or size of the user photo is invalid |
| INPUT_ERROR | The input file format is incorrect |
| INPUT_MAIN_IMAGE_EMPTY | A user image is required |
Environment & Dependency
| Sample Code Language / Tool | Recommended Runtime Versions |
|---|---|
| cURL | - bash >= 3.2 - curl >= 7.58 (modern TLS/HTTP support) - jq >= 1.6 (robust JSON parsing) |
| Node.js (JavaScript) | Node >= 18 (for global fetch) |
| JavaScript | - Chrome / Edge >= 80 - Firefox >= 74 - Safari >= 13.1 |
| PHP | PHP >= 7.4 (for modern TLS/compat), ext-curl (recommended) or allow_url_fopen=On + ext-openssl, ext-json |
| Python | Python >= 3.10 (for f-strings), requests >= 2.20.0 |
| Java | Java 11+ (for HttpClient), Jackson Databind >= 2.12.0 |
Create a new file.
To upload a new file, you'll first need to use the File API. It will give you a URL – use that URL to upload your file. Once the upload is finished, you can use the file_id from the same response to start using our AI features.
Authorizations:
Request Body schema: application/jsonrequired
required | Array of objects |
Responses
Request samples
- Payload
- curl
- Node.js
- JavaScript
- PHP
- Python
- Java
{- "files": [
- {
- "content_type": "image/jpg",
- "file_name": "my-selfie.jpg",
- "file_size": 50000
}
]
}Response samples
- 200
- 400
- 401
{- "status": 200,
- "data": {
- "files": [
- {
- "content_type": "image/jpg",
- "file_name": "my-selfie.jpg",
- "file_id": "U8aqJbsXGT537jtGnEDFHqxdDXqh8+oTF/cSkLimzuvVwMP+Jb1XbjPsf7ZgUgLY",
- "requests": [
- {
- "headers": {
- "Content-Type": "image/jpg",
- "Content-Length": 50000
}, - "method": "PUT"
}
]
}
]
}
}Run an AI Nail Vto task.
Once you start an AI task, you need to keep polling at given polling_interval to check its status until it shows either success or error because if you don't, the task will time out and when you try to check the status later, you'll get an InvalidTaskId error even if the task did finish successfully and your units will still be consumed.
Authorizations:
Request Body schema: application/jsonrequired
| src_file_url required | string Url of the file to run task. The url should be publicly accessible. |
| ref_file_urls | Array of strings non-empty |
| version required | string Default: "1.0" Version of the nail effect specification. Defaults to |
| effect_type required | string Enum: "nail_polish" "press_on_nails" |
required | Array of Nail Polish - Color - General (object) or Nail Polish - Color - Metallic (object) or Nail Polish - Color - Pearl (object) or Nail Polish - Color - Shimmer (object) or Nail Polish - Color - Textured (object) or Nail Polish - Design - General (object) or Nail Polish - Design - Metallic (object) or Nail Polish - Design - Pearl (object) or Nail Polish - Design - Shimmer (object) or Nail Polish - Design - Textured (object) or Press On Nails - Color (object) or Press on Nails - Design (object) |
Responses
Request samples
- Payload
- curl
- Node.js
- JavaScript
- PHP
- Python
- Java
{- "version": "1.0",
- "effect_type": "nail_polish",
- "effects": [
- {
- "sub_type": "color",
- "finger": "index",
- "color": "#ff0000",
- "texture": "cream",
- "reflection": 0,
- "contrast": 0,
- "roughness": 0,
- "transparency": 0
}
]
}
Response samples
- 200
- 400
- 401
{- "status": 200,
- "data": {
- "task_id": "grH0CvsgXuAIHLUzD0V1Ol34hoet3R1tvdbtiVHrDb6_UqCLKIejAIajwxrhOAfe"
}
}Check the status of a AI Nail Vto task.
Authorizations:
path Parameters
| task_id required | string Example: grH0CvsgXuAIHLUzD0V1Ol34hoet3R1tvdbtiVHrDb6_UqCLKIejAIajwxrhOAfe ID of task to check |
Responses
Request samples
- curl
- Node.js
- JavaScript
- PHP
- Python
- Java
curl --request GET \ --url https://yce-api-01.makeupar.com/s2s/v2.0/task/nail-vto/grH0CvsgXuAIHLUzD0V1Ol34hoet3R1tvdbtiVHrDb6_UqCLKIejAIajwxrhOAfe \ --header 'Authorization: Bearer <access_token for v1, API Key for v2>'
Response samples
- 200
- 400
- 401
- 500
{- "status": 200,
- "data": {
- "task_status": "running",
- "error": "exceed_max_filesize",
- "error_message": "string",
}
}AI Face Reshape
The AI Face Reshape API lets you programmatically reshape facial features — eyes, nose, lips, jawline, or the whole face — with pixel‑perfect control. Use it to generate before/after visualisations for rhinoplasty, chin fillers, lip augmentations, brow lifts and any other aesthetic‑treatment workflow.
Rhinoplasty (Nose Job) Our online rhinoplasty simulator offers medical-grade precision adjustments. Unlike generic photo editing apps, it allows for comprehensive simulation of specific details, including the Bridge, Lift, and Wing. With our hyper-realistic previews, clients can clearly visualize and explore their ideal proportions before consulting.
Chin Filler Through our online simulator, you can preview the ideal proportions achieved with chin fillers. Fine-tune Chin Length and Chin Shape to visualize improvements for a receding or short chin. Discover the optimal solution to balance your facial profile before undergoing any dermal filler treatments.
Lip Filler Users can experiment with different volumes and shapes of lip fillers to simulate the appearance of fuller lips, helping them decide on the desired outcome before undergoing the procedure.
Brow Lift Surgery This functionality enables users to preview the results of a brow lift, which involves lifting and reshaping the eyebrows to create a more youthful and rejuvenated appearance.
This guide walks you through:
Workflow for AI Face Reshape API:
Endpoint: /s2s/v2.0/file/face-reshape
Authentication Required: Authorization: Bearer YOUR_API_KEY
Workflow Steps:
Image Upload Preparation:
- The process begins with preparing a selfie image.
Optional Preprocessing For Multiple Faces:
- Preprocess the selfie image if there are more than one face in the image.
Face Reshape Effect Setup:
- Begin by selecting suitable face reshape parameters of Eye, Face, Lip or Nose.
Initiate AI Task and Obtain Task ID:
- Send the uploaded image(s) along with the chosen effect configuration via an HTTP POST request to
/s2s/v2.0/file/face-reshape. - Await a unique task ID in the response, which identifies this interaction.
- Send the uploaded image(s) along with the chosen effect configuration via an HTTP POST request to
Poll Task Status (Continuous Check):
- Use the obtained
task_idto periodically poll the task status using an HTTP GET request (e.g.,GET /task/${task_id}). - Continuously monitor for:
Task_status = "success"(process completed).Task_status = "error"(resolve or retry if applicable).
- Update the workflow accordingly once the status transitions to success.
- Use the obtained
This structured workflow ensures efficient integration with user inputs, automated monitoring of tasks, and seamless retrieval of results.
API Playground
Interactively explore and test the API using our official playground:
API Playground: http://yce.makeupar.com/api-console/en/api-playground/ai-face-reshape/
Authentication
- Include your API key in the request header using Bearer Token:
You can find your API Key at https://yce.makeupar.com/api-console/en/api-keys/.Authorization: Bearer YOUR_API_KEY
1. Upload an Image
You may upload a file directly to the server or provide a valid image URL in the AI task payload.
Upload Endpoint
POST /s2s/v2.0/file/face-reshape
Alternatively, skip this step if you already have a public image URL.
2. Prepare an effect template
Preprocessing
Output detected bounding boxes in pixel coordinate. Use the index of result to create a Face Reshape AI task later.
{
"timed": number,
"result": [
{
"left": number,
"top": number,
"width": number,
"height": number
}
]
}
Effect Template JSON Schemas
{
"version": "1.0",
"index": 0,
"features": {},
"global": {
"skin_smooth_strength": 50,
"skin_smooth_color_intensity": 50,
},
}
index: index of detected face from preprocessing. optional, default 0.
features: required at least 1, non-zero face reshape parameter, cannot be all zero.
skin_smooth_strength: 0100
skin_smooth_color_intensity: 0100
Effect Format
- Face
default range: -100
100 range of cheekbones and jaws: 0100 all feature values must not be zero at the same time, at least one feature value must be non-zero
{
"cheekbones": 0,
"jaw": 0,
"face_reshape_left": 0,
"face_reshape_right": 0,
"face_width": 0,
"chin_reshape_left": 0,
"chin_reshape_right": 0,
"chin_length": 0,
}
- Eye default range: -100~100 all feature values must not be zero at the same time, at least one feature value must be non-zero
{
"eye_size_left": 0,
"eye_size_right": 0,
"eye_distance": 0,
"eye_angle": 0,
"eye_height": 0,
"eye_width": 0,
}
- Nose default range: -100~100 all feature values must not be zero at the same time, at least one feature value must be non-zero
{
"nose_bridge_width": 0,
"nose_lift": 0,
"nose_size": 0,
"nose_tip": 0,
"nose_tip_width": 0,
"nose_wing": 0
}
- Lip default range: -100~100 all feature values must not be zero at the same time, at least one feature value must be non-zero
{
"lip_size": 0,
"lip_width": 0,
"lip_peak": 0,
"lip_height_top": 0,
"lip_height_bottom": 0,
}
Example Payload (ready to send)
{
"src_file_url": "https://plugins-media.makeupar.com/strapi/assets/face_reshape_01_85c8ffc055.jpg",
"version": "1.0",
"source": "yco",
"features": {
"eye_size_left": 80,
"eye_size_right": 80,
"eye_width": 0,
"eye_height": 0,
"eye_distance": 0,
"eye_angle": 0,
"face_reshape_left": 0,
"face_reshape_right": 0,
"chin_reshape_left": 20,
"chin_reshape_right": 20,
"chin_length": 0,
"face_width": -30,
"cheekbones": 0,
"jaw": 0,
"lip_size": 10,
"lip_width": 40,
"lip_height_top": 10,
"lip_height_bottom": 10,
"lip_peak": -10,
"nose_size": 30,
"nose_lift": -20,
"nose_bridge_width": 10,
"nose_tip": -10,
"nose_wing": 30,
"nose_tip_width": 30
},
"global": {
"skin_smooth_strength": 50,
"skin_smooth_color_intensity": 50
}
}
3. Create a Face Reshape AI Task and Poll for Results
Once you have an image and a complete effect payload, create a task. The API processes the request asynchronously. You must poll the task status until it reaches success or error.
Create Task Endpoint
POST /s2s/v2.0/task/face-reshape
Polling Endpoint
GET /s2s/v2.0/task/face-reshape/{task_id}
AI Face Reshape Specification
Supported Selfie View A selfie with width and height of a face larger than 1/20 of image width and heigh. Face angle less than 30 degree for pitch, yaw and rolling.

Supported Formats & Dimensions
| AI Feature | Supported Dimensions | Supported File Size | Supported Formats |
|---|---|---|---|
| AI Face Reshape | long side <= 4096 | < 10MB | jpg/jpeg/png |
Error Codes
| Error Code | Description |
|---|---|
| RUNTIME_ERROR | An unexpected error occurred duface reshape runtime |
| PHOTO_DETECTION_FAIL | The user photo could not be processed correctly, for example no hand detected |
| OBJECT_DETECTION_FAIL | The object photo could not be processed correctly, for example no product detected |
| PHOTO_CHECK_INVALID | The pose or size of the user photo is invalid |
| INPUT_ERROR | The input file format is incorrect |
| INPUT_MAIN_IMAGE_EMPTY | A user image is required |
Environment & Dependency
| Sample Code Language / Tool | Recommended Runtime Versions |
|---|---|
| cURL | - bash >= 3.2 - curl >= 7.58 (modern TLS/HTTP support) - jq >= 1.6 (robust JSON parsing) |
| Node.js (JavaScript) | Node >= 18 (for global fetch) |
| JavaScript | - Chrome / Edge >= 80 - Firefox >= 74 - Safari >= 13.1 |
| PHP | PHP >= 7.4 (for modern TLS/compat), ext-curl (recommended) or allow_url_fopen=On + ext-openssl, ext-json |
| Python | Python >= 3.10 (for f-strings), requests >= 2.20.0 |
| Java | Java 11+ (for HttpClient), Jackson Databind >= 2.12.0 |
Overview
The JavaScript Camera Kit provides a complete in-browser camera solution designed for high-accuracy face-based imaging tasks. It includes:
- Camera permission handling
- Real-time face detection
- Automatic face quality validation (lighting, pose, angle, distance)
- Guided capture UI
- Multi-step capture flows for advanced hair/face tasks
- Support for both base64 and blob output formats
The module is particularly optimized for AI-driven image analysis, such as AI Skin Analysis (SD/HD), AI Face Tone Analysis, and hair-related analysis.
Download the JS Camera Kit
Include the JS Camera Kit SDK via CDN:
https://plugins-media.makeupar.com/v2.2-camera-kit/sdk.js
Once loaded, the SDK installs a global YMK object.
Quick Start Example
The following sample demonstrates:
- Loading the JS Camera Kit SDK
- Implementing
window.ymkAsyncInit - Initializing the module
- Opening the camera
- Receiving captured images
<!DOCTYPE html>
<html lang="en">
<head>
<meta charset="UTF-8" />
<meta name="viewport" content="width=device-width, initial-scale=1.0" />
<title>Camera Kit Sample</title>
</head>
<body>
<script>
window.ymkAsyncInit = function() {
YMK.addEventListener('loaded', function() {
/* Module fully loaded and ready */
});
YMK.addEventListener('faceDetectionCaptured', function(capturedResult) {
/* Display all captured images */
const container = document.getElementById('captured-results');
container.innerHTML = '';
for (const image of capturedResult.images) {
const img = document.createElement('img');
img.src = typeof image.image === 'string'
? image.image
: URL.createObjectURL(image.image);
container.appendChild(img);
}
});
};
function openCameraKit() {
YMK.init({
faceDetectionMode: 'facereshape',
imageFormat: 'base64',
language: 'enu',
});
YMK.openCameraKit();
}
</script>
<!-- Load SDK -->
<script>
window.addEventListener('load', function() {
(function(d) {
const s = d.createElement('script');
s.type = 'text/javascript';
s.async = true;
s.src = 'https://plugins-media.makeupar.com/v2.2-camera-kit/sdk.js';
d.getElementsByTagName('script')[0].parentNode.insertBefore(s, null);
})(document);
});
</script>
<button onClick="openCameraKit()">Open Camera Kit</button>
<div id="YMK-module"></div>
<h3>Captured Results:</h3>
<div id="captured-results"></div>
</body>
</html>
Prerequisites
You must define the asynchronous initialization entry point:
<script>
window.ymkAsyncInit = function() {
YMK.init(); // default settings
};
</script>
Additional requirements:
| Requirement | Description |
|---|---|
| Browser | Must support getUserMedia |
| HTTPS | Required on most browsers for webcam access |
<div id="YMK-module"> |
Mandatory mount point for the UI |
Integration Guide
Step 1 — Initialize the Module
Call YMK.init() before calling YMK.openCameraKit():
YMK.init({
faceDetectionMode: 'makeup',
imageFormat: 'base64',
language: 'enu'
});
Supported Detection Modes
| Mode | Description |
|---|---|
makeup |
Standard camera mode for virtual cosmetic try-on |
skincare |
Standard skin analysis mode, close-up face capture |
hdskincare |
HD Skin capture using webcams with ≥ 2560px width |
shadefinder |
Skin Tone Analysis front-face capture |
facereshape |
AI Face Reshape capture |
hairlength |
Full hair-length capture (from a distance) |
hairfrizziness |
3-phase capture: front, right-turn, left-turn |
hairtype |
Same 3-phase multi-angle capture flow |
ring |
Hand capture for ring try‑on |
wrist |
Wrist capture for watch or bracelet try‑on |
necklace |
Selfie capture for necklace try-on |
earring |
Selfie capture for earring try-on |
Step 2 — Add Event Handlers
Event examples:
YMK.addEventListener('faceQualityChanged', function(q) {
console.log('Quality updated:', q);
});
See the full Events List below.
Step 3 — Open Camera Kit
YMK.openCameraKit();
This automatically:
- Shows the UI
- Opens webcam
- Begins real-time face quality monitoring
- Automatically captures when conditions are acceptable
Step 4 — Receiving Captured Result
Captured images arrive via:
YMK.addEventListener('faceDetectionCaptured', function(result) {
console.log(result.images);
});
Step 5 — Close Module
YMK.close();
API Reference
YMK.init(args)
Configures module appearance, detection mode, language, and capture format.
Arguments
args.faceDetectionMode
Detection flow to use.
Values:
"makeup" | "skincare" | "hdskincare" | "shadefinder" | "facereshape" | "hairlength" | "hairfrizziness" | "hairtype" | "ring" | "wrist" | "necklace" | "earring"
Default: "skincare"
args.width
Pixel width of module container. Default:
360(screens ≥ 500px)screen width(screens < 500px)
Allowed: 300–1920
args.height
Pixel height of module container. Default:
480(screens ≥ 500px)min(screen.height, innerHeight)for smaller screens
Allowed: 300–1920
args.language
UI language.
Available: "chs", "cht", "deu", "enu", "esp", "fra", "jpn", "kor", "ptb", "ita"
Default: "enu"
args.imageFormat
Format returned via faceDetectionCaptured.
"base64" or "blob"
Default: "base64"
args.disableCameraResolutionCheck
Allow running even if webcam does not meet required resolution.
Default: false
Other API Methods
YMK.openCameraKit()
Opens the module and begins detection.
YMK.addEventListener(eventName, callback)
Registers event callbacks.
Returns: EventListenerIdentifier
YMK.removeEventListener(id)
Removes listener by identifier.
YMK.isLoaded()
Returns whether livestream or photo is drawn on canvas.
Returns: boolean
YMK.pause()
Pauses the webcam stream.
YMK.resume(restartWebcam = false)
Resumes webcam after pause.
YMK.getInfo()
Returns current module info:
{
"fps": 30
}
YMK.close()
Closes module and camera.
Events Reference
Lifecycle Events
| Event | Description |
|---|---|
opened |
Module opened |
loading |
Loading progress (0–100) |
loaded |
Camera stream loaded onto canvas |
closed |
Module closed |
Camera Events
| Event | Description |
|---|---|
cameraOpened |
Webcam opened |
cameraClosed |
Webcam closed |
cameraFailed |
Permission denied or no webcam Error code:* "error_resolution_unsupported"* "error_permission_denied"* "error_access_failed" |
faceQualityChanged
Fires continuously during detection.
{
"hasFace": true,
"position": "good",
"frontal": "good",
"lighting": "ok"
}
- Field Descriptions
| Field | Values | Meaning |
|---|---|---|
hasFace |
true/false |
Whether face is detected |
position |
"good", "notgood", "toosmall", "outofboundary" |
Face distance/size quality |
frontal |
"good", "notgood" |
Whether user is facing forward |
lighting |
"good", "ok", "notgood" |
Lighting strength |
Necklace/Earring
| Field | Values | Meaning |
|---|---|---|
hasFace |
true/false |
Whether face is detected |
pose |
"good", "notgood" |
Face pose quality |
size |
"good", "notgood" |
Face size quality |
Wrist/Ring
| Field | Values | Meaning |
|---|---|---|
hasFace |
true/false |
Whether face is detected |
position |
"good", "notgood" |
Hand position quality |
pose |
"good", "notgood" |
Hand pose quality |
Minimum Recommended Quality
const minQuality = {
hasFace: true,
area: "good",
frontal: "good",
lighting: "ok"
};
faceDetectionStarted
User enters detection UI.
faceDetectionCaptured
This event is fired after all required face quality validation checks have passed and the Camera Kit has successfully completed the capture workflow.
Depending on the selected faceDetectionMode, the event may contain one or multiple captured images (e.g., multi-angle capture for hair modes).
Callback Arguments
capturedResult — Object
The result object containing all successfully captured images and metadata.
Field Definitions
mode — string
Indicates the active faceDetectionMode used for capturing.
Possible values include:
"makeup" | "skincare" | "hdskincare" | "shadefinder" | "facereshape" | "hairlength" | "hairfrizziness" | "hairtype" | "ring" | "wrist" | "necklace" | "earring"
This value corresponds directly to the configuration set in YMK.init({ faceDetectionMode }).
images — Array
ImageObject Structure
| Field | Type | Description |
|---|---|---|
phase |
integer | The zero-based index representing the capture step. Examples: • Skincare = 0 • Hair frizziness sequence = 0 (front), 1 (right turn), 2 (left turn) |
image |
string or Blob | The captured image. • Base64 string if args.imageFormat = "base64" • Binary Blob if args.imageFormat = "blob" |
width |
integer | Pixel width of the captured image. |
height |
integer | Pixel height of the captured image. |
Notes
- The number of images varies depending on
faceDetectionMode.- Example:
"hairfrizziness"and"hairtype"typically produce three images.
- Example:
- Image resolution may differ from device to device.
The actual pixel size depends on:
- The user's webcam maximum resolution
- The constraints and recommended settings for the selected mode
- All images are guaranteed to meet the minimum face quality requirements before this event is dispatched.
Configuration Notes
Quality Requirements
- Ensure correct distance
- Ensure frontal face angle
- Provide sufficient lighting (avoid shadows)
Multi-Phase Capture
Modes like hairtype or hairfrizziness require:
- Front face
- Turn right
- Turn left
Ensure event handling is in place.
Create a new file.
To upload a new file, you'll first need to use the File API. It will give you a URL – use that URL to upload your file. Once the upload is finished, you can use the file_id from the same response to start using our AI features.
Authorizations:
Request Body schema: application/jsonrequired
required | Array of objects |
Responses
Request samples
- Payload
- curl
- Node.js
- JavaScript
- PHP
- Python
- Java
{- "files": [
- {
- "content_type": "image/jpg",
- "file_name": "my-selfie.jpg",
- "file_size": 50000
}
]
}Response samples
- 200
- 400
- 401
{- "status": 200,
- "data": {
- "files": [
- {
- "content_type": "image/jpg",
- "file_name": "my-selfie.jpg",
- "file_id": "U8aqJbsXGT537jtGnEDFHqxdDXqh8+oTF/cSkLimzuvVwMP+Jb1XbjPsf7ZgUgLY",
- "requests": [
- {
- "headers": {
- "Content-Type": "image/jpg",
- "Content-Length": 50000
}, - "method": "PUT"
}
]
}
]
}
}Run an AI Face Reshape detection task.
Once you start an AI task, you need to keep polling at given polling_interval to check its status until it shows either success or error because if you don't, the task will time out and when you try to check the status later, you'll get an InvalidTaskId error even if the task did finish successfully and your units will still be consumed.
Authorizations:
Request Body schema: application/jsonrequired
| src_file_url required | string Url of the file to run task. The url should be publicly accessible. |
Responses
Request samples
- Payload
- curl
- Node.js
- JavaScript
- PHP
- Python
- Java
{
}Response samples
- 200
- 400
- 401
{- "status": 200,
- "data": {
- "task_id": "grH0CvsgXuAIHLUzD0V1Ol34hoet3R1tvdbtiVHrDb6_UqCLKIejAIajwxrhOAfe"
}
}Check the status of a AI Face Reshape detection task.
Authorizations:
path Parameters
| task_id required | string Example: grH0CvsgXuAIHLUzD0V1Ol34hoet3R1tvdbtiVHrDb6_UqCLKIejAIajwxrhOAfe ID of task to check |
Responses
Request samples
- curl
- Node.js
- JavaScript
- PHP
- Python
- Java
curl --request GET \ --url https://yce-api-01.makeupar.com/s2s/v2.0/task/face-reshape/pre-process/grH0CvsgXuAIHLUzD0V1Ol34hoet3R1tvdbtiVHrDb6_UqCLKIejAIajwxrhOAfe \ --header 'Authorization: Bearer <access_token for v1, API Key for v2>'
Response samples
- 200
- 400
- 401
- 500
{- "status": 200,
- "data": {
- "task_status": "running",
- "error": "exceed_max_filesize",
- "error_message": "string",
- "results": {
- "timed": 0,
- "result": [
- {
- "left": 0,
- "top": 0,
- "width": 0,
- "height": 0
}
]
}
}
}Run an AI Face Reshape task.
Once you start an AI task, you need to keep polling at given polling_interval to check its status until it shows either success or error because if you don't, the task will time out and when you try to check the status later, you'll get an InvalidTaskId error even if the task did finish successfully and your units will still be consumed.
Authorizations:
Request Body schema: application/jsonrequired
| src_file_url required | string Url of the file to run task. The url should be publicly accessible. |
| version required | string Default: "1.0" Version of the features specification. Defaults to |
| index | integer Default: 0 The index of the person from detection task result. |
required | object non-empty Cannot be all zero |
required | object |
Responses
Request samples
- Payload
- curl
- Node.js
- JavaScript
- PHP
- Python
- Java
{- "version": "1.0",
- "index": 0,
- "features": {
- "cheekbones": 0,
- "jaw": 0,
- "face_reshape_left": 0,
- "face_reshape_right": 0,
- "face_width": 0,
- "chin_reshape_left": 0,
- "chin_reshape_right": 0,
- "chin_length": 0,
- "eye_size_left": 0,
- "eye_size_right": 0,
- "eye_distance": 0,
- "eye_angle": 0,
- "eye_height": 0,
- "eye_width": 0,
- "nose_bridge_width": 0,
- "nose_lift": 0,
- "nose_size": 0,
- "nose_tip": 0,
- "nose_tip_width": 0,
- "nose_wing": 0,
- "lip_size": 0,
- "lip_width": 0,
- "lip_peak": 0,
- "lip_height_top": 0,
- "lip_height_bottom": 0
}, - "global": {
- "skin_smooth_strength": 50,
- "skin_smooth_color_intensity": 50
}
}Response samples
- 200
- 400
- 401
{- "status": 200,
- "data": {
- "task_id": "grH0CvsgXuAIHLUzD0V1Ol34hoet3R1tvdbtiVHrDb6_UqCLKIejAIajwxrhOAfe"
}
}Check the status of a AI Face Reshape task.
Authorizations:
path Parameters
| task_id required | string Example: grH0CvsgXuAIHLUzD0V1Ol34hoet3R1tvdbtiVHrDb6_UqCLKIejAIajwxrhOAfe ID of task to check |
Responses
Request samples
- curl
- Node.js
- JavaScript
- PHP
- Python
- Java
curl --request GET \ --url https://yce-api-01.makeupar.com/s2s/v2.0/task/face-reshape/grH0CvsgXuAIHLUzD0V1Ol34hoet3R1tvdbtiVHrDb6_UqCLKIejAIajwxrhOAfe \ --header 'Authorization: Bearer <access_token for v1, API Key for v2>'
Response samples
- 200
- 400
- 401
- 500
{- "status": 200,
- "data": {
- "task_status": "running",
- "error": "exceed_max_filesize",
- "error_message": "string",
}
}Create a new file.
To upload a new file, you'll first need to use the File API. It will give you a URL – use that URL to upload your file. Once the upload is finished, you can use the file_id from the same response to start using our AI features.
Authorizations:
Request Body schema: application/jsonrequired
required | Array of objects |
Responses
Request samples
- Payload
- curl
- Node.js
- JavaScript
- PHP
- Python
- Java
{- "files": [
- {
- "content_type": "image/jpg",
- "file_name": "my-selfie.jpg",
- "file_size": 50000
}
]
}Response samples
- 200
- 400
- 401
{- "status": 200,
- "data": {
- "files": [
- {
- "content_type": "image/jpg",
- "file_name": "my-selfie.jpg",
- "file_id": "U8aqJbsXGT537jtGnEDFHqxdDXqh8+oTF/cSkLimzuvVwMP+Jb1XbjPsf7ZgUgLY",
- "requests": [
- {
- "headers": {
- "Content-Type": "image/jpg",
- "Content-Length": 50000
}, - "method": "PUT"
}
]
}
]
}
}Run an AI Face Lift detection task.
Once you start an AI task, you need to keep polling at given polling_interval to check its status until it shows either success or error because if you don't, the task will time out and when you try to check the status later, you'll get an InvalidTaskId error even if the task did finish successfully and your units will still be consumed.
Authorizations:
Request Body schema: application/jsonrequired
| src_file_url required | string Url of the file to run task. The url should be publicly accessible. |
Responses
Request samples
- Payload
- curl
- Node.js
- JavaScript
- PHP
- Python
- Java
{
}Response samples
- 200
- 400
- 401
{- "status": 200,
- "data": {
- "task_id": "grH0CvsgXuAIHLUzD0V1Ol34hoet3R1tvdbtiVHrDb6_UqCLKIejAIajwxrhOAfe"
}
}Check the status of a AI Face Lift detection task.
Authorizations:
path Parameters
| task_id required | string Example: grH0CvsgXuAIHLUzD0V1Ol34hoet3R1tvdbtiVHrDb6_UqCLKIejAIajwxrhOAfe ID of task to check |
Responses
Request samples
- curl
- Node.js
- JavaScript
- PHP
- Python
- Java
curl --request GET \ --url https://yce-api-01.makeupar.com/s2s/v2.0/task/face-lift/pre-process/grH0CvsgXuAIHLUzD0V1Ol34hoet3R1tvdbtiVHrDb6_UqCLKIejAIajwxrhOAfe \ --header 'Authorization: Bearer <access_token for v1, API Key for v2>'
Response samples
- 200
- 400
- 401
- 500
{- "status": 200,
- "data": {
- "task_status": "running",
- "error": "exceed_max_filesize",
- "error_message": "string",
- "results": {
- "timed": 0,
- "result": [
- {
- "left": 0,
- "top": 0,
- "width": 0,
- "height": 0
}
]
}
}
}Run an AI Face Lift task.
Once you start an AI task, you need to keep polling at given polling_interval to check its status until it shows either success or error because if you don't, the task will time out and when you try to check the status later, you'll get an InvalidTaskId error even if the task did finish successfully and your units will still be consumed.
Authorizations:
Request Body schema: application/jsonrequired
| src_file_url required | string Url of the file to run task. The url should be publicly accessible. |
| type | string Default: "custom" Value: "auto" |
| version required | string Default: "1.0" Version of the features specification. Defaults to |
| index | integer Default: 0 The index of the person from detection task result. |
object Cannot be all zero when using 'custom' type. | |
object (GlobalSkinSmoothCommon) |
Responses
Request samples
- Payload
- curl
- Node.js
- JavaScript
- PHP
- Python
- Java
{- "type": "custom",
- "version": "1.0",
- "index": 0,
- "features": {
- "eye_bag": 0,
- "cheek": 0,
- "forehead": 0,
- "shape": 0,
- "mouth": 0
}, - "global": {
- "skin_smooth_strength": 50,
- "skin_smooth_color_intensity": 50
}
}Response samples
- 200
- 400
- 401
{- "status": 200,
- "data": {
- "task_id": "grH0CvsgXuAIHLUzD0V1Ol34hoet3R1tvdbtiVHrDb6_UqCLKIejAIajwxrhOAfe"
}
}Check the status of a AI Face Lift task.
Authorizations:
path Parameters
| task_id required | string Example: grH0CvsgXuAIHLUzD0V1Ol34hoet3R1tvdbtiVHrDb6_UqCLKIejAIajwxrhOAfe ID of task to check |
Responses
Request samples
- curl
- Node.js
- JavaScript
- PHP
- Python
- Java
curl --request GET \ --url https://yce-api-01.makeupar.com/s2s/v2.0/task/face-lift/grH0CvsgXuAIHLUzD0V1Ol34hoet3R1tvdbtiVHrDb6_UqCLKIejAIajwxrhOAfe \ --header 'Authorization: Bearer <access_token for v1, API Key for v2>'
Response samples
- 200
- 400
- 401
- 500
{- "status": 200,
- "data": {
- "task_status": "running",
- "error": "exceed_max_filesize",
- "error_message": "string",
}
}AI Body Reshape
AI Body Reshape API for Body Reshape & Slimming Feel confident in photos with an AI body editor! Slim, reshape, and enhance your body for natural, stunning proportions. Effortlessly reshape any area — waist, arms, thighs, chest, and more. Get natural, stunning results in just a tap!
This guide walks you through:
Workflow for AI Body Reshape API:
Endpoint: /s2s/v2.0/file/body-reshape
Authentication Required: Authorization: Bearer YOUR_API_KEY
Workflow Steps:
Image Upload Preparation:
- The process begins with preparing a selfie image.
Optional Preprocessing For Group Photos:
- Preprocess the selfie image if there are more than one person in the image.
Body Reshape Effect Setup:
- Begin by selecting suitable body reshape parameters.
Initiate AI Task and Obtain Task ID:
- Send the uploaded image(s) along with the chosen effect configuration via an HTTP POST request to
/s2s/v2.0/file/body-reshape. - Await a unique task ID in the response, which identifies this interaction.
- Send the uploaded image(s) along with the chosen effect configuration via an HTTP POST request to
Poll Task Status (Continuous Check):
- Use the obtained
task_idto periodically poll the task status using an HTTP GET request (e.g.,GET /task/${task_id}). - Continuously monitor for:
Task_status = "success"(process completed).Task_status = "error"(resolve or retry if applicable).
- Update the workflow accordingly once the status transitions to success.
- Use the obtained
This structured workflow ensures efficient integration with user inputs, automated monitoring of tasks, and seamless retrieval of results.
API Playground
Interactively explore and test the API using our official playground:
API Playground: http://yce.makeupar.com/api-console/en/api-playground/ai-body-reshape/
Authentication
- Include your API key in the request header using Bearer Token:
You can find your API Key at https://yce.makeupar.com/api-console/en/api-keys/.Authorization: Bearer YOUR_API_KEY
1. Upload an Image
You may upload a file directly to the server or provide a valid image URL in the AI task payload.
Upload Endpoint
POST /s2s/v2.0/file/body-reshape
Alternatively, skip this step if you already have a public image URL.
2. Prepare an effect template
Preprocessing
Output detected bounding boxes in pixel coordinate. Use the index of result to create a Body Reshape AI task later.
{
"timed": number,
"result": [
{
"left": number,
"top": number,
"width": number,
"height": number
}
]
}
Effect Template JSON Schemas
{
"version": "1.0",
"index": 0,
"features": {
"arm": 0, // -100~100
"breast_left": 0, // -100~100
"breast_right": 0, // -100~100
"hip": 0, // -100~100
"hip_lift": 0, // -100~100
"leg": 0, // -100~100
"neck_left": 0, // 0~100
"neck_right": 0, // 0~100
"shoulder_left": 0, // -100~100
"shoulder_right": 0, // -100~100
"squared_shoulder_left": 0, // -100~100
"squared_shoulder_right": 0, // -100~100
"slim": 0, // -100~100
"taller": 0, // 0~100
"waist": 0, // -100~100
"belly": 0 // -100~100
}
}
index: index of detected body from preprocessing. optional, default 0. features: required at least 1, non-zero body reshape parameter, cannot be all zero.
Example Payload (ready to send)
{
"src_file_url": "https://plugins-media.makeupar.com/strapi/assets/body_reshape_02_7777218379.jpg",
"version": "1.0",
"index": 0,
"features": {
"arm": 0,
"waist": -20,
"taller": 80,
"squared_shoulder_left": 10,
"squared_shoulder_right": 10,
"neck_left": 0,
"neck_right": 0,
"hip": 10,
"breast_left": 30,
"breast_right": 30,
"slim": -70,
"shoulder_left": 30,
"shoulder_right": 30,
"leg": -30,
"hip_lift": 0,
"belly": -50
}
}
3. Create a Body Reshape AI Task and Poll for Results
Once you have an image and a complete effect payload, create a task. The API processes the request asynchronously. You must poll the task status until it reaches success or error.
Create Task Endpoint
POST /s2s/v2.0/task/body-reshape
Polling Endpoint
GET /s2s/v2.0/task/body-reshape/{task_id}
AI Body Reshape Specification
Supported Selfie View Full body shot with clear facial expression and body posture visible.

Visibility & Pose Requirements
| Region | What must be true in the source image |
|---|---|
| Neck | The neck must be visible in the source image. |
| Arm | Both arms – upper arm, forearm and hand – have to be fully shown. |
| Leg | The whole leg must appear in the picture. |
| Hip | Hips need to be in view. |
| Hip‑Lift | Hips need to be in view. |
| Shoulder | • Shoulders are required to be seen. • Raising a hand is not allowed. • A 90° side pose is not allowed. |
| Belly | The belly is required to be visible. |
| Waist | Waist must be visible. |
| Breast | • Breast area must appear in the picture. • The shot should include the hips (i.e., not a “half‑body without hips”). • The middle of the breast must be shown. |
| Slim | Shoulders need to be in the frame. |
| Taller | • Hips must appear. • A half‑body view should include the legs (i.e., legs are visible). |
Supported Formats & Dimensions
| AI Feature | Supported Dimensions | Supported File Size | Supported Formats |
|---|---|---|---|
| AI Body Reshape | long side <= 2048, short side >= 320 | < 10MB | jpg/jpeg/png |
Error Codes
| Error Code | Description |
|---|---|
| RUNTIME_ERROR | An unexpected error occurred dubody reshape runtime |
| PHOTO_DETECTION_FAIL | The user photo could not be processed correctly, for example no hand detected |
| PHOTO_CHECK_INVALID | The pose or size of the user photo is invalid |
| INPUT_ERROR | The input file format is incorrect |
| INPUT_MAIN_IMAGE_EMPTY | A user image is required |
Environment & Dependency
| Sample Code Language / Tool | Recommended Runtime Versions |
|---|---|
| cURL | - bash >= 3.2 - curl >= 7.58 (modern TLS/HTTP support) - jq >= 1.6 (robust JSON parsing) |
| Node.js (JavaScript) | Node >= 18 (for global fetch) |
| JavaScript | - Chrome / Edge >= 80 - Firefox >= 74 - Safari >= 13.1 |
| PHP | PHP >= 7.4 (for modern TLS/compat), ext-curl (recommended) or allow_url_fopen=On + ext-openssl, ext-json |
| Python | Python >= 3.10 (for f-strings), requests >= 2.20.0 |
| Java | Java 11+ (for HttpClient), Jackson Databind >= 2.12.0 |
Create a new file.
To upload a new file, you'll first need to use the File API. It will give you a URL – use that URL to upload your file. Once the upload is finished, you can use the file_id from the same response to start using our AI features.
Authorizations:
Request Body schema: application/jsonrequired
required | Array of objects |
Responses
Request samples
- Payload
- curl
- Node.js
- JavaScript
- PHP
- Python
- Java
{- "files": [
- {
- "content_type": "image/jpg",
- "file_name": "my-selfie.jpg",
- "file_size": 50000
}
]
}Response samples
- 200
- 400
- 401
{- "status": 200,
- "data": {
- "files": [
- {
- "content_type": "image/jpg",
- "file_name": "my-selfie.jpg",
- "file_id": "U8aqJbsXGT537jtGnEDFHqxdDXqh8+oTF/cSkLimzuvVwMP+Jb1XbjPsf7ZgUgLY",
- "requests": [
- {
- "headers": {
- "Content-Type": "image/jpg",
- "Content-Length": 50000
}, - "method": "PUT"
}
]
}
]
}
}Run an AI Body Reshape detection task.
Once you start an AI task, you need to keep polling at given polling_interval to check its status until it shows either success or error because if you don't, the task will time out and when you try to check the status later, you'll get an InvalidTaskId error even if the task did finish successfully and your units will still be consumed.
Authorizations:
Request Body schema: application/jsonrequired
| src_file_url required | string Url of the file to run task. The url should be publicly accessible. |
Responses
Request samples
- Payload
- curl
- Node.js
- JavaScript
- PHP
- Python
- Java
{
}Response samples
- 200
- 400
- 401
{- "status": 200,
- "data": {
- "task_id": "grH0CvsgXuAIHLUzD0V1Ol34hoet3R1tvdbtiVHrDb6_UqCLKIejAIajwxrhOAfe"
}
}Check the status of a AI Body Reshape detection task.
Authorizations:
path Parameters
| task_id required | string Example: grH0CvsgXuAIHLUzD0V1Ol34hoet3R1tvdbtiVHrDb6_UqCLKIejAIajwxrhOAfe ID of task to check |
Responses
Request samples
- curl
- Node.js
- JavaScript
- PHP
- Python
- Java
curl --request GET \ --url https://yce-api-01.makeupar.com/s2s/v2.0/task/body-reshape/pre-process/grH0CvsgXuAIHLUzD0V1Ol34hoet3R1tvdbtiVHrDb6_UqCLKIejAIajwxrhOAfe \ --header 'Authorization: Bearer <access_token for v1, API Key for v2>'
Response samples
- 200
- 400
- 401
- 500
{- "status": 200,
- "data": {
- "task_status": "running",
- "error": "exceed_max_filesize",
- "error_message": "string",
- "results": {
- "timed": 0,
- "result": [
- {
- "left": 0,
- "top": 0,
- "width": 0,
- "height": 0
}
]
}
}
}Run an AI Body Reshape task.
Once you start an AI task, you need to keep polling at given polling_interval to check its status until it shows either success or error because if you don't, the task will time out and when you try to check the status later, you'll get an InvalidTaskId error even if the task did finish successfully and your units will still be consumed.
Authorizations:
Request Body schema: application/jsonrequired
| src_file_url required | string Url of the file to run task. The url should be publicly accessible. |
| version required | string Default: "1.0" Version of the features specification. Defaults to |
| index | integer The index of the person from detection task result. |
required | object non-empty Cannot be all zero |
Responses
Request samples
- Payload
- curl
- Node.js
- JavaScript
- PHP
- Python
- Java
{- "version": "1.0",
- "index": 0,
- "features": {
- "arm": 0,
- "breast_left": 0,
- "breast_right": 0,
- "hip": 0,
- "hip_lift": 0,
- "leg": 0,
- "neck_left": 0,
- "neck_right": 0,
- "shoulder_left": 0,
- "shoulder_right": 0,
- "squared_shoulder_left": 0,
- "squared_shoulder_right": 0,
- "slim": 0,
- "taller": 0,
- "waist": 0,
- "belly": 0
}
}Response samples
- 200
- 400
- 401
{- "status": 200,
- "data": {
- "task_id": "grH0CvsgXuAIHLUzD0V1Ol34hoet3R1tvdbtiVHrDb6_UqCLKIejAIajwxrhOAfe"
}
}Check the status of a AI Body Reshape task.
Authorizations:
path Parameters
| task_id required | string Example: grH0CvsgXuAIHLUzD0V1Ol34hoet3R1tvdbtiVHrDb6_UqCLKIejAIajwxrhOAfe ID of task to check |
Responses
Request samples
- curl
- Node.js
- JavaScript
- PHP
- Python
- Java
curl --request GET \ --url https://yce-api-01.makeupar.com/s2s/v2.0/task/body-reshape/grH0CvsgXuAIHLUzD0V1Ol34hoet3R1tvdbtiVHrDb6_UqCLKIejAIajwxrhOAfe \ --header 'Authorization: Bearer <access_token for v1, API Key for v2>'
Response samples
- 200
- 400
- 401
- 500
{- "status": 200,
- "data": {
- "task_status": "running",
- "error": "exceed_max_filesize",
- "error_message": "string",
- "results": {
- "timed": 0,
- "timed_apply": 0,
- "arm": true,
- "breast_left": true,
- "breast_right": true,
- "hip": true,
- "hip_lift": true,
- "leg": true,
- "neck_left": true,
- "neck_right": true,
- "shoulder_left": true,
- "shoulder_right": true,
- "squared_shoulder_left": true,
- "squared_shoulder_right": true,
- "slim": true,
- "taller": true,
- "waist": true,
- "belly": true
}
}
}Create a new file.
To upload a new file, you'll first need to use the File API. It will give you a URL – use that URL to upload your file. Once the upload is finished, you can use the file_id from the same response to start using our AI features.
Authorizations:
Request Body schema: application/jsonrequired
required | Array of objects |
Responses
Request samples
- Payload
- curl
- Node.js
- JavaScript
- PHP
- Python
- Java
{- "files": [
- {
- "content_type": "image/jpg",
- "file_name": "my-selfie.jpg",
- "file_size": 50000
}
]
}Response samples
- 200
- 400
- 401
{- "status": 200,
- "data": {
- "files": [
- {
- "content_type": "image/jpg",
- "file_name": "my-selfie.jpg",
- "file_id": "U8aqJbsXGT537jtGnEDFHqxdDXqh8+oTF/cSkLimzuvVwMP+Jb1XbjPsf7ZgUgLY",
- "requests": [
- {
- "headers": {
- "Content-Type": "image/jpg",
- "Content-Length": 50000
}, - "method": "PUT"
}
]
}
]
}
}Run an AI Teeth Whiten detection task.
Once you start an AI task, you need to keep polling at given polling_interval to check its status until it shows either success or error because if you don't, the task will time out and when you try to check the status later, you'll get an InvalidTaskId error even if the task did finish successfully and your units will still be consumed.
Authorizations:
Request Body schema: application/jsonrequired
| src_file_url required | string Url of the file to run task. The url should be publicly accessible. |
Responses
Request samples
- Payload
- curl
- Node.js
- JavaScript
- PHP
- Python
- Java
{
}Response samples
- 200
- 400
- 401
{- "status": 200,
- "data": {
- "task_id": "grH0CvsgXuAIHLUzD0V1Ol34hoet3R1tvdbtiVHrDb6_UqCLKIejAIajwxrhOAfe"
}
}Check the status of a AI Teeth Whiten detection task.
Authorizations:
path Parameters
| task_id required | string Example: grH0CvsgXuAIHLUzD0V1Ol34hoet3R1tvdbtiVHrDb6_UqCLKIejAIajwxrhOAfe ID of task to check |
Responses
Request samples
- curl
- Node.js
- JavaScript
- PHP
- Python
- Java
curl --request GET \ --url https://yce-api-01.makeupar.com/s2s/v2.0/task/teeth-whiten/pre-process/grH0CvsgXuAIHLUzD0V1Ol34hoet3R1tvdbtiVHrDb6_UqCLKIejAIajwxrhOAfe \ --header 'Authorization: Bearer <access_token for v1, API Key for v2>'
Response samples
- 200
- 400
- 401
- 500
{- "status": 200,
- "data": {
- "task_status": "running",
- "error": "exceed_max_filesize",
- "error_message": "string",
- "results": {
- "timed": 0,
- "result": [
- {
- "left": 0,
- "top": 0,
- "width": 0,
- "height": 0
}
]
}
}
}Run an AI Teeth Whiten task.
Once you start an AI task, you need to keep polling at given polling_interval to check its status until it shows either success or error because if you don't, the task will time out and when you try to check the status later, you'll get an InvalidTaskId error even if the task did finish successfully and your units will still be consumed.
Authorizations:
Request Body schema: application/jsonrequired
| src_file_url required | string Url of the file to run task. The url should be publicly accessible. |
| version required | string Value: "1.0" |
| index | integer Default: 0 The index of the person from detection task result. |
required | object |
Responses
Request samples
- Payload
- curl
- Node.js
- JavaScript
- PHP
- Python
- Java
{- "version": "1.0",
- "index": 0,
- "effect": {
- "whitening_intensity": 100,
- "skin_smooth_strength": 50,
- "skin_smooth_color_intensity": 50
}
}Response samples
- 200
- 400
- 401
{- "status": 200,
- "data": {
- "task_id": "grH0CvsgXuAIHLUzD0V1Ol34hoet3R1tvdbtiVHrDb6_UqCLKIejAIajwxrhOAfe"
}
}Check the status of a AI Teeth Whiten task.
Authorizations:
path Parameters
| task_id required | string Example: grH0CvsgXuAIHLUzD0V1Ol34hoet3R1tvdbtiVHrDb6_UqCLKIejAIajwxrhOAfe ID of task to check |
Responses
Request samples
- curl
- Node.js
- JavaScript
- PHP
- Python
- Java
curl --request GET \ --url https://yce-api-01.makeupar.com/s2s/v2.0/task/teeth-whiten/grH0CvsgXuAIHLUzD0V1Ol34hoet3R1tvdbtiVHrDb6_UqCLKIejAIajwxrhOAfe \ --header 'Authorization: Bearer <access_token for v1, API Key for v2>'
Response samples
- 200
- 400
- 401
- 500
{- "status": 200,
- "data": {
- "task_status": "running",
- "error": "exceed_max_filesize",
- "error_message": "string",
}
}AI Clothes
AI Clothes is a virtual fitting room that lets users try on clothes without physically wearing them. Using AI and photo editing technology, these apps overlay outfits onto your image so you can see how different styles and fits look on your body type. It’s perfect for online shopping, style inspiration, or just playing around with fashion ideas. Try on clothes virtually with AI Clothes . Upload any clothing reference to swap outfits with you photo for an instant virtual wardrobe transformation.
API Playground
You can use the API Playground to test the AI Clothes virtual try-on feature. This allows you to experiment with your ideas and gain a better understanding of the try-on process.
Access the API Playground at: https://yce.makeupar.com/api-console/en/api-playground/ai-clothes/
AI Clothes API Usage Guide
This guide explains how to upload images, prepare reference outfits, and create virtual try-on tasks using the AI Clothes API.
Step 1. Upload a File Using the File API
Use the File API (/s2s/v2.0/file/cloth) to upload a target user image.
Image Requirements:
- Upload a high-resolution full-body photo.
- Ensure the photo clearly shows the entire body.
- Avoid backgrounds with multiple people or distracting objects.
Example Request:
curl --request POST \
--url https://yce-api-01.makeupar.com/s2s/v2.0/file/cloth \
--header 'Authorization: Bearer YOUR_API_KEY' \
--header 'content-type: application/json' \
--data '{
"files": [
{
"content_type": "image/jpg",
"file_name": "full_body_photo_01_3dbd1b6683.jpg",
"file_size": 547541
}
]
}'
Step 2. Retrieve File API Response
The response includes:
file_idfor creating an AI task.requests.urlfor uploading the actual image file.
Sample Response:
{
"status": 200,
"data": {
"files": [
{
"content_type": "image/jpg",
"file_name": "full_body_photo_01_3dbd1b6683.jpg",
"file_id": "SaGaqpDgKwFrVBgMpQMA3HY0LeqdT9/13W5TOD8/u/FfjK3xgCQ+hRt9MJXBFaud",
"requests": [
{
"method": "PUT",
"url": "https://yce-us.s3-accelerate.amazonaws.com/demo/ttl30/...signature...",
"headers": {
"Content-Length": "547541",
"Content-Type": "image/jpg"
}
}
]
}
]
}
}
Step 3. Upload Image to Provided URL
Use the requests.url from the File API response to upload the image:
curl --location --request PUT 'https://yce-us.s3-accelerate.amazonaws.com/demo/ttl30/...signature...' \
--header 'Content-Type: image/jpg' \
--header 'Content-Length: 547541' \
--data-binary @'./full_body_photo_01_3dbd1b6683.jpg'
Step 4. Prepare a Reference Outfit
4.1 Fetch Predefined Outfit Templates
Use the Template API (/s2s/v2.0/task/template/cloth) to retrieve a list of predefined outfit templates:
curl --request GET \
--url 'https://yce-api-01.makeupar.com/s2s/v2.0/task/template/cloth?page_size=20&starting_token=13045969587275114' \
--header 'Authorization: Bearer YOUR_API_KEY'
4.2 Upload a Reference Outfit Image
You can:
- Upload an outfit image using the File API (
/s2s/v2.0/file/cloth), or - Provide a valid image URL.
Supported Outfit Images:
- Product image of the clothing.
- Full-body photo as an outfit reference.
Refer to File Specs and Errors for detailed specifications.
Step 5. Create an AI Task
Use the AI Task API (/s2s/v2.0/task/cloth) to create a virtual try-on task.
Parameters:
- For the user image:
src_file_idorsrc_file_url. - For the outfit image:
ref_file_id,ref_file_url, ortemplate_id.
Example Request:
curl --request POST \
--url https://yce-api-01.makeupar.com/s2s/v2.0/task/cloth \
--header 'Authorization: Bearer YOUR_API_KEY' \
--header 'content-type: application/json' \
--data '{
"src_file_url": "https://plugins-media.makeupar.com/strapi/assets/clothes_03_cccd5d4803.jpeg",
"ref_file_url": "https://plugins-media.makeupar.com/strapi/assets/clothes_reference_full_body_01_5a000d999f.png",
"garment_category": "full_body"
}'
Sample Response:
{
"status": 200,
"data": {
"task_id": "SaGaqpDgKwFrVBgMpQMA3HY0LeqdT9_13W5TOD8_u_GPi6NqQ3dhlmN-6ntFwhzT"
}
}
Step 6. Poll for Task Result
Use the task ID to check the status:
curl --request GET \
--url https://yce-api-01.makeupar.com/s2s/v2.0/task/cloth/<YOUR_TASK_ID> \
--header 'Authorization: Bearer YOUR_API_KEY' \
--header 'content-type: application/json'
Step 7. Retrieve Result
A successful response includes a download URL for the result image:
{
"status": 200,
"data": {
"error": null,
"results": {
"url": "https://yce-us.s3-accelerate.amazonaws.com/demo/ttl30/...signature..."
},
"task_status": "success"
}
}
Invalid API Key error response:
{
"status": 401,
"error": "Unauthorized",
"error_code": "InvalidAccessToken"
}
Use cases:


Suggestions for How to Shoot:

Supported Formats & Dimensions
| Type | Supported Dimensions | Supported File Size | Supported Formats |
|---|---|---|---|
| Target user image | 1024×768 recommended, 512×384 minimum, max side 4096 px. - Single person only. - The person should occupy at least 80% of the frame for optimal results. - Images should include the upper body only, from the chest upwards. There is no need to show the abdomen, but the shoulders should be visible. - The face must be fully visible, with no obstructions. - The body must be facing forward in a standing position (no sitting or crouching). | < 10MB | jpg/png |
| Reference image of the clothing | 1024×768 recommended, 512×384 minimum, max side 4096 px. - If Using a Real-Person Clothing Photo as Reference - Must feature only one person. - The visible clothing area must fully cover the intended try-on area. - Example: For full-body try-on, a half-body clothing image is not acceptable. - Example: For lower-body try-on, partial pants are not acceptable. - The clothing must not be heavily obstructed (e.g. covered by long hair or arms). - The face must be fully visible, with no obstructions. - The body must be facing forward in a standing position (no sitting or crouching). - If Using a Product Image as Reference - Must be a front-facing product shot of a single garment. - Do not use composite images (e.g. top and bottom in one photo). - For the lower body, only actual worn outfits are supported, not standalone product images. | < 10MB | jpg/png |
Error Codes
| Error Code | Description |
|---|---|
| error_invalid_ref | The uploaded clothing image appears empty or only partially visible |
| error_apply_region_mismatch | The source and reference images don’t match — for example, the source image shows only the upper body, while the reference image is focused on pants |
| invalid_parameter | - Invalid garment category - Style_id not in inference_style_list - Invalid keys/acts |
| error_download_image | - Download image error |
| exceed_max_filesize | - image size too large (> 10MB) |
| error_nsfw_content_detected | - Potential NSFW content detected in result image |
| unknown_internal_error | - Failed to load model - Invalid scheduler algorithm type - No engine loaded - File not in the upload results |
Environment & Dependency
| Sample Code Language / Tool | Recommended Runtime Versions |
|---|---|
| cURL | - bash >= 3.2 - curl >= 7.58 (modern TLS/HTTP support) - jq >= 1.6 (robust JSON parsing) |
| Node.js (JavaScript) | Node >= 18 (for global fetch) |
| JavaScript | - Chrome / Edge >= 80 - Firefox >= 74 - Safari >= 13.1 |
| PHP | PHP >= 7.4 (for modern TLS/compat), ext-curl (recommended) or allow_url_fopen=On + ext-openssl, ext-json |
| Python | Python >= 3.10 (for f-strings), requests >= 2.20.0 |
| Java | Java 11+ (for HttpClient), Jackson Databind >= 2.12.0 |
Create a new file.
To upload a new file, you'll first need to use the File API. It will give you a URL – use that URL to upload your file. Once the upload is finished, you can use the file_id from the same response to start using our AI features.
Authorizations:
Request Body schema: application/jsonrequired
required | Array of objects |
Responses
Request samples
- Payload
- curl
- Node.js
- JavaScript
- PHP
- Python
- Java
{- "files": [
- {
- "content_type": "image/jpg",
- "file_name": "my-selfie.jpg",
- "file_size": 50000
}
]
}Response samples
- 200
- 400
- 401
{- "status": 200,
- "data": {
- "files": [
- {
- "content_type": "image/jpg",
- "file_name": "my-selfie.jpg",
- "file_id": "U8aqJbsXGT537jtGnEDFHqxdDXqh8+oTF/cSkLimzuvVwMP+Jb1XbjPsf7ZgUgLY",
- "requests": [
- {
- "headers": {
- "Content-Type": "image/jpg",
- "Content-Length": 50000
}, - "method": "PUT"
}
]
}
]
}
}List predefined templates.
Authorizations:
query Parameters
| page_size | integer Example: page_size=20 Number of results to return in this page. Valid value should be between 1 and 20. Default 20. |
| starting_token | string Example: starting_token=13045969587275114 Token for current page. Start with |
Responses
Request samples
- curl
- Node.js
- JavaScript
- PHP
- Python
- Java
curl --request GET \ --url 'https://yce-api-01.makeupar.com/s2s/v2.0/task/template/cloth?page_size=20&starting_token=13045969587275114' \ --header 'Authorization: Bearer <access_token for v1, API Key for v2>'
Response samples
- 200
- 400
- 401
{- "status": 200,
- "data": {
- "templates": [
- {
- "id": "good_template_001",
- "thumb": "string",
- "title": "string",
- "category_name": "string"
}
], - "next_token": 13045969587275114
}
}Run an AI Cloths task.
Once you start an AI task, you need to keep polling at given polling_interval to check its status until it shows either success or error because if you don't, the task will time out and when you try to check the status later, you'll get an InvalidTaskId error even if the task did finish successfully and your units will still be consumed.
Authorizations:
Request Body schema: application/jsonrequired
| src_file_url required | string Url of the file to run task. The url should be publicly accessible. |
| ref_file_url required | string Url of the reference file to run task. The url should be publicly accessible. |
| garment_category required | string Enum: "full_body" "lower_body" "upper_body" "shoes" "auto" The category of garment of reference image. It's required if reference image provided. Utilize the "auto" parameter to allow the AI engine to automatically identify and classify garment categories. |
| change_shoes | boolean Default: true Control whether shoes should be swapped when a full body reference image with shoes is available for processing. |
Responses
Request samples
- Payload
- curl
- Node.js
- JavaScript
- PHP
- Python
- Java
{- "garment_category": "full_body",
- "change_shoes": true
}Response samples
- 200
- 400
- 401
{- "status": 200,
- "data": {
- "task_id": "grH0CvsgXuAIHLUzD0V1Ol34hoet3R1tvdbtiVHrDb6_UqCLKIejAIajwxrhOAfe"
}
}Check the status of a AI Cloths task.
Authorizations:
path Parameters
| task_id required | string Example: grH0CvsgXuAIHLUzD0V1Ol34hoet3R1tvdbtiVHrDb6_UqCLKIejAIajwxrhOAfe ID of task to check |
Responses
Request samples
- curl
- Node.js
- JavaScript
- PHP
- Python
- Java
curl --request GET \ --url https://yce-api-01.makeupar.com/s2s/v2.0/task/cloth/grH0CvsgXuAIHLUzD0V1Ol34hoet3R1tvdbtiVHrDb6_UqCLKIejAIajwxrhOAfe \ --header 'Authorization: Bearer <access_token for v1, API Key for v2>'
Response samples
- 200
- 400
- 401
- 500
{- "status": 200,
- "data": {
- "task_status": "running",
- "error": "exceed_max_filesize",
- "error_message": "string",
}
}Create a new file.
To upload a new file, you'll first need to use the File API. It will give you a URL – use that URL to upload your file. Once the upload is finished, you can use the file_id from the same response to start using our AI features.
Authorizations:
Request Body schema: application/jsonrequired
required | Array of objects |
Responses
Request samples
- Payload
- curl
- Node.js
- JavaScript
- PHP
- Python
- Java
{- "files": [
- {
- "content_type": "image/jpg",
- "file_name": "my-selfie.jpg",
- "file_size": 50000
}
]
}Response samples
- 200
- 400
- 401
{- "status": 200,
- "data": {
- "files": [
- {
- "content_type": "image/jpg",
- "file_name": "my-selfie.jpg",
- "file_id": "U8aqJbsXGT537jtGnEDFHqxdDXqh8+oTF/cSkLimzuvVwMP+Jb1XbjPsf7ZgUgLY",
- "requests": [
- {
- "headers": {
- "Content-Type": "image/jpg",
- "Content-Length": 50000
}, - "method": "PUT"
}
]
}
]
}
}Run an AI Cloth V3 task.
Once you start an AI task, you need to keep polling at given polling_interval to check its status until it shows either success or error because if you don't, the task will time out and when you try to check the status later, you'll get an InvalidTaskId error even if the task did finish successfully and your units will still be consumed.
Authorizations:
Request Body schema: application/jsonrequired
| src_file_url required | string Url of the file to run task. The url should be publicly accessible. |
| ref_file_url required | string Url of the reference file to run task. The url should be publicly accessible. |
| garment_category required | string Enum: "full_body" "lower_body" "upper_body" "shoes" "auto" The category of garment of reference image. It's required if reference image provided. Utilize the "auto" parameter to allow the AI engine to automatically identify and classify garment categories. |
| change_shoes | boolean Default: true Control whether shoes should be swapped when a full body reference image with shoes is available for processing.
|
Responses
Request samples
- Payload
- curl
- Node.js
- JavaScript
- PHP
- Python
- Java
{- "garment_category": "full_body",
- "change_shoes": true
}Response samples
- 200
- 400
- 401
{- "status": 200,
- "data": {
- "task_id": "grH0CvsgXuAIHLUzD0V1Ol34hoet3R1tvdbtiVHrDb6_UqCLKIejAIajwxrhOAfe"
}
}Check the status of a AI Cloth V3 task.
Authorizations:
path Parameters
| task_id required | string Example: grH0CvsgXuAIHLUzD0V1Ol34hoet3R1tvdbtiVHrDb6_UqCLKIejAIajwxrhOAfe ID of task to check |
Responses
Request samples
- curl
- Node.js
- JavaScript
- PHP
- Python
- Java
curl --request GET \ --url https://yce-api-01.makeupar.com/s2s/v2.0/task/cloth-v3/grH0CvsgXuAIHLUzD0V1Ol34hoet3R1tvdbtiVHrDb6_UqCLKIejAIajwxrhOAfe \ --header 'Authorization: Bearer <access_token for v1, API Key for v2>'
Response samples
- 200
- 400
- 401
- 500
{- "status": 200,
- "data": {
- "task_status": "running",
- "error": "exceed_max_filesize",
- "error_message": "string",
}
}AI Fabric
Transform your look with stunning realism! Explore unique fabric styles with photo mode — whether it's the elegance of silky textures or the vibrance of bold prints, the AI Fabric API brings materials to life! Developers can craft immersive experiences that let users see and feel fabrics like never before. Plus, fresh fabric updates are always on the way!
AI Fabric API Usage Guide
This guide explains how to upload images, fetch predefined fabric styles, and create virtual try-on tasks using the AI Fabric API.
Step 1. Upload a File Using the File API
Use the File API (/s2s/v2.0/file/fabric) to upload a target user image.
Image Requirements:
- Upload a high-resolution full-body photo.
- Ensure the photo clearly shows the entire body.
- Avoid backgrounds with multiple people or distracting objects.
Example Request:
curl --request POST \
--url https://yce-api-01.makeupar.com/s2s/v2.0/file/fabric \
--header 'Authorization: Bearer YOUR_API_KEY' \
--header 'content-type: application/json' \
--data '{
"files": [
{
"content_type": "image/jpg",
"file_name": "full_body_photo_01_3dbd1b6683.jpg",
"file_size": 547541
}
]
}'
Step 2. Retrieve File API Response
The response includes:
file_idfor creating an AI task.requests.urlfor uploading the actual image file.
Sample Response:
{
"status": 200,
"data": {
"files": [
{
"content_type": "image/jpg",
"file_name": "full_body_photo_01_3dbd1b6683.jpg",
"file_id": "SaGaqpDgKwFrVBgMpQMA3HY0LeqdT9/13W5TOD8/u/FfjK3xgCQ+hRt9MJXBFaud",
"requests": [
{
"method": "PUT",
"url": "https://yce-us.s3-accelerate.amazonaws.com/demo/ttl30/...signature...",
"headers": {
"Content-Length": "547541",
"Content-Type": "image/jpg"
}
}
]
}
]
}
}
Step 3. Upload Image to Provided URL
Use the requests.url from the File API response to upload the image:
curl --location --request PUT 'https://yce-us.s3-accelerate.amazonaws.com/demo/ttl30/...signature...' \
--header 'Content-Type: image/jpg' \
--header 'Content-Length: 547541' \
--data-binary @'./full_body_photo_01_3dbd1b6683.jpg'
Step 4. Fetch Predefined Fabric Templates
Use the Template API (/s2s/v2.0/task/template/fabric) to retrieve a list of predefined fabric templates:
curl --request GET \
--url 'https://yce-api-01.makeupar.com/s2s/v2.0/task/template/fabric?page_size=20&starting_token=13045969587275114' \
--header 'Authorization: Bearer YOUR_API_KEY'
Step 5. Create an AI Task
Use the AI Task API (/s2s/v2.0/task/fabric) to create a virtual try-on task.
Parameters:
- For the user image:
src_file_idorsrc_file_url. - For the fabric style:
template_id.
Example Request:
curl --request POST \
--url https://yce-api-01.makeupar.com/s2s/v2.0/task/fabric \
--header 'Authorization: Bearer YOUR_API_KEY' \
--header 'content-type: application/json' \
--data '{
"template_id":"good_template_001",
"src_file_url":"https://example.com/selfie.jpg"
}'
Sample Response:
{
"status": 200,
"data": {
"task_id": "SaGaqpDgKwFrVBgMpQMA3HY0LeqdT9_13W5TOD8_u_GPi6NqQ3dhlmN-6ntFwhzT"
}
}
Step 6. Poll for Task Result
Use the task ID to check the status:
curl --request GET \
--url https://yce-api-01.makeupar.com/s2s/v2.0/task/fabric/<YOUR_TASK_ID> \
--header 'Authorization: Bearer YOUR_API_KEY' \
--header 'content-type: application/json'
Step 7. Retrieve Result
A successful response includes a download URL for the result image:
{
"status": 200,
"data": {
"error": null,
"results": {
"url": "https://yce-us.s3-accelerate.amazonaws.com/demo/ttl30/...signature..."
},
"task_status": "success"
}
}
Invalid API Key error response:
{
"status": 401,
"error": "Unauthorized",
"error_code": "InvalidAccessToken"
}
Use cases:


Suggestions for How to Shoot:
Supported Formats & Dimensions
| AI Feature | Supported Dimensions | Supported File Size | Supported Formats |
|---|---|---|---|
| AI Fabric | long side <= 4096, single person only, The abdomen, face, and shoulders should all be visible. The face must not be obstructed. The body should be upright and facing forward, without any unusual poses like sitting or squatting. | < 10MB | jpg/jpeg |
Error Codes
| Error Code | Description |
|---|---|
| error_apply_region_not_detected | The clothing area is either too small or wasn’t detected in the input image |
Environment & Dependency
| Sample Code Language / Tool | Recommended Runtime Versions |
|---|---|
| cURL | - bash >= 3.2 - curl >= 7.58 (modern TLS/HTTP support) - jq >= 1.6 (robust JSON parsing) |
| Node.js (JavaScript) | Node >= 18 (for global fetch) |
| JavaScript | - Chrome / Edge >= 80 - Firefox >= 74 - Safari >= 13.1 |
| PHP | PHP >= 7.4 (for modern TLS/compat), ext-curl (recommended) or allow_url_fopen=On + ext-openssl, ext-json |
| Python | Python >= 3.10 (for f-strings), requests >= 2.20.0 |
| Java | Java 11+ (for HttpClient), Jackson Databind >= 2.12.0 |
Create a new file.
To upload a new file, you'll first need to use the File API. It will give you a URL – use that URL to upload your file. Once the upload is finished, you can use the file_id from the same response to start using our AI features.
Authorizations:
Request Body schema: application/jsonrequired
required | Array of objects |
Responses
Request samples
- Payload
- curl
- Node.js
- JavaScript
- PHP
- Python
- Java
{- "files": [
- {
- "content_type": "image/jpg",
- "file_name": "my-selfie.jpg",
- "file_size": 50000
}
]
}Response samples
- 200
- 400
- 401
{- "status": 200,
- "data": {
- "files": [
- {
- "content_type": "image/jpg",
- "file_name": "my-selfie.jpg",
- "file_id": "U8aqJbsXGT537jtGnEDFHqxdDXqh8+oTF/cSkLimzuvVwMP+Jb1XbjPsf7ZgUgLY",
- "requests": [
- {
- "headers": {
- "Content-Type": "image/jpg",
- "Content-Length": 50000
}, - "method": "PUT"
}
]
}
]
}
}List predefined templates.
Authorizations:
query Parameters
| page_size | integer Example: page_size=20 Number of results to return in this page. Valid value should be between 1 and 20. Default 20. |
| starting_token | string Example: starting_token=13045969587275114 Token for current page. Start with |
Responses
Request samples
- curl
- Node.js
- JavaScript
- PHP
- Python
- Java
curl --request GET \ --url 'https://yce-api-01.makeupar.com/s2s/v2.0/task/template/fabric?page_size=20&starting_token=13045969587275114' \ --header 'Authorization: Bearer <access_token for v1, API Key for v2>'
Response samples
- 200
- 400
- 401
{- "status": 200,
- "data": {
- "templates": [
- {
- "id": "good_template_001",
- "thumb": "string",
- "title": "string",
- "category_name": "string"
}
], - "next_token": 13045969587275114
}
}Run an Fabric task.
Once you start an AI task, you need to keep polling at given polling_interval to check its status until it shows either success or error because if you don't, the task will time out and when you try to check the status later, you'll get an InvalidTaskId error even if the task did finish successfully and your units will still be consumed.
Authorizations:
Request Body schema: application/jsonrequired
| src_file_url required | string Url of the file to run task. The url should be publicly accessible. |
| template_id required | string ID of the template. List predefined templates first, and use the id of a template. |
Responses
Request samples
- Payload
- curl
- Node.js
- JavaScript
- PHP
- Python
- Java
{- "template_id": "good_template_001"
}Response samples
- 200
- 400
- 401
{- "status": 200,
- "data": {
- "task_id": "grH0CvsgXuAIHLUzD0V1Ol34hoet3R1tvdbtiVHrDb6_UqCLKIejAIajwxrhOAfe"
}
}Check the status of the Fabric task.
Authorizations:
path Parameters
| task_id required | string Example: grH0CvsgXuAIHLUzD0V1Ol34hoet3R1tvdbtiVHrDb6_UqCLKIejAIajwxrhOAfe ID of task to check |
Responses
Request samples
- curl
- Node.js
- JavaScript
- PHP
- Python
- Java
curl --request GET \ --url https://yce-api-01.makeupar.com/s2s/v2.0/task/fabric/grH0CvsgXuAIHLUzD0V1Ol34hoet3R1tvdbtiVHrDb6_UqCLKIejAIajwxrhOAfe \ --header 'Authorization: Bearer <access_token for v1, API Key for v2>'
Response samples
- 200
- 400
- 401
- 500
{- "status": 200,
- "data": {
- "task_status": "running",
- "error": "exceed_max_filesize",
- "error_message": "string",
}
}AI Bag Virtual Try-On
AR makes luxury bag shopping a tangible experience! AR tech empowers brands to showcase handbags with unmatched realism. From strap length to bag pairing, customers can visualize products instantly through camera.
This guide walks you through:
- Endpoint:
/s2s/v2.0/file/bag - Authentication: All requests require an
Authorization: Bearer YOUR_API_KEY - Workflow:
- Prepare a selfie image: Uploading an image or providing a valid image URL of yourself as the virtual try-on target.
- Prepare a bag image: Uploading an image or providing a valid image URL of a bag product or a person carrying a bag without any obstruction.
- Select a style and a gender: Select a preferred style and the gender you wish to visualize.
- Fire an AI task and Retrieve Task ID: Capture the
task_idfrom the response. - Poll Status (
GET): Use thetask_idto check the status of the task. Continue polling untiltask_statusis"success"or"error".
Authentication
- Include your API key in the request header using Bearer Token:
Authorization: Bearer YOUR_API_KEY
You can find your API Key at https://yce.makeupar.com/api-console/en/api-keys/.
AI Bag API Usage Guide
This guide explains how to upload images, prepare reference bags, and create virtual try-on tasks using the AI Bag API.
Step 1. Upload a File Using the File API
Use the File API (/s2s/v2.0/file/bag) to upload a target user image.
Image Requirements:
- Upload a selfie photo.
- Ensure the photo clearly shows the upper body.
- Avoid backgrounds with multiple people or distracting objects.
Example Request:
curl --request POST \
--url https://yce-api-01.makeupar.com/s2s/v2.0/file/bag \
--header 'Authorization: Bearer YOUR_API_KEY' \
--header 'content-type: application/json' \
--data '{
"files": [
{
"content_type": "image/jpg",
"file_name": "selfie_photo_01_3dbd1b6683.jpg",
"file_size": 547541
}
]
}'
Step 2. Retrieve File API Response
The response includes:
file_idfor creating an AI task.requests.urlfor uploading the actual image file.
Sample Response:
{
"status": 200,
"data": {
"files": [
{
"content_type": "image/jpg",
"file_name": "selfie_photo_01_3dbd1b6683.jpg",
"file_id": "SaGaqpDgKwFrVBgMpQMA3HY0LeqdT9/13W5TOD8/u/FfjK3xgCQ+hRt9MJXBFaud",
"requests": [
{
"method": "PUT",
"url": "https://yce-us.s3-accelerate.amazonaws.com/demo/ttl30/...signature...",
"headers": {
"Content-Length": "547541",
"Content-Type": "image/jpg"
}
}
]
}
]
}
}
Step 3. Upload Image to Provided URL
Use the requests.url from the File API response to upload the image:
curl --location --request PUT 'https://yce-us.s3-accelerate.amazonaws.com/demo/ttl30/...signature...' \
--header 'Content-Type: image/jpg' \
--header 'Content-Length: 547541' \
--data-binary @'./selfie_photo_01_3dbd1b6683.jpg'
Step 4. Prepare a Reference Bag Image
You can:
- Upload a bag image using the File API (
/s2s/v2.0/file/bag), or - Provide a valid image URL.
Supported Bag Images:
- Product image of the bag.
- A person carrying a bag without any obstruction as a bag reference.
Refer to File Specs and Errors for detailed specifications.
Step 5. Create an AI Task
Select a preferred style and the gender you wish to visualize.
Use the AI Task API (/s2s/v2.0/task/bag) to create a virtual try-on task.
Parameters:
- For the user image:
src_file_idorsrc_file_url. - For the bag image:
ref_file_id, orref_file_url.
Example Request:
curl --request POST \
--url https://yce-api-01.makeupar.com/s2s/v2.0/task/bag \
--header 'Authorization: Bearer YOUR_API_KEY' \
--header 'content-type: application/json' \
--data '{
"src_file_url": "https://example.com/selfie.jpg",
"ref_file_url": "https://example.com/accessory.jpg",
"gender": "female",
"style": "random"
}'
Sample Response:
{
"status": 200,
"data": {
"task_id": "SaGaqpDgKwFrVBgMpQMA3HY0LeqdT9_13W5TOD8_u_GPi6NqQ3dhlmN-6ntFwhzT"
}
}
Step 6. Poll for Task Result
Use the task ID to check the status:
curl --request GET \
--url https://yce-api-01.makeupar.com/s2s/v2.0/task/bag/SaGaqpDgKwFrVBgMpQMA3HY0LeqdT9_13W5TOD8_u_GPi6NqQ3dhlmN-6ntFwhzT \
--header 'Authorization: Bearer YOUR_API_KEY' \
--header 'content-type: application/json'
Step 7. Retrieve Result
A successful response includes a download URL for the result image:
{
"status": 200,
"data": {
"error": null,
"results": {
"url": "https://yce-us.s3-accelerate.amazonaws.com/demo/ttl30/...signature..."
},
"task_status": "success"
}
}
Invalid API Key error response:
{
"status": 401,
"error": "Unauthorized",
"error_code": "InvalidAccessToken"
}
AI Bag Virtual Try-On Specification
Supported Bag Image
- Product Image Requirements
- Minimum resolution: 512 × 512 pixels
- Only one product per image
- The product should cover more than 25 per cent of the image height

- Worn Image Requirements
- Minimum resolution: 800 × 800 pixels

Supported Selfie View
- Recommended image resolution: at least 512 × 512 pixels.
- Recommended face coverage: more than 15 per cent of the image height.
- The image must clearly show a single human subject with the face fully visible and at least a head shot included in the frame, from head to chest. A half-body shot is preferred.

Try-on Styles
- There are four predefined styles for generating the virtual try-on output: "style_parisian_chic", "style_urban_chic", "style_mediterranean_chic" and "style_art_deco_style". You can specify this style parameter when creating an AI task or allow the system to randomly select a style by default.

Supported Formats & Dimensions
| AI Feature | Supported Dimensions | Supported File Size | Supported Formats |
|---|---|---|---|
| AI Bag Virtual Try-On | Input: long side <= 4096 Output: 1104 x 1472 |
< 10MB | jpg/jpeg/png/heic |
Error Codes
| Error Code | Description |
|---|---|
| error_download_image | Download srcKeys/refKeys error |
| error_inference | Inference pipeline error |
| error_no_face | No face detected in source image |
| error_nsfw_content_detected | NSFW content detected in result image |
| exceed_max_filesize | Input file size exceeds the maximum limit (10 MB) |
| invalid_parameter | Invalid gender option value Invalid style option value |
| unknown_internal_error | Others |
Environment & Dependency
| Sample Code Language / Tool | Recommended Runtime Versions |
|---|---|
| cURL | - bash >= 3.2 - curl >= 7.58 (modern TLS/HTTP support) - jq >= 1.6 (robust JSON parsing) |
| Node.js (JavaScript) | Node >= 18 (for global fetch) |
| JavaScript | - Chrome / Edge >= 80 - Firefox >= 74 - Safari >= 13.1 |
| PHP | PHP >= 7.4 (for modern TLS/compat), ext-curl (recommended) or allow_url_fopen=On + ext-openssl, ext-json |
| Python | Python >= 3.10 (for f-strings), requests >= 2.20.0 |
| Java | Java 11+ (for HttpClient), Jackson Databind >= 2.12.0 |
Create a new file.
To upload a new file, you'll first need to use the File API. It will give you a URL – use that URL to upload your file. Once the upload is finished, you can use the file_id from the same response to start using our AI features.
Authorizations:
Request Body schema: application/jsonrequired
required | Array of objects |
Responses
Request samples
- Payload
- curl
- Node.js
- JavaScript
- PHP
- Python
- Java
{- "files": [
- {
- "content_type": "image/jpg",
- "file_name": "my-selfie.jpg",
- "file_size": 50000
}
]
}Response samples
- 200
- 400
- 401
{- "status": 200,
- "data": {
- "files": [
- {
- "content_type": "image/jpg",
- "file_name": "my-selfie.jpg",
- "file_id": "U8aqJbsXGT537jtGnEDFHqxdDXqh8+oTF/cSkLimzuvVwMP+Jb1XbjPsf7ZgUgLY",
- "requests": [
- {
- "headers": {
- "Content-Type": "image/jpg",
- "Content-Length": 50000
}, - "method": "PUT"
}
]
}
]
}
}Run an AI Bag task.
Once you start an AI task, you need to keep polling at given polling_interval to check its status until it shows either success or error because if you don't, the task will time out and when you try to check the status later, you'll get an InvalidTaskId error even if the task did finish successfully and your units will still be consumed.
Authorizations:
Request Body schema: application/jsonrequired
| src_file_url required | string Url of the file to run task. The url should be publicly accessible. |
| ref_file_url required | string Url of the reference file to run task. The url should be publicly accessible. |
| gender required | string Enum: "female" "male" Gender of the person in the image. |
| style | string Default: "random" Enum: "random" "style_parisian_chic" "style_urban_chic" "style_mediterranean_chic" "style_art_deco_style" To control outfit and background style. |
Responses
Request samples
- Payload
- curl
- Node.js
- JavaScript
- PHP
- Python
- Java
{- "gender": "female",
- "style": "random"
}Response samples
- 200
- 400
- 401
{- "status": 200,
- "data": {
- "task_id": "grH0CvsgXuAIHLUzD0V1Ol34hoet3R1tvdbtiVHrDb6_UqCLKIejAIajwxrhOAfe"
}
}Check the status of a AI Bag task.
Authorizations:
path Parameters
| task_id required | string Example: grH0CvsgXuAIHLUzD0V1Ol34hoet3R1tvdbtiVHrDb6_UqCLKIejAIajwxrhOAfe ID of task to check |
Responses
Request samples
- curl
- Node.js
- JavaScript
- PHP
- Python
- Java
curl --request GET \ --url https://yce-api-01.makeupar.com/s2s/v2.0/task/bag/grH0CvsgXuAIHLUzD0V1Ol34hoet3R1tvdbtiVHrDb6_UqCLKIejAIajwxrhOAfe \ --header 'Authorization: Bearer <access_token for v1, API Key for v2>'
Response samples
- 200
- 400
- 401
- 500
{- "status": 200,
- "data": {
- "task_status": "running",
- "error": "exceed_max_filesize",
- "error_message": "string",
}
}AI Scarf Virtual Try-On
Enhance your fashion experience with the online AR Scarf Virtual Try-On. Shoppers can instantly drape scarves over their outfits and see how patterns flow in real life. This interactive virtual scarf feature allows customers to explore different styles and colors online, replicating the in-store experience. Powered by high-fidelity AR simulation, users can enjoy detailed scarf visualisation anytime, anywhere.
This guide walks you through:
- Endpoint:
/s2s/v2.0/file/scarf - Authentication: All requests require an
Authorization: Bearer YOUR_API_KEY - Workflow:
- Prepare a selfie image: Uploading an image or providing a valid image URL of yourself as the virtual try-on target.
- Prepare a scarf image: Upload an image or provide a valid image URL of a scarf product or a person wearing a scarf clearly visible without any obstruction.
- Select a style and a gender: Select a preferred style and the gender you wish to visualize.
- Fire an AI task and Retrieve Task ID: Capture the
task_idfrom the response. - Poll Status (
GET): Use thetask_idto check the status of the task. Continue polling untiltask_statusis"success"or"error".
Authentication
- Include your API key in the request header using Bearer Token:
Authorization: Bearer YOUR_API_KEY
You can find your API Key at https://yce.makeupar.com/api-console/en/api-keys/.
AI Scarf API Usage Guide
This guide explains how to upload images, prepare reference scarfs, and create virtual try-on tasks using the AI Scarf API.
Step 1. Prepare a Selfie Image
You can:
- Upload a selfie image using the File API (
/s2s/v2.0/file/scarf), or - Provide a valid image URL.
Step 1.1 Upload a File Using the File API
Use the File API (/s2s/v2.0/file/scarf) to upload a target user image.
Image Requirements:
- Upload a selfie photo.
- Ensure the photo clearly shows the upper body.
- Avoid backgrounds with multiple people or distracting objects.
Example Request:
curl --request POST \
--url https://yce-api-01.makeupar.com/s2s/v2.0/file/scarf \
--header 'Authorization: Bearer YOUR_API_KEY' \
--header 'content-type: application/json' \
--data '{
"files": [
{
"content_type": "image/jpg",
"file_name": "selfie_photo_01_3dbd1b6683.jpg",
"file_size": 547541
}
]
}'
Step 1.2. Retrieve File API Response
The response includes:
file_idfor creating an AI task.requests.urlfor uploading the actual image file.
Sample Response:
{
"status": 200,
"data": {
"files": [
{
"content_type": "image/jpg",
"file_name": "selfie_photo_01_3dbd1b6683.jpg",
"file_id": "SaGaqpDgKwFrVBgMpQMA3HY0LeqdT9/13W5TOD8/u/FfjK3xgCQ+hRt9MJXBFaud",
"requests": [
{
"method": "PUT",
"url": "https://yce-us.s3-accelerate.amazonaws.com/demo/ttl30/...signature...",
"headers": {
"Content-Length": "547541",
"Content-Type": "image/jpg"
}
}
]
}
]
}
}
Step 1.3. Upload Image to Provided URL
Use the requests.url from the File API response to upload the image:
curl --location --request PUT 'https://yce-us.s3-accelerate.amazonaws.com/demo/ttl30/...signature...' \
--header 'Content-Type: image/jpg' \
--header 'Content-Length: 547541' \
--data-binary @'./selfie_photo_01_3dbd1b6683.jpg'
Step 2. Prepare a Reference Scarf Image
You can:
- Upload a scarf image using the File API (
/s2s/v2.0/file/scarf), or - Provide a valid image URL.
Supported Scarf Images:
- Product image of the scarf.
- A person carrying a scarf without any obstruction as a scarf reference.
Refer to File Specs and Errors for detailed specifications.
Step 3. Create an AI Task
Select a preferred style and the gender you wish to visualize.
Use the AI Task API (/s2s/v2.0/task/scarf) to create a virtual try-on task.
Parameters:
- For the user image:
src_file_idorsrc_file_url. - For the scarf image:
ref_file_id, orref_file_url.
Example Request:
curl --request POST \
--url https://yce-api-01.makeupar.com/s2s/v2.0/task/scarf \
--header 'Authorization: Bearer YOUR_API_KEY' \
--header 'content-type: application/json' \
--data '{
"src_file_url": "https://example.com/selfie.jpg",
"ref_file_url": "https://example.com/accessory.jpg",
"gender": "female",
"style": "random"
}'
Sample Response:
{
"status": 200,
"data": {
"task_id": "SaGaqpDgKwFrVBgMpQMA3HY0LeqdT9_13W5TOD8_u_GPi6NqQ3dhlmN-6ntFwhzT"
}
}
Step 4. Poll for Task Result
Use the task ID to check the status:
curl --request GET \
--url https://yce-api-01.makeupar.com/s2s/v2.0/task/scarf/SaGaqpDgKwFrVBgMpQMA3HY0LeqdT9_13W5TOD8_u_GPi6NqQ3dhlmN-6ntFwhzT \
--header 'Authorization: Bearer YOUR_API_KEY' \
--header 'content-type: application/json'
Step 5. Retrieve Result
A successful response includes a download URL for the result image:
{
"status": 200,
"data": {
"error": null,
"results": {
"url": "https://yce-us.s3-accelerate.amazonaws.com/demo/ttl30/...signature..."
},
"task_status": "success"
}
}
Invalid API Key error response:
{
"status": 401,
"error": "Unauthorized",
"error_code": "InvalidAccessToken"
}
AI Scarf Virtual Try-On Specification
Image Requirements
| Type | Minimum Resolution | Notes |
|---|---|---|
| Selfie | 512 × 512 | Face visible, head-to-chest preferred |
| Scarf | 512 × 512 (product) 800 × 800 (worn) |
Clear, unobstructed scarf view |
Supported Scarf Image
- Product Image Requirements
- Minimum resolution: 512 × 512 pixels
- Only one product per image
- The product should cover more than 25 per cent of the image height
- Worn Image Requirements
- Minimum resolution: 800 × 800 pixels

Supported Selfie View
- Recommended image resolution: at least 512 × 512 pixels.
- Recommended face coverage: more than 15 per cent of the image height.
- The image must clearly show a single human subject with the face fully visible and at least a head shot included in the frame, from head to chest. A half-body shot is preferred.
Try-on Styles
- There are five predefined styles for generating the virtual try-on output: "style_french_elegance", "style_light_luxury", "style_cottagecore", "style_modern_chic" and "style_bohemian". You can specify this style parameter when creating an AI task or allow the system to select a style at random by default.

Supported Formats & Dimensions
| AI Feature | Supported Dimensions | Supported File Size | Supported Formats |
|---|---|---|---|
| AI Scarf Virtual Try-On | Input: long side <= 4096 Output: 896 x 1152 |
< 10MB | jpg/jpeg/png/heic |
Error Codes
| Error Code | Description |
|---|---|
| error_download_image | Failed to download source or reference image |
| error_inference | Inference pipeline error |
| error_no_face | No face detected in source image |
| error_nsfw_content_detected | NSFW content detected in result |
| exceed_max_filesize | File size exceeds 10 MB |
| invalid_parameter | Invalid gender or style value |
| unknown_internal_error | Other internal errors |
Environment & Dependency
| Sample Code Language / Tool | Recommended Runtime Versions |
|---|---|
| cURL | - bash >= 3.2 - curl >= 7.58 (modern TLS/HTTP support) - jquery >= 1.6 (robust JSON parsing) |
| Node.js (JavaScript) | Node >= 18 (for global fetch) |
| JavaScript | - Chrome / Edge >= 80 - Firefox >= 74 - Safari >= 13.1 |
| PHP | PHP >= 7.4 (for modern TLS/compat), ext-curl (recommended) or allow_url_fopen=On + ext-openssl, ext-json |
| Python | Python >= 3.10 (for f-strings), requests >= 2.20.0 |
| Java | Java 11+ (for HttpClient), Jackson Databind >= 2.12.0 |
Create a new file.
To upload a new file, you'll first need to use the File API. It will give you a URL – use that URL to upload your file. Once the upload is finished, you can use the file_id from the same response to start using our AI features.
Authorizations:
Request Body schema: application/jsonrequired
required | Array of objects |
Responses
Request samples
- Payload
- curl
- Node.js
- JavaScript
- PHP
- Python
- Java
{- "files": [
- {
- "content_type": "image/jpg",
- "file_name": "my-selfie.jpg",
- "file_size": 50000
}
]
}Response samples
- 200
- 400
- 401
{- "status": 200,
- "data": {
- "files": [
- {
- "content_type": "image/jpg",
- "file_name": "my-selfie.jpg",
- "file_id": "U8aqJbsXGT537jtGnEDFHqxdDXqh8+oTF/cSkLimzuvVwMP+Jb1XbjPsf7ZgUgLY",
- "requests": [
- {
- "headers": {
- "Content-Type": "image/jpg",
- "Content-Length": 50000
}, - "method": "PUT"
}
]
}
]
}
}Run an AI Scarf task.
Once you start an AI task, you need to keep polling at given polling_interval to check its status until it shows either success or error because if you don't, the task will time out and when you try to check the status later, you'll get an InvalidTaskId error even if the task did finish successfully and your units will still be consumed.
Authorizations:
Request Body schema: application/jsonrequired
| src_file_url required | string Url of the file to run task. The url should be publicly accessible. |
| ref_file_url required | string Url of the reference file to run task. The url should be publicly accessible. |
| gender required | string Enum: "female" "male" Gender of the person in the image. |
| style | string Default: "random" Enum: "random" "style_french_elegance" "style_light_luxury" "style_cottagecore" "style_modern_chic" "style_bohemian" To control outfit and background style. |
Responses
Request samples
- Payload
- curl
- Node.js
- JavaScript
- PHP
- Python
- Java
{- "gender": "female",
- "style": "random"
}Response samples
- 200
- 400
- 401
{- "status": 200,
- "data": {
- "task_id": "grH0CvsgXuAIHLUzD0V1Ol34hoet3R1tvdbtiVHrDb6_UqCLKIejAIajwxrhOAfe"
}
}Check the status of a AI Scarf task.
Authorizations:
path Parameters
| task_id required | string Example: grH0CvsgXuAIHLUzD0V1Ol34hoet3R1tvdbtiVHrDb6_UqCLKIejAIajwxrhOAfe ID of task to check |
Responses
Request samples
- curl
- Node.js
- JavaScript
- PHP
- Python
- Java
curl --request GET \ --url https://yce-api-01.makeupar.com/s2s/v2.0/task/scarf/grH0CvsgXuAIHLUzD0V1Ol34hoet3R1tvdbtiVHrDb6_UqCLKIejAIajwxrhOAfe \ --header 'Authorization: Bearer <access_token for v1, API Key for v2>'
Response samples
- 200
- 400
- 401
- 500
{- "status": 200,
- "data": {
- "task_status": "running",
- "error": "exceed_max_filesize",
- "error_message": "string",
}
}AI Shoes Virtual Try-On
Step into the future of shopping with our AR Shoes Virtual Try-On. Instantly see how your favourite styles look and fit right from your screen. Powered by cutting-edge AI technology, this experience delivers a perfect visual fit, helping you shop with confidence and reduce returns. Explore endless styles and colours from the comfort of home. Our high-fidelity AR simulation brings every detail to life so you can enjoy the thrill of an in-store experience anytime, anywhere. Try it today and find the perfect pair that matches your style.
This guide walks you through:
- Endpoint:
/s2s/v2.0/file/shoes - Authentication: All requests require an
Authorization: Bearer YOUR_API_KEY - Workflow:
- Prepare a selfie image: Uploading an image or providing a valid image URL of yourself as the virtual try-on target.
- Prepare a shoes image: Upload a shoe product image or a photo of a person wearing shoes.
- Select a style and a gender: Select a preferred style and the gender you wish to visualize.
- Fire an AI task and Retrieve Task ID: Capture the
task_idfrom the response. - Poll Status (
GET): Use thetask_idto check the status of the task. Continue polling untiltask_statusis"success"or"error".
Authentication
- Include your API key in the request header using Bearer Token:
Authorization: Bearer YOUR_API_KEY
You can find your API Key at https://yce.makeupar.com/api-console/en/api-keys/.
AI Shoes API Usage Guide
This guide explains how to upload images, prepare reference shoes, and create virtual try-on tasks using the AI Shoes API.
Step 1. Prepare a Selfie Image
You can:
- Upload a selfie image using the File API (
/s2s/v2.0/file/shoes), or - Provide a valid image URL.
Step 1.1 Upload a File Using the File API
Use the File API (/s2s/v2.0/file/shoes) to upload a target user image.
Image Requirements:
- Upload a selfie photo.
- Ensure the photo clearly shows the upper body.
- Avoid backgrounds with multiple people or distracting objects.
Example Request:
curl --request POST \
--url https://yce-api-01.makeupar.com/s2s/v2.0/file/shoes \
--header 'Authorization: Bearer YOUR_API_KEY' \
--header 'content-type: application/json' \
--data '{
"files": [
{
"content_type": "image/jpg",
"file_name": "selfie_photo_01_3dbd1b6683.jpg",
"file_size": 547541
}
]
}'
Step 1.2. Retrieve File API Response
The response includes:
file_idfor creating an AI task.requests.urlfor uploading the actual image file.
Sample Response:
{
"status": 200,
"data": {
"files": [
{
"content_type": "image/jpg",
"file_name": "selfie_photo_01_3dbd1b6683.jpg",
"file_id": "SaGaqpDgKwFrVBgMpQMA3HY0LeqdT9/13W5TOD8/u/FfjK3xgCQ+hRt9MJXBFaud",
"requests": [
{
"method": "PUT",
"url": "https://yce-us.s3-accelerate.amazonaws.com/demo/ttl30/...signature...",
"headers": {
"Content-Length": "547541",
"Content-Type": "image/jpg"
}
}
]
}
]
}
}
Step 1.3. Upload Image to Provided URL
Use the requests.url from the File API response to upload the image:
curl --location --request PUT 'https://yce-us.s3-accelerate.amazonaws.com/demo/ttl30/...signature...' \
--header 'Content-Type: image/jpg' \
--header 'Content-Length: 547541' \
--data-binary @'./selfie_photo_01_3dbd1b6683.jpg'
Step 2. Prepare a Reference Shoes Image
You can:
- Upload a shoe image using the File API (
/s2s/v2.0/file/shoes), or - Provide a valid image URL.
Supported Shoes Images:
- A shoe product image.
- A photo of a person wearing shoes.
Refer to File Specs and Errors for detailed specifications.
Step 3. Create an AI Task
Select a preferred style and the gender you wish to visualize.
Use the AI Task API (/s2s/v2.0/task/shoes) to create a virtual try-on task.
Parameters:
- For the user image:
src_file_idorsrc_file_url. - For the shoes image:
ref_file_id, orref_file_url.
Example Request:
curl --request POST \
--url https://yce-api-01.makeupar.com/s2s/v2.0/task/shoes \
--header 'Authorization: Bearer YOUR_API_KEY' \
--header 'content-type: application/json' \
--data '{
"src_file_url": "https://example.com/selfie.jpg",
"ref_file_url": "https://example.com/accessory.jpg",
"gender": "female",
"style": "random"
}'
Sample Response:
{
"status": 200,
"data": {
"task_id": "SaGaqpDgKwFrVBgMpQMA3HY0LeqdT9_13W5TOD8_u_GPi6NqQ3dhlmN-6ntFwhzT"
}
}
Step 4. Poll for Task Result
Use the task ID to check the status:
curl --request GET \
--url https://yce-api-01.makeupar.com/s2s/v2.0/task/shoes/SaGaqpDgKwFrVBgMpQMA3HY0LeqdT9_13W5TOD8_u_GPi6NqQ3dhlmN-6ntFwhzT \
--header 'Authorization: Bearer YOUR_API_KEY' \
--header 'content-type: application/json'
Step 5. Retrieve Result
A successful response includes a download URL for the result image:
{
"status": 200,
"data": {
"error": null,
"results": {
"url": "https://yce-us.s3-accelerate.amazonaws.com/demo/ttl30/...signature..."
},
"task_status": "success"
}
}
Invalid API Key error response:
{
"status": 401,
"error": "Unauthorized",
"error_code": "InvalidAccessToken"
}
AI Shoes Virtual Try-On Specification
Image Requirements
| Type | Minimum Resolution | Notes |
|---|---|---|
| Selfie | 512 × 512 | Face visible, head-to-chest preferred |
| Shoes | 512 × 512 (product) 800 × 800 (worn) |
Clear, unobstructed shoes view |
Supported Shoes Image
- Product Image Requirements
- Minimum resolution: 512 × 512 pixels
- Only one product per image
- The product should cover more than 25% of the image height
- Worn Image Requirements
- Minimum resolution: 800 × 800 pixels
- Single Item Requirement: The model must wear exactly one item. Multiple items or accessories are not permitted.
- Coverage Ratio: The worn item must occupy more than 20% of the total image height. This ensures the item is clearly visible and prominent within the frame.

Supported Selfie View
- Recommended image resolution: at least 512 × 512 pixels.
- Recommended face coverage: more than 15% of the image height.
- Single Subject Requirement: The image must contain exactly one human subject. No additional people or partial figures are allowed.
- Face Visibility: The subject's face must be fully visible without obstruction. Hair, accessories, or objects should not cover key facial features.
- Framing: The image must include at least a head shot, covering the area from the top of the head to the chest. A half-body shot (head to waist) is preferred for optimal analysis.
Try-on Styles
- There are five predefined styles for generating the virtual try-on output: "style_minimalist" "style_bohemian" "style_cottagecore" "style_french_elegance" and "style_retro_fashion". You can specify this style parameter when creating an AI task or allow the system to select a style at random by default.

Supported Formats & Dimensions
| AI Feature | Supported Dimensions | Supported File Size | Supported Formats |
|---|---|---|---|
| AI Shoes Virtual Try-On | Input: long side <= 4096 Output: 1008 x 1344 |
< 10MB | jpg/jpeg/png/heic |
Error Codes
| Error Code | Description |
|---|---|
| error_download_image | Failed to download source or reference image |
| error_inference | Inference pipeline error |
| error_no_face | No face detected in source image |
| error_nsfw_content_detected | NSFW content detected in result |
| exceed_max_filesize | File size exceeds 10 MB |
| invalid_parameter | Invalid gender or style value |
| unknown_internal_error | Other internal errors |
Environment & Dependency
| Sample Code Language / Tool | Recommended Runtime Versions |
|---|---|
| cURL | - bash >= 3.2 - curl >= 7.58 (modern TLS/HTTP support) - jquery >= 1.6 (robust JSON parsing) |
| Node.js (JavaScript) | Node >= 18 (for global fetch) |
| JavaScript | - Chrome / Edge >= 80 - Firefox >= 74 - Safari >= 13.1 |
| PHP | PHP >= 7.4 (for modern TLS/compat), ext-curl (recommended) or allow_url_fopen=On + ext-openssl, ext-json |
| Python | Python >= 3.10 (for f-strings), requests >= 2.20.0 |
| Java | Java 11+ (for HttpClient), Jackson Databind >= 2.12.0 |
Create a new file.
To upload a new file, you'll first need to use the File API. It will give you a URL – use that URL to upload your file. Once the upload is finished, you can use the file_id from the same response to start using our AI features.
Authorizations:
Request Body schema: application/jsonrequired
required | Array of objects |
Responses
Request samples
- Payload
- curl
- Node.js
- JavaScript
- PHP
- Python
- Java
{- "files": [
- {
- "content_type": "image/jpg",
- "file_name": "my-selfie.jpg",
- "file_size": 50000
}
]
}Response samples
- 200
- 400
- 401
{- "status": 200,
- "data": {
- "files": [
- {
- "content_type": "image/jpg",
- "file_name": "my-selfie.jpg",
- "file_id": "U8aqJbsXGT537jtGnEDFHqxdDXqh8+oTF/cSkLimzuvVwMP+Jb1XbjPsf7ZgUgLY",
- "requests": [
- {
- "headers": {
- "Content-Type": "image/jpg",
- "Content-Length": 50000
}, - "method": "PUT"
}
]
}
]
}
}Run an AI Shoes task.
Once you start an AI task, you need to keep polling at given polling_interval to check its status until it shows either success or error because if you don't, the task will time out and when you try to check the status later, you'll get an InvalidTaskId error even if the task did finish successfully and your units will still be consumed.
Authorizations:
Request Body schema: application/jsonrequired
| src_file_url required | string Url of the file to run task. The url should be publicly accessible. |
| ref_file_url required | string Url of the reference file to run task. The url should be publicly accessible. |
| gender required | string Enum: "female" "male" Gender of the person in the image. |
| style | string Default: "random" Enum: "random" "style_minimalist" "style_bohemian" "style_cottagecore" "style_french_elegance" "style_retro_fashion" To control outfit and background style. |
Responses
Request samples
- Payload
- curl
- Node.js
- JavaScript
- PHP
- Python
- Java
{- "gender": "female",
- "style": "random"
}Response samples
- 200
- 400
- 401
{- "status": 200,
- "data": {
- "task_id": "grH0CvsgXuAIHLUzD0V1Ol34hoet3R1tvdbtiVHrDb6_UqCLKIejAIajwxrhOAfe"
}
}Check the status of a AI Shoes task.
Authorizations:
path Parameters
| task_id required | string Example: grH0CvsgXuAIHLUzD0V1Ol34hoet3R1tvdbtiVHrDb6_UqCLKIejAIajwxrhOAfe ID of task to check |
Responses
Request samples
- curl
- Node.js
- JavaScript
- PHP
- Python
- Java
curl --request GET \ --url https://yce-api-01.makeupar.com/s2s/v2.0/task/shoes/grH0CvsgXuAIHLUzD0V1Ol34hoet3R1tvdbtiVHrDb6_UqCLKIejAIajwxrhOAfe \ --header 'Authorization: Bearer <access_token for v1, API Key for v2>'
Response samples
- 200
- 400
- 401
- 500
{- "status": 200,
- "data": {
- "task_status": "running",
- "error": "exceed_max_filesize",
- "error_message": "string",
}
}AI Hat Virtual Try-On
Step into the future of fashion with our Hyper-Realistic AR Try-On for Headwear, powered by cutting-edge AI technology. This innovative solution transforms online shopping into an immersive experience, allowing customers to virtually try on headwear with unmatched precision and realism. From instant style discovery to true-to-life visualization, our AR technology ensures every hat and headband looks and feels authentic. Helping shoppers find their perfect fit and style before they buy. Elevate engagement, boost confidence, and redefine the way customers interact with your products.
This guide walks you through:
- Endpoint:
/s2s/v2.0/file/hat - Authentication: All requests require an
Authorization: Bearer YOUR_API_KEY - Workflow:
- Prepare a selfie image: Uploading an image or providing a valid image URL of yourself as the virtual try-on target.
- Prepare a hat image: Upload a hat product image or a photo of a person wearing hat.
- Select a style and a gender: Select a preferred style and the gender you wish to visualize.
- Fire an AI task and Retrieve Task ID: Capture the
task_idfrom the response. - Poll Status (
GET): Use thetask_idto check the status of the task. Continue polling untiltask_statusis"success"or"error".
Authentication
- Include your API key in the request header using Bearer Token:
Authorization: Bearer YOUR_API_KEY
You can find your API Key at https://yce.makeupar.com/api-console/en/api-keys/.
AI Hat API Usage Guide
This guide explains how to upload images, prepare reference hat, and create virtual try-on tasks using the AI Hat API.
Step 1. Prepare a Selfie Image
You can:
- Upload a selfie image using the File API (
/s2s/v2.0/file/hat), or - Provide a valid image URL.
Step 1.1 Upload a File Using the File API
Use the File API (/s2s/v2.0/file/hat) to upload a target user image.
Image Requirements:
- Upload a selfie photo.
- Ensure the photo clearly shows the upper body.
- Avoid backgrounds with multiple people or distracting objects.
Example Request:
curl --request POST \
--url https://yce-api-01.makeupar.com/s2s/v2.0/file/hat \
--header 'Authorization: Bearer YOUR_API_KEY' \
--header 'content-type: application/json' \
--data '{
"files": [
{
"content_type": "image/jpg",
"file_name": "selfie_photo_01_3dbd1b6683.jpg",
"file_size": 547541
}
]
}'
Step 1.2. Retrieve File API Response
The response includes:
file_idfor creating an AI task.requests.urlfor uploading the actual image file.
Sample Response:
{
"status": 200,
"data": {
"files": [
{
"content_type": "image/jpg",
"file_name": "selfie_photo_01_3dbd1b6683.jpg",
"file_id": "SaGaqpDgKwFrVBgMpQMA3HY0LeqdT9/13W5TOD8/u/FfjK3xgCQ+hRt9MJXBFaud",
"requests": [
{
"method": "PUT",
"url": "https://yce-us.s3-accelerate.amazonaws.com/demo/ttl30/...signature...",
"headers": {
"Content-Length": "547541",
"Content-Type": "image/jpg"
}
}
]
}
]
}
}
Step 1.3. Upload Image to Provided URL
Use the requests.url from the File API response to upload the image:
curl --location --request PUT 'https://yce-us.s3-accelerate.amazonaws.com/demo/ttl30/...signature...' \
--header 'Content-Type: image/jpg' \
--header 'Content-Length: 547541' \
--data-binary @'./selfie_photo_01_3dbd1b6683.jpg'
Step 2. Prepare a Reference Hat Image
You can:
- Upload a hat image using the File API (
/s2s/v2.0/file/hat), or - Provide a valid image URL.
Supported Hat Images:
- A hat product image.
- A photo of a person wearing hat.
Refer to File Specs and Errors for detailed specifications.
Step 3. Create an AI Task
Select a preferred style and the gender you wish to visualize.
Use the AI Task API (/s2s/v2.0/task/hat) to create a virtual try-on task.
Parameters:
- For the user image:
src_file_idorsrc_file_url. - For the hat image:
ref_file_id, orref_file_url.
Example Request:
curl --request POST \
--url https://yce-api-01.makeupar.com/s2s/v2.0/task/hat \
--header 'Authorization: Bearer YOUR_API_KEY' \
--header 'content-type: application/json' \
--data '{
"src_file_url": "https://example.com/selfie.jpg",
"ref_file_url": "https://example.com/accessory.jpg",
"gender": "female",
"style": "random"
}'
Sample Response:
{
"status": 200,
"data": {
"task_id": "SaGaqpDgKwFrVBgMpQMA3HY0LeqdT9_13W5TOD8_u_GPi6NqQ3dhlmN-6ntFwhzT"
}
}
Step 4. Poll for Task Result
Use the task ID to check the status:
curl --request GET \
--url https://yce-api-01.makeupar.com/s2s/v2.0/task/hat/SaGaqpDgKwFrVBgMpQMA3HY0LeqdT9_13W5TOD8_u_GPi6NqQ3dhlmN-6ntFwhzT \
--header 'Authorization: Bearer YOUR_API_KEY' \
--header 'content-type: application/json'
Step 5. Retrieve Result
A successful response includes a download URL for the result image:
{
"status": 200,
"data": {
"error": null,
"results": {
"url": "https://yce-us.s3-accelerate.amazonaws.com/demo/ttl30/...signature..."
},
"task_status": "success"
}
}
Invalid API Key error response:
{
"status": 401,
"error": "Unauthorized",
"error_code": "InvalidAccessToken"
}
AI Hat Virtual Try-On Specification
Image Requirements
| Type | Minimum Resolution | Notes |
|---|---|---|
| Selfie | 512 × 512 | Face visible, head-to-chest preferred |
| Hat | 512 × 512 (product) 800 × 800 (worn) |
Clear, unobstructed hat view |
Supported Hat Image
- Product Image Requirements
- Minimum resolution: 512 × 512 pixels
- Only one product per image
- The product should cover more than 25% of the image height
- Worn Image Requirements
- Minimum resolution: 800 × 800 pixels
- Single Item Requirement: The model must wear exactly one item. Multiple items or accessories are not permitted.
- Coverage Ratio: The worn item must occupy more than 20% of the total image height. This ensures the item is clearly visible and prominent within the frame.
Supported Selfie View
- Recommended image resolution: at least 512 × 512 pixels.
- Recommended face coverage: more than 15% of the image height.
- Single Subject Requirement: The image must contain exactly one human subject. No additional people or partial figures are allowed.
- Face Visibility: The subject's face must be fully visible without obstruction. Hair, accessories, or objects should not cover key facial features.
- Framing: The image must include at least a head shot, covering the area from the top of the head to the chest. A half-body shot (head to waist) is preferred for optimal analysis.
Try-on Styles
- There are five predefined styles for generating the virtual try-on output: "style_sporty_casual" "style_urban_fashion" "style_vacation_casual" "style_warm_cozy" and "style_bohemian". You can specify this style parameter when creating an AI task or allow the system to select a style at random by default.
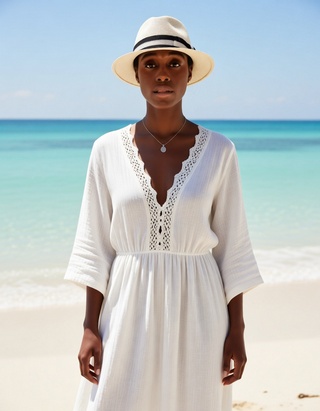
Supported Formats & Dimensions
| AI Feature | Supported Dimensions | Supported File Size | Supported Formats |
|---|---|---|---|
| AI Hat Virtual Try-On | Input: long side <= 4096 Output: 896 x 1152 |
< 10MB | jpg/jpeg/png/heic |
Error Codes
| Error Code | Description |
|---|---|
| error_download_image | Failed to download source or reference image |
| error_inference | Inference pipeline error |
| error_no_face | No face detected in source image |
| error_nsfw_content_detected | NSFW content detected in result |
| exceed_max_filesize | File size exceeds 10 MB |
| invalid_parameter | Invalid gender or style value |
| unknown_internal_error | Other internal errors |
Environment & Dependency
| Sample Code Language / Tool | Recommended Runtime Versions |
|---|---|
| cURL | - bash >= 3.2 - curl >= 7.58 (modern TLS/HTTP support) - jquery >= 1.6 (robust JSON parsing) |
| Node.js (JavaScript) | Node >= 18 (for global fetch) |
| JavaScript | - Chrome / Edge >= 80 - Firefox >= 74 - Safari >= 13.1 |
| PHP | PHP >= 7.4 (for modern TLS/compat), ext-curl (recommended) or allow_url_fopen=On + ext-openssl, ext-json |
| Python | Python >= 3.10 (for f-strings), requests >= 2.20.0 |
| Java | Java 11+ (for HttpClient), Jackson Databind >= 2.12.0 |
Create a new file.
To upload a new file, you'll first need to use the File API. It will give you a URL – use that URL to upload your file. Once the upload is finished, you can use the file_id from the same response to start using our AI features.
Authorizations:
Request Body schema: application/jsonrequired
required | Array of objects |
Responses
Request samples
- Payload
- curl
- Node.js
- JavaScript
- PHP
- Python
- Java
{- "files": [
- {
- "content_type": "image/jpg",
- "file_name": "my-selfie.jpg",
- "file_size": 50000
}
]
}Response samples
- 200
- 400
- 401
{- "status": 200,
- "data": {
- "files": [
- {
- "content_type": "image/jpg",
- "file_name": "my-selfie.jpg",
- "file_id": "U8aqJbsXGT537jtGnEDFHqxdDXqh8+oTF/cSkLimzuvVwMP+Jb1XbjPsf7ZgUgLY",
- "requests": [
- {
- "headers": {
- "Content-Type": "image/jpg",
- "Content-Length": 50000
}, - "method": "PUT"
}
]
}
]
}
}Run an AI Hat task.
Once you start an AI task, you need to keep polling at given polling_interval to check its status until it shows either success or error because if you don't, the task will time out and when you try to check the status later, you'll get an InvalidTaskId error even if the task did finish successfully and your units will still be consumed.
Authorizations:
Request Body schema: application/jsonrequired
| src_file_url required | string Url of the file to run task. The url should be publicly accessible. |
| ref_file_url required | string Url of the reference file to run task. The url should be publicly accessible. |
| gender required | string Enum: "female" "male" Gender of the person in the image. |
| style | string Default: "random" Enum: "random" "style_sporty_casual" "style_urban_fashion" "style_vacation_casual" "style_warm_cozy" "style_bohemian" To control outfit and background style. |
Responses
Request samples
- Payload
- curl
- Node.js
- JavaScript
- PHP
- Python
- Java
{- "gender": "female",
- "style": "random"
}Response samples
- 200
- 400
- 401
{- "status": 200,
- "data": {
- "task_id": "grH0CvsgXuAIHLUzD0V1Ol34hoet3R1tvdbtiVHrDb6_UqCLKIejAIajwxrhOAfe"
}
}Check the status of a AI Hat task.
Authorizations:
path Parameters
| task_id required | string Example: grH0CvsgXuAIHLUzD0V1Ol34hoet3R1tvdbtiVHrDb6_UqCLKIejAIajwxrhOAfe ID of task to check |
Responses
Request samples
- curl
- Node.js
- JavaScript
- PHP
- Python
- Java
curl --request GET \ --url https://yce-api-01.makeupar.com/s2s/v2.0/task/hat/grH0CvsgXuAIHLUzD0V1Ol34hoet3R1tvdbtiVHrDb6_UqCLKIejAIajwxrhOAfe \ --header 'Authorization: Bearer <access_token for v1, API Key for v2>'
Response samples
- 200
- 400
- 401
- 500
{- "status": 200,
- "data": {
- "task_status": "running",
- "error": "exceed_max_filesize",
- "error_message": "string",
}
}AI Ring Virtual Try-On
Easily Create Your AR Ring or Engagement Ring Try Ons. You Only Need to Upload Images. Opt for 2D images for effortless yet high-quality virtual try-on experiences with minimal effort.
This guide walks you through:
- Endpoint:
/s2s/v2.0/file/2d-vto/ring - Authentication: All requests require an
Authorization: Bearer YOUR_API_KEY - Workflow:
- Prepare a hand image: Uploading an image or provide a valid image URL of your hand
- Prepare a ring image: Uploading an image or provide a valid image URL of a ring product
- Fire an AI task and Retrieve Task ID: Capture the
task_idfrom the response. - Poll Status (
GET): Use thetask_idto check the status of the task. Continue polling untiltask_statusis"success"or"error".
API Playground
Interactively explore and test the API using our official playground:
API Playground: http://yce.makeupar.com/api-console/en/api-playground/ai-ring-virtual-try-on/
Authentication
- Include your API key in the request header using Bearer Token:
You can find your API Key at https://yce.makeupar.com/api-console/en/api-keys/.Authorization: Bearer YOUR_API_KEY
1. Upload an Image
You may upload a file directly to the server or provide a valid image URL in the VTO task payload.
Upload Endpoint
POST /s2s/v2.0/file/2d-vto/ring
Alternatively, skip this step if you already have a public image URL.
You may upload a file directly to the URL provided in the response from the File API and then use the corresponding src_file_id returned by the File API to invoke the AI task later. Or provide a valid image URL in the VTO task payload as src_file_url. The src_file_id or src_file_url will serve as the virtual try-on target.
You must also provide another ring product image as a reference using ref_file_ids or ref_file_urls to be applied to your src_file_id or src_file_url.
The AI engine supports automatic background removal for your ring product image. However, you may provide an occlusion mask image file for either your hand (srcmsk_file_id or srcmsk_file_url) or the ring product (refmsk_file_ids or refmsk_file_urls) to fine-tune the segmentation.
2. Create a Ring VTO Task and Poll for Results
Once you have an image and a template ID, create a task. The API processes the request asynchronously. You must poll the task status until it reaches success or error.
Create Task Endpoint
POST /s2s/v2.0/task/2d-vto/ring
Polling Endpoint
GET /s2s/v2.0/task/2d-vto/ring/{task_id}
AI Ring Virtual Try-On Specification
Supported Ring View The ring image must be provided in a three-quarter front view (approximately 45 degrees).

Supported Hand View The back of the hand should be fully visible with all five fingers clearly shown and without any occlusion.
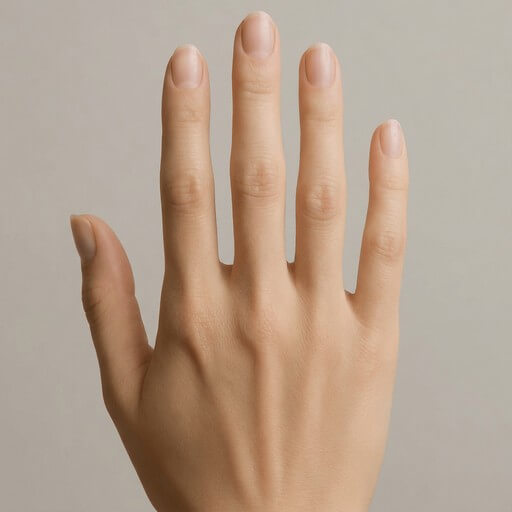
ring_wearing_finger: integer (0–4) Specifies the finger on which the ring is worn: 0 = Thumb 1 = Index finger 2 = Middle finger 3 = Ring finger 4 = Little finger
ring_wearing_location: float (0.0–1.0) Indicates the position along the finger: 0.0 = Near the MCP joint (large knuckle) 1.0 = Near the PIP joint (middle joint)
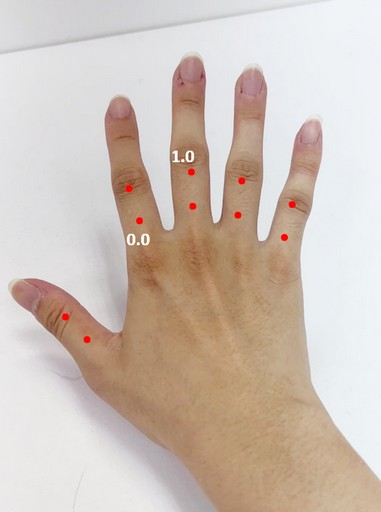
ring_shadow_intensity: float (0.0–1.0) Controls the shadow strength: 0.0 = No shadow 1.0 = Maximum shadow Default: 0.15
ring_ambient_light_intensity: float (0.0–1.0) Defines how much the lighting references the target hand image: 0.0 = Ignore the hand image lighting 1.0 = Fully match the hand image lighting and shadow rendering Default: 1.0
ring_anchor_point: array of two points in pixel coordinate (optional) Marks the inner edge of the ring where it contacts the finger, specifying the left and right points. This is particularly useful for wide or thick rings. If this parameter is not provided, the AI engine will automatically detect the anchor points.
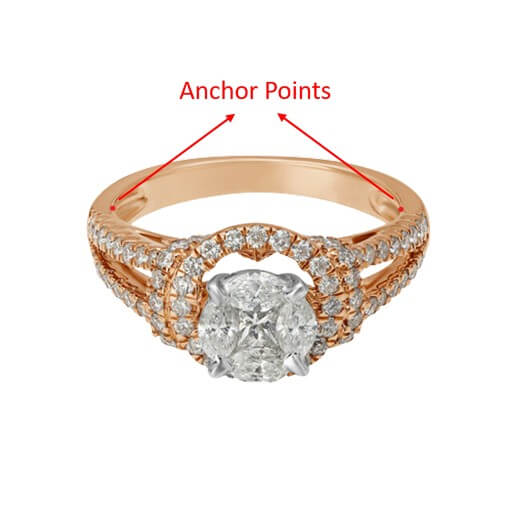
Supported Formats & Dimensions
| AI Feature | Supported Dimensions | Supported File Size | Supported Formats |
|---|---|---|---|
| AI Ring Virtual Try-On | long side <= 4096 | < 10MB | jpg/jpeg/png |
Error Codes
| Error Code | Description |
|---|---|
| RUNTIME_ERROR | An unexpected error occurred during runtime |
| PHOTO_DETECTION_FAIL | The user photo could not be processed correctly, for example no hand detected |
| OBJECT_DETECTION_FAIL | The object photo could not be processed correctly, for example no product detected |
| PHOTO_CHECK_INVALID | The pose or size of the user photo is invalid |
| INPUT_ERROR | The input file format is incorrect |
| INPUT_MAIN_IMAGE_EMPTY | A user image is required |
Environment & Dependency
| Sample Code Language / Tool | Recommended Runtime Versions |
|---|---|
| cURL | - bash >= 3.2 - curl >= 7.58 (modern TLS/HTTP support) - jq >= 1.6 (robust JSON parsing) |
| Node.js (JavaScript) | Node >= 18 (for global fetch) |
| JavaScript | - Chrome / Edge >= 80 - Firefox >= 74 - Safari >= 13.1 |
| PHP | PHP >= 7.4 (for modern TLS/compat), ext-curl (recommended) or allow_url_fopen=On + ext-openssl, ext-json |
| Python | Python >= 3.10 (for f-strings), requests >= 2.20.0 |
| Java | Java 11+ (for HttpClient), Jackson Databind >= 2.12.0 |
Overview
The JavaScript Camera Kit provides a complete in-browser camera solution designed for high-accuracy face-based imaging tasks. It includes:
- Camera permission handling
- Real-time face detection
- Automatic face quality validation (lighting, pose, angle, distance)
- Guided capture UI
- Multi-step capture flows for advanced hair/face tasks
- Support for both base64 and blob output formats
The module is particularly optimized for AI-driven image analysis, such as AI Skin Analysis (SD/HD), AI Face Tone Analysis, and hair-related analysis.
Download the JS Camera Kit
Include the JS Camera Kit SDK via CDN:
https://plugins-media.makeupar.com/v2.2-camera-kit/sdk.js
Once loaded, the SDK installs a global YMK object.
Quick Start Example
The following sample demonstrates:
- Loading the JS Camera Kit SDK
- Implementing
window.ymkAsyncInit - Initializing the module
- Opening the camera
- Receiving captured images
<!DOCTYPE html>
<html lang="en">
<head>
<meta charset="UTF-8" />
<meta name="viewport" content="width=device-width, initial-scale=1.0" />
<title>Camera Kit Sample</title>
</head>
<body>
<script>
window.ymkAsyncInit = function() {
YMK.addEventListener('loaded', function() {
/* Module fully loaded and ready */
});
YMK.addEventListener('faceDetectionCaptured', function(capturedResult) {
/* Display all captured images */
const container = document.getElementById('captured-results');
container.innerHTML = '';
for (const image of capturedResult.images) {
const img = document.createElement('img');
img.src = typeof image.image === 'string'
? image.image
: URL.createObjectURL(image.image);
container.appendChild(img);
}
});
};
function openCameraKit() {
YMK.init({
faceDetectionMode: 'ring',
imageFormat: 'base64',
language: 'enu',
});
YMK.openCameraKit();
}
</script>
<!-- Load SDK -->
<script>
window.addEventListener('load', function() {
(function(d) {
const s = d.createElement('script');
s.type = 'text/javascript';
s.async = true;
s.src = 'https://plugins-media.makeupar.com/v2.2-camera-kit/sdk.js';
d.getElementsByTagName('script')[0].parentNode.insertBefore(s, null);
})(document);
});
</script>
<button onClick="openCameraKit()">Open Camera Kit</button>
<div id="YMK-module"></div>
<h3>Captured Results:</h3>
<div id="captured-results"></div>
</body>
</html>
Prerequisites
You must define the asynchronous initialization entry point:
<script>
window.ymkAsyncInit = function() {
YMK.init(); // default settings
};
</script>
Additional requirements:
| Requirement | Description |
|---|---|
| Browser | Must support getUserMedia |
| HTTPS | Required on most browsers for webcam access |
<div id="YMK-module"> |
Mandatory mount point for the UI |
Integration Guide
Step 1 — Initialize the Module
Call YMK.init() before calling YMK.openCameraKit():
YMK.init({
faceDetectionMode: 'ring',
imageFormat: 'base64',
language: 'enu'
});
Supported Detection Modes
| Mode | Description |
|---|---|
makeup |
Standard camera mode for virtual cosmetic try-on |
skincare |
Standard skin analysis mode, close-up face capture |
hdskincare |
HD Skin capture using webcams with ≥ 2560px width |
shadefinder |
Skin Tone Analysis front-face capture |
facereshape |
AI Face Reshape capture |
hairlength |
Full hair-length capture (from a distance) |
hairfrizziness |
3-phase capture: front, right-turn, left-turn |
hairtype |
Same 3-phase multi-angle capture flow |
ring |
Hand capture for ring try‑on |
wrist |
Wrist capture for watch or bracelet try‑on |
necklace |
Selfie capture for necklace try-on |
earring |
Selfie capture for earring try-on |
Step 2 — Add Event Handlers
Event examples:
YMK.addEventListener('faceQualityChanged', function(q) {
console.log('Quality updated:', q);
});
See the full Events List below.
Step 3 — Open Camera Kit
YMK.openCameraKit();
This automatically:
- Shows the UI
- Opens webcam
- Begins real-time face quality monitoring
- Automatically captures when conditions are acceptable
Step 4 — Receiving Captured Result
Captured images arrive via:
YMK.addEventListener('faceDetectionCaptured', function(result) {
console.log(result.images);
});
Step 5 — Close Module
YMK.close();
API Reference
YMK.init(args)
Configures module appearance, detection mode, language, and capture format.
Arguments
args.faceDetectionMode
Detection flow to use.
Values:
"makeup" | "skincare" | "hdskincare" | "shadefinder" | "facereshape" | "hairlength" | "hairfrizziness" | "hairtype" | "ring" | "wrist" | "necklace" | "earring"
Default: "skincare"
args.width
Pixel width of module container. Default:
360(screens ≥ 500px)screen width(screens < 500px)
Allowed: 300–1920
args.height
Pixel height of module container. Default:
480(screens ≥ 500px)min(screen.height, innerHeight)for smaller screens
Allowed: 300–1920
args.language
UI language.
Available: "chs", "cht", "deu", "enu", "esp", "fra", "jpn", "kor", "ptb", "ita"
Default: "enu"
args.imageFormat
Format returned via faceDetectionCaptured.
"base64" or "blob"
Default: "base64"
args.disableCameraResolutionCheck
Allow running even if webcam does not meet required resolution.
Default: false
Other API Methods
YMK.openCameraKit()
Opens the module and begins detection.
YMK.addEventListener(eventName, callback)
Registers event callbacks.
Returns: EventListenerIdentifier
YMK.removeEventListener(id)
Removes listener by identifier.
YMK.isLoaded()
Returns whether livestream or photo is drawn on canvas.
Returns: boolean
YMK.pause()
Pauses the webcam stream.
YMK.resume(restartWebcam = false)
Resumes webcam after pause.
YMK.getInfo()
Returns current module info:
{
"fps": 30
}
YMK.close()
Closes module and camera.
Events Reference
Lifecycle Events
| Event | Description |
|---|---|
opened |
Module opened |
loading |
Loading progress (0–100) |
loaded |
Camera stream loaded onto canvas |
closed |
Module closed |
Camera Events
| Event | Description |
|---|---|
cameraOpened |
Webcam opened |
cameraClosed |
Webcam closed |
cameraFailed |
Permission denied or no webcam Error code:* "error_resolution_unsupported"* "error_permission_denied"* "error_access_failed" |
faceQualityChanged
Fires continuously during detection.
{
"hasFace": true,
"position": "good",
"frontal": "good",
"lighting": "ok"
}
- Field Descriptions
| Field | Values | Meaning |
|---|---|---|
hasFace |
true/false |
Whether face is detected |
position |
"good", "notgood", "toosmall", "outofboundary" |
Face distance/size quality |
frontal |
"good", "notgood" |
Whether user is facing forward |
lighting |
"good", "ok", "notgood" |
Lighting strength |
Necklace/Earring
| Field | Values | Meaning |
|---|---|---|
hasFace |
true/false |
Whether face is detected |
pose |
"good", "notgood" |
Face pose quality |
size |
"good", "notgood" |
Face size quality |
Wrist/Ring
| Field | Values | Meaning |
|---|---|---|
hasFace |
true/false |
Whether face is detected |
position |
"good", "notgood" |
Hand position quality |
pose |
"good", "notgood" |
Hand pose quality |
Minimum Recommended Quality
const minQuality = {
hasFace: true,
area: "good",
frontal: "good",
lighting: "ok"
};
faceDetectionStarted
User enters detection UI.
faceDetectionCaptured
This event is fired after all required face quality validation checks have passed and the Camera Kit has successfully completed the capture workflow.
Depending on the selected faceDetectionMode, the event may contain one or multiple captured images (e.g., multi-angle capture for hair modes).
Callback Arguments
capturedResult — Object
The result object containing all successfully captured images and metadata.
Field Definitions
mode — string
Indicates the active faceDetectionMode used for capturing.
Possible values include:
"makeup" | "skincare" | "hdskincare" | "shadefinder" | "facereshape" | "hairlength" | "hairfrizziness" | "hairtype" | "ring" | "wrist" | "necklace" | "earring"
This value corresponds directly to the configuration set in YMK.init({ faceDetectionMode }).
images — Array
ImageObject Structure
| Field | Type | Description |
|---|---|---|
phase |
integer | The zero-based index representing the capture step. Examples: • Skincare = 0 • Hair frizziness sequence = 0 (front), 1 (right turn), 2 (left turn) |
image |
string or Blob | The captured image. • Base64 string if args.imageFormat = "base64" • Binary Blob if args.imageFormat = "blob" |
width |
integer | Pixel width of the captured image. |
height |
integer | Pixel height of the captured image. |
Notes
- The number of images varies depending on
faceDetectionMode.- Example:
"hairfrizziness"and"hairtype"typically produce three images.
- Example:
- Image resolution may differ from device to device.
The actual pixel size depends on:
- The user's webcam maximum resolution
- The constraints and recommended settings for the selected mode
- All images are guaranteed to meet the minimum face quality requirements before this event is dispatched.
Configuration Notes
Quality Requirements
- Ensure correct distance
- Ensure frontal face angle
- Provide sufficient lighting (avoid shadows)
Multi-Phase Capture
Modes like hairtype or hairfrizziness require:
- Front face
- Turn right
- Turn left
Ensure event handling is in place.
Create a new file.
To upload a new file, you'll first need to use the File API. It will give you a URL – use that URL to upload your file. Once the upload is finished, you can use the file_id from the same response to start using our AI features.
Authorizations:
Request Body schema: application/jsonrequired
required | Array of objects |
Responses
Request samples
- Payload
- curl
- Node.js
- JavaScript
- PHP
- Python
- Java
{- "files": [
- {
- "content_type": "image/jpg",
- "file_name": "my-selfie.jpg",
- "file_size": 50000
}
]
}Response samples
- 200
- 400
- 401
{- "status": 200,
- "data": {
- "files": [
- {
- "content_type": "image/jpg",
- "file_name": "my-selfie.jpg",
- "file_id": "U8aqJbsXGT537jtGnEDFHqxdDXqh8+oTF/cSkLimzuvVwMP+Jb1XbjPsf7ZgUgLY",
- "requests": [
- {
- "headers": {
- "Content-Type": "image/jpg",
- "Content-Length": 50000
}, - "method": "PUT"
}
]
}
]
}
}Run an AI 2D Virtual Try On Ring task.
Once you start an AI task, you need to keep polling at given polling_interval to check its status until it shows either success or error because if you don't, the task will time out and when you try to check the status later, you'll get an InvalidTaskId error even if the task did finish successfully and your units will still be consumed.
Authorizations:
Request Body schema: application/jsonrequired
| src_file_url required | string Url of the file to run task. The url should be publicly accessible. |
| srcmsk_file_url | string Url of the source mask file to run task. The url should be publicly accessible. |
| ref_file_urls required | Array of strings Url of the reference file to run task. The url should be publicly accessible. |
| refmsk_file_urls | Array of strings Url of the reference mask file to run task. The url should be publicly accessible. |
required | object Contain source photo informations. |
required | Array of objects |
Responses
Request samples
- Payload
- curl
- Node.js
- JavaScript
- PHP
- Python
- Java
{- "source_info": {
}, - "object_infos": [
- {
- "parameter": {
- "ring_need_remove_background": true,
- "ring_anchor_point": null,
- "ring_wearing_finger": null,
- "ring_wearing_location": null,
- "ring_shadow_intensity": 0.15,
- "ring_ambient_light_intensity": 1
}
}
]
}
Response samples
- 200
- 400
- 401
{- "status": 200,
- "data": {
- "task_id": "grH0CvsgXuAIHLUzD0V1Ol34hoet3R1tvdbtiVHrDb6_UqCLKIejAIajwxrhOAfe"
}
}Check the status of a AI 2D Virtual Try On Ring task.
Authorizations:
path Parameters
| task_id required | string Example: grH0CvsgXuAIHLUzD0V1Ol34hoet3R1tvdbtiVHrDb6_UqCLKIejAIajwxrhOAfe ID of task to check |
Responses
Request samples
- curl
- Node.js
- JavaScript
- PHP
- Python
- Java
curl --request GET \ --url https://yce-api-01.makeupar.com/s2s/v2.0/task/2d-vto/ring/grH0CvsgXuAIHLUzD0V1Ol34hoet3R1tvdbtiVHrDb6_UqCLKIejAIajwxrhOAfe \ --header 'Authorization: Bearer <access_token for v1, API Key for v2>'
Response samples
- 200
- 400
- 401
- 500
{- "status": 200,
- "data": {
- "task_status": "running",
- "error": "exceed_max_filesize",
- "error_message": "string",
}
}AI Bracelet Virtual Try-On
The Ultimate AI Bracelet Virtual Try-On Employ AI-powered solutions to assist your customers with online purchases, ensuring perfect fit and great shopping satisfaction every time. Only One 2D Image Needed.
Create a compelling shopping flow with the hyper-realistic bracelet virtual try-on experiences. Our solution caters to the needs of jewelry brands of all sizes. Opt for 2D images for effortless yet high-quality virtual try-on experiences with minimal effort. This unique feature sets us apart in the world of e-commerce, making it easier than ever for customers to experience your products.
This guide walks you through:
- Endpoint:
/s2s/v2.0/file/2d-vto/bracelet - Authentication: All requests require an
Authorization: Bearer YOUR_API_KEY - Workflow:
- Prepare a wrist image: Uploading an image or provide a valid image URL of your wrist
- Prepare a bracelet image: Uploading an image or provide a valid image URL of a bracelet product
- Fire an AI task and Retrieve Task ID: Capture the
task_idfrom the response. - Poll Status (
GET): Use thetask_idto check the status of the task. Continue polling untiltask_statusis"success"or"error".
API Playground
Interactively explore and test the API using our official playground:
API Playground: http://yce.makeupar.com/api-console/en/api-playground/ai-bracelet-virtual-try-on/
Authentication
- Include your API key in the request header using Bearer Token:
You can find your API Key at https://yce.makeupar.com/api-console/en/api-keys/.Authorization: Bearer YOUR_API_KEY
1. Upload an Image
You may upload a file directly to the server or provide a valid image URL in the VTO task payload.
Upload Endpoint
POST /s2s/v2.0/file/2d-vto/bracelet
Alternatively, skip this step if you already have a public image URL.
You may upload a file directly to the URL provided in the response from the File API and then use the corresponding src_file_id returned by the File API to invoke the AI task later. Or provide a valid image URL in the VTO task payload as src_file_url. The src_file_id or src_file_url will serve as the virtual try-on target.
You must also provide another bracelet product image as a reference using ref_file_ids or ref_file_urls to be applied to your src_file_id or src_file_url.
The AI engine supports automatic background removal for your bracelet product image. However, you may provide an occlusion mask image file for either your hand (srcmsk_file_id or srcmsk_file_url) or the bracelet product (refmsk_file_ids or refmsk_file_urls) to fine-tune the segmentation.
2. Create a Bracelet VTO Task and Poll for Results
Once you have an image and a template ID, create a task. The API processes the request asynchronously. You must poll the task status until it reaches success or error.
Create Task Endpoint
POST /s2s/v2.0/task/2d-vto/bracelet
Polling Endpoint
GET /s2s/v2.0/task/2d-vto/bracelet/{task_id}
AI Bracelet Virtual Try-On Specification
Supported Bracelet View A bracelet image must be provided in a three-quarter front view (approximately 45 degrees).

Supported Wrist View The back of the wrist should be fully visible with all five fingers clearly shown and without any occlusion.
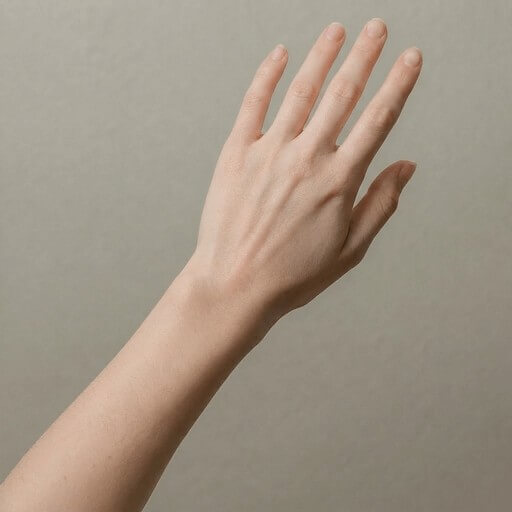
bracelet_wearing_location: float (−0.3 to 1.0) Indicates the position along the wrist: −0.3 represents near the main wrist joint 1.0 represents far from the main wrist joint Default value: null (use engine default)
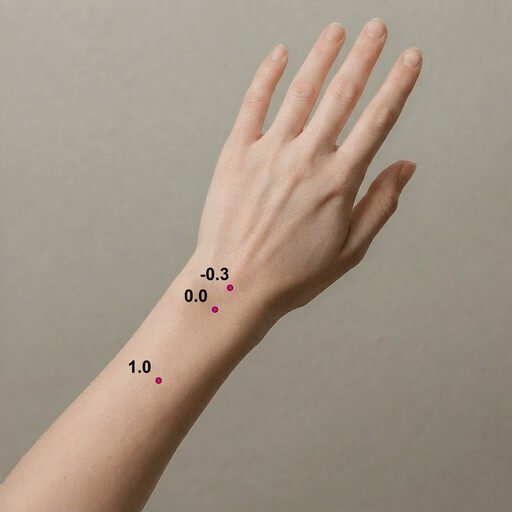
bracelet_shadow_intensity: float (0.0 to 1.0) Controls the strength of the shadow: 0.0 represents no shadow 1.0 represents maximum shadow Default value: 0.15
bracelet_ambient_light_intensity: float (0.0 to 1.0) Defines the extent to which lighting references the target hand image: 0.0 ignores the hand image lighting 1.0 fully matches the hand image lighting and shadow rendering Default value: 1.0
Bracelet Anchor Points: array of 2 points in pixel coordinate (optional)
Marks the inner edge of the bracelet where it contacts the wrist, specifying the left and right points.
If this parameter is not provided, the AI engine will automatically detect the anchor points.
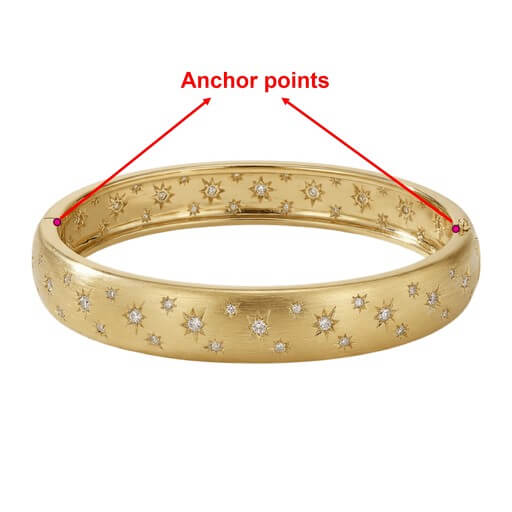
Supported Formats & Dimensions
| AI Feature | Supported Dimensions | Supported File Size | Supported Formats |
|---|---|---|---|
| AI Bracelet Virtual Try-On | long side <= 4096 | < 10MB | jpg/jpeg/png |
Error Codes
| Error Code | Description |
|---|---|
| RUNTIME_ERROR | An unexpected error occurred dubracelet runtime |
| PHOTO_DETECTION_FAIL | The user photo could not be processed correctly, for example no hand detected |
| OBJECT_DETECTION_FAIL | The object photo could not be processed correctly, for example no product detected |
| PHOTO_CHECK_INVALID | The pose or size of the user photo is invalid |
| INPUT_ERROR | The input file format is incorrect |
| INPUT_MAIN_IMAGE_EMPTY | A user image is required |
Environment & Dependency
| Sample Code Language / Tool | Recommended Runtime Versions |
|---|---|
| cURL | - bash >= 3.2 - curl >= 7.58 (modern TLS/HTTP support) - jq >= 1.6 (robust JSON parsing) |
| Node.js (JavaScript) | Node >= 18 (for global fetch) |
| JavaScript | - Chrome / Edge >= 80 - Firefox >= 74 - Safari >= 13.1 |
| PHP | PHP >= 7.4 (for modern TLS/compat), ext-curl (recommended) or allow_url_fopen=On + ext-openssl, ext-json |
| Python | Python >= 3.10 (for f-strings), requests >= 2.20.0 |
| Java | Java 11+ (for HttpClient), Jackson Databind >= 2.12.0 |
Overview
The JavaScript Camera Kit provides a complete in-browser camera solution designed for high-accuracy face-based imaging tasks. It includes:
- Camera permission handling
- Real-time face detection
- Automatic face quality validation (lighting, pose, angle, distance)
- Guided capture UI
- Multi-step capture flows for advanced hair/face tasks
- Support for both base64 and blob output formats
The module is particularly optimized for AI-driven image analysis, such as AI Skin Analysis (SD/HD), AI Face Tone Analysis, and hair-related analysis.
Download the JS Camera Kit
Include the JS Camera Kit SDK via CDN:
https://plugins-media.makeupar.com/v2.2-camera-kit/sdk.js
Once loaded, the SDK installs a global YMK object.
Quick Start Example
The following sample demonstrates:
- Loading the JS Camera Kit SDK
- Implementing
window.ymkAsyncInit - Initializing the module
- Opening the camera
- Receiving captured images
<!DOCTYPE html>
<html lang="en">
<head>
<meta charset="UTF-8" />
<meta name="viewport" content="width=device-width, initial-scale=1.0" />
<title>Camera Kit Sample</title>
</head>
<body>
<script>
window.ymkAsyncInit = function() {
YMK.addEventListener('loaded', function() {
/* Module fully loaded and ready */
});
YMK.addEventListener('faceDetectionCaptured', function(capturedResult) {
/* Display all captured images */
const container = document.getElementById('captured-results');
container.innerHTML = '';
for (const image of capturedResult.images) {
const img = document.createElement('img');
img.src = typeof image.image === 'string'
? image.image
: URL.createObjectURL(image.image);
container.appendChild(img);
}
});
};
function openCameraKit() {
YMK.init({
faceDetectionMode: 'wrist',
imageFormat: 'base64',
language: 'enu',
});
YMK.openCameraKit();
}
</script>
<!-- Load SDK -->
<script>
window.addEventListener('load', function() {
(function(d) {
const s = d.createElement('script');
s.type = 'text/javascript';
s.async = true;
s.src = 'https://plugins-media.makeupar.com/v2.2-camera-kit/sdk.js';
d.getElementsByTagName('script')[0].parentNode.insertBefore(s, null);
})(document);
});
</script>
<button onClick="openCameraKit()">Open Camera Kit</button>
<div id="YMK-module"></div>
<h3>Captured Results:</h3>
<div id="captured-results"></div>
</body>
</html>
Prerequisites
You must define the asynchronous initialization entry point:
<script>
window.ymkAsyncInit = function() {
YMK.init(); // default settings
};
</script>
Additional requirements:
| Requirement | Description |
|---|---|
| Browser | Must support getUserMedia |
| HTTPS | Required on most browsers for webcam access |
<div id="YMK-module"> |
Mandatory mount point for the UI |
Integration Guide
Step 1 — Initialize the Module
Call YMK.init() before calling YMK.openCameraKit():
YMK.init({
faceDetectionMode: 'wrist',
imageFormat: 'base64',
language: 'enu'
});
Supported Detection Modes
| Mode | Description |
|---|---|
makeup |
Standard camera mode for virtual cosmetic try-on |
skincare |
Standard skin analysis mode, close-up face capture |
hdskincare |
HD Skin capture using webcams with ≥ 2560px width |
shadefinder |
Skin Tone Analysis front-face capture |
facereshape |
AI Face Reshape capture |
hairlength |
Full hair-length capture (from a distance) |
hairfrizziness |
3-phase capture: front, right-turn, left-turn |
hairtype |
Same 3-phase multi-angle capture flow |
ring |
Hand capture for ring try‑on |
wrist |
Wrist capture for watch or bracelet try‑on |
necklace |
Selfie capture for necklace try-on |
earring |
Selfie capture for earring try-on |
Step 2 — Add Event Handlers
Event examples:
YMK.addEventListener('faceQualityChanged', function(q) {
console.log('Quality updated:', q);
});
See the full Events List below.
Step 3 — Open Camera Kit
YMK.openCameraKit();
This automatically:
- Shows the UI
- Opens webcam
- Begins real-time face quality monitoring
- Automatically captures when conditions are acceptable
Step 4 — Receiving Captured Result
Captured images arrive via:
YMK.addEventListener('faceDetectionCaptured', function(result) {
console.log(result.images);
});
Step 5 — Close Module
YMK.close();
API Reference
YMK.init(args)
Configures module appearance, detection mode, language, and capture format.
Arguments
args.faceDetectionMode
Detection flow to use.
Values:
"makeup" | "skincare" | "hdskincare" | "shadefinder" | "facereshape" | "hairlength" | "hairfrizziness" | "hairtype" | "ring" | "wrist" | "necklace" | "earring"
Default: "skincare"
args.width
Pixel width of module container. Default:
360(screens ≥ 500px)screen width(screens < 500px)
Allowed: 300–1920
args.height
Pixel height of module container. Default:
480(screens ≥ 500px)min(screen.height, innerHeight)for smaller screens
Allowed: 300–1920
args.language
UI language.
Available: "chs", "cht", "deu", "enu", "esp", "fra", "jpn", "kor", "ptb", "ita"
Default: "enu"
args.imageFormat
Format returned via faceDetectionCaptured.
"base64" or "blob"
Default: "base64"
args.disableCameraResolutionCheck
Allow running even if webcam does not meet required resolution.
Default: false
Other API Methods
YMK.openCameraKit()
Opens the module and begins detection.
YMK.addEventListener(eventName, callback)
Registers event callbacks.
Returns: EventListenerIdentifier
YMK.removeEventListener(id)
Removes listener by identifier.
YMK.isLoaded()
Returns whether livestream or photo is drawn on canvas.
Returns: boolean
YMK.pause()
Pauses the webcam stream.
YMK.resume(restartWebcam = false)
Resumes webcam after pause.
YMK.getInfo()
Returns current module info:
{
"fps": 30
}
YMK.close()
Closes module and camera.
Events Reference
Lifecycle Events
| Event | Description |
|---|---|
opened |
Module opened |
loading |
Loading progress (0–100) |
loaded |
Camera stream loaded onto canvas |
closed |
Module closed |
Camera Events
| Event | Description |
|---|---|
cameraOpened |
Webcam opened |
cameraClosed |
Webcam closed |
cameraFailed |
Permission denied or no webcam Error code:* "error_resolution_unsupported"* "error_permission_denied"* "error_access_failed" |
faceQualityChanged
Fires continuously during detection.
{
"hasFace": true,
"position": "good",
"frontal": "good",
"lighting": "ok"
}
- Field Descriptions
| Field | Values | Meaning |
|---|---|---|
hasFace |
true/false |
Whether face is detected |
position |
"good", "notgood", "toosmall", "outofboundary" |
Face distance/size quality |
frontal |
"good", "notgood" |
Whether user is facing forward |
lighting |
"good", "ok", "notgood" |
Lighting strength |
Necklace/Earring
| Field | Values | Meaning |
|---|---|---|
hasFace |
true/false |
Whether face is detected |
pose |
"good", "notgood" |
Face pose quality |
size |
"good", "notgood" |
Face size quality |
Wrist/Ring
| Field | Values | Meaning |
|---|---|---|
hasFace |
true/false |
Whether face is detected |
position |
"good", "notgood" |
Hand position quality |
pose |
"good", "notgood" |
Hand pose quality |
Minimum Recommended Quality
const minQuality = {
hasFace: true,
area: "good",
frontal: "good",
lighting: "ok"
};
faceDetectionStarted
User enters detection UI.
faceDetectionCaptured
This event is fired after all required face quality validation checks have passed and the Camera Kit has successfully completed the capture workflow.
Depending on the selected faceDetectionMode, the event may contain one or multiple captured images (e.g., multi-angle capture for hair modes).
Callback Arguments
capturedResult — Object
The result object containing all successfully captured images and metadata.
Field Definitions
mode — string
Indicates the active faceDetectionMode used for capturing.
Possible values include:
"makeup" | "skincare" | "hdskincare" | "shadefinder" | "facereshape" | "hairlength" | "hairfrizziness" | "hairtype" | "ring" | "wrist" | "necklace" | "earring"
This value corresponds directly to the configuration set in YMK.init({ faceDetectionMode }).
images — Array
ImageObject Structure
| Field | Type | Description |
|---|---|---|
phase |
integer | The zero-based index representing the capture step. Examples: • Skincare = 0 • Hair frizziness sequence = 0 (front), 1 (right turn), 2 (left turn) |
image |
string or Blob | The captured image. • Base64 string if args.imageFormat = "base64" • Binary Blob if args.imageFormat = "blob" |
width |
integer | Pixel width of the captured image. |
height |
integer | Pixel height of the captured image. |
Notes
- The number of images varies depending on
faceDetectionMode.- Example:
"hairfrizziness"and"hairtype"typically produce three images.
- Example:
- Image resolution may differ from device to device.
The actual pixel size depends on:
- The user's webcam maximum resolution
- The constraints and recommended settings for the selected mode
- All images are guaranteed to meet the minimum face quality requirements before this event is dispatched.
Configuration Notes
Quality Requirements
- Ensure correct distance
- Ensure frontal face angle
- Provide sufficient lighting (avoid shadows)
Multi-Phase Capture
Modes like hairtype or hairfrizziness require:
- Front face
- Turn right
- Turn left
Ensure event handling is in place.
Create a new file.
To upload a new file, you'll first need to use the File API. It will give you a URL – use that URL to upload your file. Once the upload is finished, you can use the file_id from the same response to start using our AI features.
Authorizations:
Request Body schema: application/jsonrequired
required | Array of objects |
Responses
Request samples
- Payload
- curl
- Node.js
- JavaScript
- PHP
- Python
- Java
{- "files": [
- {
- "content_type": "image/jpg",
- "file_name": "my-selfie.jpg",
- "file_size": 50000
}
]
}Response samples
- 200
- 400
- 401
{- "status": 200,
- "data": {
- "files": [
- {
- "content_type": "image/jpg",
- "file_name": "my-selfie.jpg",
- "file_id": "U8aqJbsXGT537jtGnEDFHqxdDXqh8+oTF/cSkLimzuvVwMP+Jb1XbjPsf7ZgUgLY",
- "requests": [
- {
- "headers": {
- "Content-Type": "image/jpg",
- "Content-Length": 50000
}, - "method": "PUT"
}
]
}
]
}
}Run an AI 2D Virtual Try On Bracelet task.
Once you start an AI task, you need to keep polling at given polling_interval to check its status until it shows either success or error because if you don't, the task will time out and when you try to check the status later, you'll get an InvalidTaskId error even if the task did finish successfully and your units will still be consumed.
Authorizations:
Request Body schema: application/jsonrequired
| src_file_url required | string Url of the file to run task. The url should be publicly accessible. |
| srcmsk_file_url | string Url of the source mask file to run task. The url should be publicly accessible. |
| ref_file_urls required | Array of strings Url of the reference file to run task. The url should be publicly accessible. |
| refmsk_file_urls | Array of strings Url of the reference mask file to run task. The url should be publicly accessible. |
required | object Contain source photo informations. |
required | Array of objects |
Responses
Request samples
- Payload
- curl
- Node.js
- JavaScript
- PHP
- Python
- Java
{- "source_info": {
}, - "object_infos": [
- {
- "parameter": {
- "bracelet_need_remove_background": true,
- "bracelet_anchor_point": null,
- "bracelet_wearing_location": null,
- "bracelet_shadow_intensity": 0.3,
- "bracelet_ambient_light_intensity": 1
}
}
]
}Response samples
- 200
- 400
- 401
{- "status": 200,
- "data": {
- "task_id": "grH0CvsgXuAIHLUzD0V1Ol34hoet3R1tvdbtiVHrDb6_UqCLKIejAIajwxrhOAfe"
}
}Check the status of a AI 2D Virtual Try On Bracelet task.
Authorizations:
path Parameters
| task_id required | string Example: grH0CvsgXuAIHLUzD0V1Ol34hoet3R1tvdbtiVHrDb6_UqCLKIejAIajwxrhOAfe ID of task to check |
Responses
Request samples
- curl
- Node.js
- JavaScript
- PHP
- Python
- Java
curl --request GET \ --url https://yce-api-01.makeupar.com/s2s/v2.0/task/2d-vto/bracelet/grH0CvsgXuAIHLUzD0V1Ol34hoet3R1tvdbtiVHrDb6_UqCLKIejAIajwxrhOAfe \ --header 'Authorization: Bearer <access_token for v1, API Key for v2>'
Response samples
- 200
- 400
- 401
- 500
{- "status": 200,
- "data": {
- "task_status": "running",
- "error": "exceed_max_filesize",
- "error_message": "string",
}
}AI Watch Virtual Try-On
Virtually Try-On AR Watches with Ease! Only One 2D Image Needed.
With just a single 2D image upload, users can instantly try on top-notch watches virtually using our innovative AR-Watches App. This unique feature sets us apart in the world of e-commerce, making it easier than ever for customers to experience your products.
This guide walks you through:
- Endpoint:
/s2s/v2.0/file/2d-vto/watch - Authentication: All requests require an
Authorization: Bearer YOUR_API_KEY - Workflow:
- Prepare a wrist image: Uploading an image or provide a valid image URL of your wrist
- Prepare a watch image: Uploading an image or provide a valid image URL of a watch product
- Fire an AI task and Retrieve Task ID: Capture the
task_idfrom the response. - Poll Status (
GET): Use thetask_idto check the status of the task. Continue polling untiltask_statusis"success"or"error".
API Playground
Interactively explore and test the API using our official playground:
API Playground: http://yce.makeupar.com/api-console/en/api-playground/ai-watch-virtual-try-on/
Authentication
- Include your API key in the request header using Bearer Token:
You can find your API Key at https://yce.makeupar.com/api-console/en/api-keys/.Authorization: Bearer YOUR_API_KEY
1. Upload an Image
You may upload a file directly to the server or provide a valid image URL in the VTO task payload.
Upload Endpoint
POST /s2s/v2.0/file/2d-vto/watch
Alternatively, skip this step if you already have a public image URL.
You may upload a file directly to the URL provided in the response from the File API and then use the corresponding src_file_id returned by the File API to invoke the AI task later. Or provide a valid image URL in the VTO task payload as src_file_url. The src_file_id or src_file_url will serve as the virtual try-on target.
You must also provide another watch product image as a reference using ref_file_ids or ref_file_urls to be applied to your src_file_id or src_file_url.
The AI engine supports automatic background removal for your watch product image. However, you may provide an occlusion mask image file for either your hand (srcmsk_file_id or srcmsk_file_url) or the watch product (refmsk_file_ids or refmsk_file_urls) to fine-tune the segmentation.
2. Create a Watch VTO Task and Poll for Results
Once you have an image and a template ID, create a task. The API processes the request asynchronously. You must poll the task status until it reaches success or error.
Create Task Endpoint
POST /s2s/v2.0/task/2d-vto/watch
Polling Endpoint
GET /s2s/v2.0/task/2d-vto/watch/{task_id}
AI Watch Virtual Try-On Specification
Supported Watch View A watch image in a clear front view with the watch face unobstructed. The strap should be cropped to resemble a realistic wearing length.
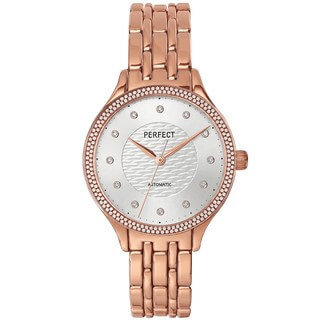
Supported Wrist View The back of the wrist should be fully visible with all five fingers clearly shown and without any occlusion.
watch_wearing_location: float (−0.3 to 1.0) Indicates the position along the wrist: −0.3 represents near the main wrist joint 1.0 represents far from the main wrist joint Default value: null (use engine default)
watch_shadow_intensity: float (0.0 to 1.0) Controls the strength of the shadow: 0.0 represents no shadow 1.0 represents maximum shadow Default value: 0.15
watch_ambient_light_intensity: float (0.0 to 1.0) Defines the extent to which lighting references the target hand image: 0.0 ignores the hand image lighting 1.0 fully matches the hand image lighting and shadow rendering Default value: 1.0
Watch Anchor Points: array of 4 points in pixel coordinate (optional) The first two points mark the beginning and end of the strap when worn. The remaining two points mark the upper and lower edges of the watch case.
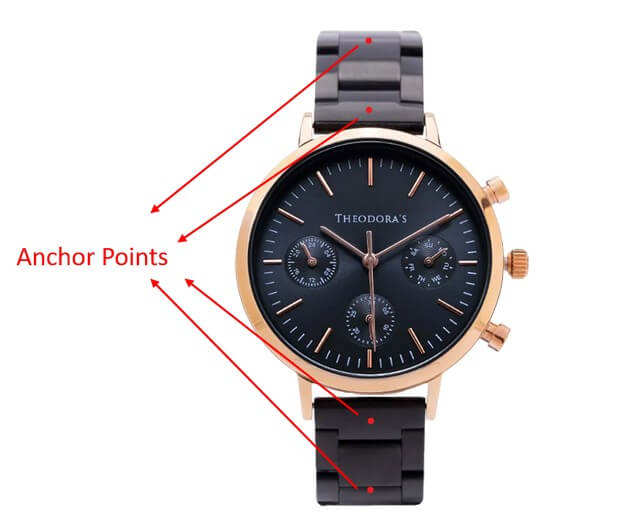
Supported Formats & Dimensions
| AI Feature | Supported Dimensions | Supported File Size | Supported Formats |
|---|---|---|---|
| AI Watch Virtual Try-On | long side <= 4096 | < 10MB | jpg/jpeg/png |
Error Codes
| Error Code | Description |
|---|---|
| RUNTIME_ERROR | An unexpected error occurred duwatch runtime |
| PHOTO_DETECTION_FAIL | The user photo could not be processed correctly, for example no hand detected |
| OBJECT_DETECTION_FAIL | The object photo could not be processed correctly, for example no product detected |
| PHOTO_CHECK_INVALID | The pose or size of the user photo is invalid |
| INPUT_ERROR | The input file format is incorrect |
| INPUT_MAIN_IMAGE_EMPTY | A user image is required |
Environment & Dependency
| Sample Code Language / Tool | Recommended Runtime Versions |
|---|---|
| cURL | - bash >= 3.2 - curl >= 7.58 (modern TLS/HTTP support) - jq >= 1.6 (robust JSON parsing) |
| Node.js (JavaScript) | Node >= 18 (for global fetch) |
| JavaScript | - Chrome / Edge >= 80 - Firefox >= 74 - Safari >= 13.1 |
| PHP | PHP >= 7.4 (for modern TLS/compat), ext-curl (recommended) or allow_url_fopen=On + ext-openssl, ext-json |
| Python | Python >= 3.10 (for f-strings), requests >= 2.20.0 |
| Java | Java 11+ (for HttpClient), Jackson Databind >= 2.12.0 |
Overview
The JavaScript Camera Kit provides a complete in-browser camera solution designed for high-accuracy face-based imaging tasks. It includes:
- Camera permission handling
- Real-time face detection
- Automatic face quality validation (lighting, pose, angle, distance)
- Guided capture UI
- Multi-step capture flows for advanced hair/face tasks
- Support for both base64 and blob output formats
The module is particularly optimized for AI-driven image analysis, such as AI Skin Analysis (SD/HD), AI Face Tone Analysis, and hair-related analysis.
Download the JS Camera Kit
Include the JS Camera Kit SDK via CDN:
https://plugins-media.makeupar.com/v2.2-camera-kit/sdk.js
Once loaded, the SDK installs a global YMK object.
Quick Start Example
The following sample demonstrates:
- Loading the JS Camera Kit SDK
- Implementing
window.ymkAsyncInit - Initializing the module
- Opening the camera
- Receiving captured images
<!DOCTYPE html>
<html lang="en">
<head>
<meta charset="UTF-8" />
<meta name="viewport" content="width=device-width, initial-scale=1.0" />
<title>Camera Kit Sample</title>
</head>
<body>
<script>
window.ymkAsyncInit = function() {
YMK.addEventListener('loaded', function() {
/* Module fully loaded and ready */
});
YMK.addEventListener('faceDetectionCaptured', function(capturedResult) {
/* Display all captured images */
const container = document.getElementById('captured-results');
container.innerHTML = '';
for (const image of capturedResult.images) {
const img = document.createElement('img');
img.src = typeof image.image === 'string'
? image.image
: URL.createObjectURL(image.image);
container.appendChild(img);
}
});
};
function openCameraKit() {
YMK.init({
faceDetectionMode: 'wrist',
imageFormat: 'base64',
language: 'enu',
});
YMK.openCameraKit();
}
</script>
<!-- Load SDK -->
<script>
window.addEventListener('load', function() {
(function(d) {
const s = d.createElement('script');
s.type = 'text/javascript';
s.async = true;
s.src = 'https://plugins-media.makeupar.com/v2.2-camera-kit/sdk.js';
d.getElementsByTagName('script')[0].parentNode.insertBefore(s, null);
})(document);
});
</script>
<button onClick="openCameraKit()">Open Camera Kit</button>
<div id="YMK-module"></div>
<h3>Captured Results:</h3>
<div id="captured-results"></div>
</body>
</html>
Prerequisites
You must define the asynchronous initialization entry point:
<script>
window.ymkAsyncInit = function() {
YMK.init(); // default settings
};
</script>
Additional requirements:
| Requirement | Description |
|---|---|
| Browser | Must support getUserMedia |
| HTTPS | Required on most browsers for webcam access |
<div id="YMK-module"> |
Mandatory mount point for the UI |
Integration Guide
Step 1 — Initialize the Module
Call YMK.init() before calling YMK.openCameraKit():
YMK.init({
faceDetectionMode: 'wrist',
imageFormat: 'base64',
language: 'enu'
});
Supported Detection Modes
| Mode | Description |
|---|---|
makeup |
Standard camera mode for virtual cosmetic try-on |
skincare |
Standard skin analysis mode, close-up face capture |
hdskincare |
HD Skin capture using webcams with ≥ 2560px width |
shadefinder |
Skin Tone Analysis front-face capture |
facereshape |
AI Face Reshape capture |
hairlength |
Full hair-length capture (from a distance) |
hairfrizziness |
3-phase capture: front, right-turn, left-turn |
hairtype |
Same 3-phase multi-angle capture flow |
ring |
Hand capture for ring try‑on |
wrist |
Wrist capture for watch or bracelet try‑on |
necklace |
Selfie capture for necklace try-on |
earring |
Selfie capture for earring try-on |
Step 2 — Add Event Handlers
Event examples:
YMK.addEventListener('faceQualityChanged', function(q) {
console.log('Quality updated:', q);
});
See the full Events List below.
Step 3 — Open Camera Kit
YMK.openCameraKit();
This automatically:
- Shows the UI
- Opens webcam
- Begins real-time face quality monitoring
- Automatically captures when conditions are acceptable
Step 4 — Receiving Captured Result
Captured images arrive via:
YMK.addEventListener('faceDetectionCaptured', function(result) {
console.log(result.images);
});
Step 5 — Close Module
YMK.close();
API Reference
YMK.init(args)
Configures module appearance, detection mode, language, and capture format.
Arguments
args.faceDetectionMode
Detection flow to use.
Values:
"makeup" | "skincare" | "hdskincare" | "shadefinder" | "facereshape" | "hairlength" | "hairfrizziness" | "hairtype" | "ring" | "wrist" | "necklace" | "earring"
Default: "skincare"
args.width
Pixel width of module container. Default:
360(screens ≥ 500px)screen width(screens < 500px)
Allowed: 300–1920
args.height
Pixel height of module container. Default:
480(screens ≥ 500px)min(screen.height, innerHeight)for smaller screens
Allowed: 300–1920
args.language
UI language.
Available: "chs", "cht", "deu", "enu", "esp", "fra", "jpn", "kor", "ptb", "ita"
Default: "enu"
args.imageFormat
Format returned via faceDetectionCaptured.
"base64" or "blob"
Default: "base64"
args.disableCameraResolutionCheck
Allow running even if webcam does not meet required resolution.
Default: false
Other API Methods
YMK.openCameraKit()
Opens the module and begins detection.
YMK.addEventListener(eventName, callback)
Registers event callbacks.
Returns: EventListenerIdentifier
YMK.removeEventListener(id)
Removes listener by identifier.
YMK.isLoaded()
Returns whether livestream or photo is drawn on canvas.
Returns: boolean
YMK.pause()
Pauses the webcam stream.
YMK.resume(restartWebcam = false)
Resumes webcam after pause.
YMK.getInfo()
Returns current module info:
{
"fps": 30
}
YMK.close()
Closes module and camera.
Events Reference
Lifecycle Events
| Event | Description |
|---|---|
opened |
Module opened |
loading |
Loading progress (0–100) |
loaded |
Camera stream loaded onto canvas |
closed |
Module closed |
Camera Events
| Event | Description |
|---|---|
cameraOpened |
Webcam opened |
cameraClosed |
Webcam closed |
cameraFailed |
Permission denied or no webcam Error code:* "error_resolution_unsupported"* "error_permission_denied"* "error_access_failed" |
faceQualityChanged
Fires continuously during detection.
{
"hasFace": true,
"position": "good",
"frontal": "good",
"lighting": "ok"
}
- Field Descriptions
| Field | Values | Meaning |
|---|---|---|
hasFace |
true/false |
Whether face is detected |
position |
"good", "notgood", "toosmall", "outofboundary" |
Face distance/size quality |
frontal |
"good", "notgood" |
Whether user is facing forward |
lighting |
"good", "ok", "notgood" |
Lighting strength |
Necklace/Earring
| Field | Values | Meaning |
|---|---|---|
hasFace |
true/false |
Whether face is detected |
pose |
"good", "notgood" |
Face pose quality |
size |
"good", "notgood" |
Face size quality |
Wrist/Ring
| Field | Values | Meaning |
|---|---|---|
hasFace |
true/false |
Whether face is detected |
position |
"good", "notgood" |
Hand position quality |
pose |
"good", "notgood" |
Hand pose quality |
Minimum Recommended Quality
const minQuality = {
hasFace: true,
area: "good",
frontal: "good",
lighting: "ok"
};
faceDetectionStarted
User enters detection UI.
faceDetectionCaptured
This event is fired after all required face quality validation checks have passed and the Camera Kit has successfully completed the capture workflow.
Depending on the selected faceDetectionMode, the event may contain one or multiple captured images (e.g., multi-angle capture for hair modes).
Callback Arguments
capturedResult — Object
The result object containing all successfully captured images and metadata.
Field Definitions
mode — string
Indicates the active faceDetectionMode used for capturing.
Possible values include:
"makeup" | "skincare" | "hdskincare" | "shadefinder" | "facereshape" | "hairlength" | "hairfrizziness" | "hairtype" | "ring" | "wrist" | "necklace" | "earring"
This value corresponds directly to the configuration set in YMK.init({ faceDetectionMode }).
images — Array
ImageObject Structure
| Field | Type | Description |
|---|---|---|
phase |
integer | The zero-based index representing the capture step. Examples: • Skincare = 0 • Hair frizziness sequence = 0 (front), 1 (right turn), 2 (left turn) |
image |
string or Blob | The captured image. • Base64 string if args.imageFormat = "base64" • Binary Blob if args.imageFormat = "blob" |
width |
integer | Pixel width of the captured image. |
height |
integer | Pixel height of the captured image. |
Notes
- The number of images varies depending on
faceDetectionMode.- Example:
"hairfrizziness"and"hairtype"typically produce three images.
- Example:
- Image resolution may differ from device to device.
The actual pixel size depends on:
- The user's webcam maximum resolution
- The constraints and recommended settings for the selected mode
- All images are guaranteed to meet the minimum face quality requirements before this event is dispatched.
Configuration Notes
Quality Requirements
- Ensure correct distance
- Ensure frontal face angle
- Provide sufficient lighting (avoid shadows)
Multi-Phase Capture
Modes like hairtype or hairfrizziness require:
- Front face
- Turn right
- Turn left
Ensure event handling is in place.
Create a new file.
To upload a new file, you'll first need to use the File API. It will give you a URL – use that URL to upload your file. Once the upload is finished, you can use the file_id from the same response to start using our AI features.
Authorizations:
Request Body schema: application/jsonrequired
required | Array of objects |
Responses
Request samples
- Payload
- curl
- Node.js
- JavaScript
- PHP
- Python
- Java
{- "files": [
- {
- "content_type": "image/jpg",
- "file_name": "my-selfie.jpg",
- "file_size": 50000
}
]
}Response samples
- 200
- 400
- 401
{- "status": 200,
- "data": {
- "files": [
- {
- "content_type": "image/jpg",
- "file_name": "my-selfie.jpg",
- "file_id": "U8aqJbsXGT537jtGnEDFHqxdDXqh8+oTF/cSkLimzuvVwMP+Jb1XbjPsf7ZgUgLY",
- "requests": [
- {
- "headers": {
- "Content-Type": "image/jpg",
- "Content-Length": 50000
}, - "method": "PUT"
}
]
}
]
}
}Run an AI 2D Virtual Try On Watch task.
Once you start an AI task, you need to keep polling at given polling_interval to check its status until it shows either success or error because if you don't, the task will time out and when you try to check the status later, you'll get an InvalidTaskId error even if the task did finish successfully and your units will still be consumed.
Authorizations:
Request Body schema: application/jsonrequired
| src_file_url required | string Url of the file to run task. The url should be publicly accessible. |
| srcmsk_file_url | string Url of the source mask file to run task. The url should be publicly accessible. |
| ref_file_urls required | Array of strings Url of the reference file to run task. The url should be publicly accessible. |
| refmsk_file_urls | Array of strings Url of the reference mask file to run task. The url should be publicly accessible. |
required | object Contain source photo informations. |
required | Array of objects |
Responses
Request samples
- Payload
- curl
- Node.js
- JavaScript
- PHP
- Python
- Java
{- "source_info": {
}, - "object_infos": [
- {
- "parameter": {
- "watch_need_remove_background": true,
- "watch_anchor_point": null,
- "watch_wearing_location": null,
- "watch_shadow_intensity": 0.3,
- "watch_ambient_light_intensity": 1
}
}
]
}Response samples
- 200
- 400
- 401
{- "status": 200,
- "data": {
- "task_id": "grH0CvsgXuAIHLUzD0V1Ol34hoet3R1tvdbtiVHrDb6_UqCLKIejAIajwxrhOAfe"
}
}Check the status of a AI 2D Virtual Try On Watch task.
Authorizations:
path Parameters
| task_id required | string Example: grH0CvsgXuAIHLUzD0V1Ol34hoet3R1tvdbtiVHrDb6_UqCLKIejAIajwxrhOAfe ID of task to check |
Responses
Request samples
- curl
- Node.js
- JavaScript
- PHP
- Python
- Java
curl --request GET \ --url https://yce-api-01.makeupar.com/s2s/v2.0/task/2d-vto/watch/grH0CvsgXuAIHLUzD0V1Ol34hoet3R1tvdbtiVHrDb6_UqCLKIejAIajwxrhOAfe \ --header 'Authorization: Bearer <access_token for v1, API Key for v2>'
Response samples
- 200
- 400
- 401
- 500
{- "status": 200,
- "data": {
- "task_status": "running",
- "error": "exceed_max_filesize",
- "error_message": "string",
}
}AI Earring Virtual Try-On
The Ultimate AI Earring Virtual Try-On Top AI ear piercing simulator for virtual earring try-on and virtual piercing try-on
Create realistic and dynamic earrings vitual try-on from a 2D image, no expensive 3D modelling required. Our advanced algorithms create lifelike virtual try-on earring SKUs with sophisticated lighting effects and physically accurate motions.
This guide walks you through:
- Endpoint:
/s2s/v2.0/file/2d-vto/earring - Authentication: All requests require an
Authorization: Bearer YOUR_API_KEY - Workflow:
- Prepare a selfie image: Uploading an image or provide a valid image URL
- Prepare an earring image: Uploading an image or provide a valid image URL of an earring product
- Fire an AI task and Retrieve Task ID: Capture the
task_idfrom the response. - Poll Status (
GET): Use thetask_idto check the status of the task. Continue polling untiltask_statusis"success"or"error".
API Playground
Interactively explore and test the API using our official playground:
API Playground: http://yce.makeupar.com/api-console/en/api-playground/ai-earring-virtual-try-on/
Authentication
- Include your API key in the request header using Bearer Token:
You can find your API Key at https://yce.makeupar.com/api-console/en/api-keys/.Authorization: Bearer YOUR_API_KEY
1. Upload an Image
You may upload a file directly to the server or provide a valid image URL in the VTO task payload.
Upload Endpoint
POST /s2s/v2.0/file/2d-vto/earring
Alternatively, skip this step if you already have a public image URL.
You may upload a file directly to the URL provided in the response from the File API and then use the corresponding src_file_id returned by the File API to invoke the AI task later. Or provide a valid image URL in the VTO task payload as src_file_url. The src_file_id or src_file_url will serve as the virtual try-on target.
You must also provide another earring product image as a reference using ref_file_ids or ref_file_urls to be applied to your src_file_id or src_file_url.
The AI engine supports automatic background removal for your earring product image. However, you may provide an occlusion mask image file for either your hand (srcmsk_file_id or srcmsk_file_url) or the earring product (refmsk_file_ids or refmsk_file_urls) to fine-tune the segmentation.
2. Create a Earring VTO Task and Poll for Results
Once you have an image and a template ID, create a task. The API processes the request asynchronously. You must poll the task status until it reaches success or error.
Create Task Endpoint
POST /s2s/v2.0/task/2d-vto/earring
Polling Endpoint
GET /s2s/v2.0/task/2d-vto/earring/{task_id}
AI Earring Virtual Try-On Specification
Supported Earring View A single earring image in a clear front view without obstruction.
Supported Selfie View A clear view of one side of the face with the ear unobstructed. Only single-side earring wearing is supported. Vertical head tilt is supported from 0 degrees to 20 degrees upward. Horizontal head rotation is supported from 15 degrees to 75 degrees sideways. The ear size should be moderate, occupying between 10 per cent and 50 per cent of the image height.
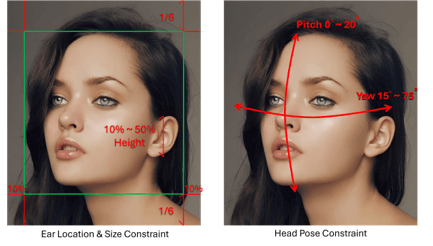
earring_wearing_location: integer array of size 2 Specifies the target location in the selfie where the earring should be placed. Default value: null (engine default)
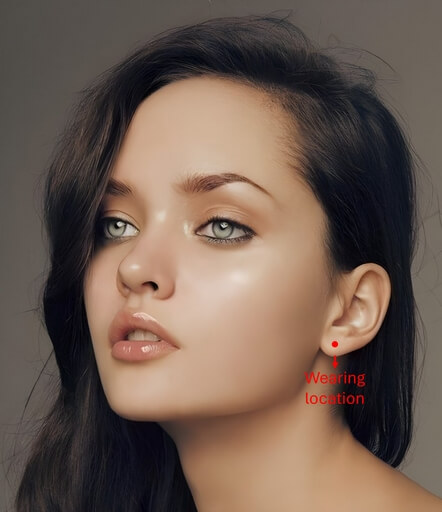
earring_scale: number greater than 0 Controls the earring size in centimetres. Default value: null (engine default)
earring_is_right_ear: boolean Indicates whether the earring is worn on the right ear. By default, it is worn on the right ear. Default value: true
earring_occluded_type: number (Enum: 0, 1, 2) Specifies the occlusion type: 0 means auto-detect 1 means occluded 2 means no occlusion Default value: 0
earring_shadow_intensity: float (0.0 to 1.0) Controls the shadow strength: 0.0 represents no shadow 1.0 represents maximum shadow Default value: 0.15
earring_ambient_light_intensity: float (0.0 to 1.0) Defines how much the lighting references the selfie image: 0.0 ignores the selfie image lighting 1.0 fully matches the selfie image lighting and shadow rendering Default value: 1.0
earring_anchor_point: array of one point in pixel coordinate (optional) Specifies the wearing position in the earring product image. Default value: null (engine default)
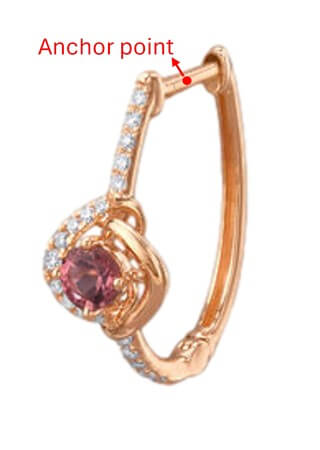
Supported Formats & Dimensions
| AI Feature | Supported Dimensions | Supported File Size | Supported Formats |
|---|---|---|---|
| AI Earring Virtual Try-On | long side <= 4096 | < 10MB | jpg/jpeg/png |
Error Codes
| Error Code | Description |
|---|---|
| RUNTIME_ERROR | An unexpected error occurred duearring runtime |
| PHOTO_DETECTION_FAIL | The user photo could not be processed correctly, for example no hand detected |
| OBJECT_DETECTION_FAIL | The object photo could not be processed correctly, for example no product detected |
| PHOTO_CHECK_INVALID | The pose or size of the user photo is invalid |
| INPUT_ERROR | The input file format is incorrect |
| INPUT_MAIN_IMAGE_EMPTY | A user image is required |
Environment & Dependency
| Sample Code Language / Tool | Recommended Runtime Versions |
|---|---|
| cURL | - bash >= 3.2 - curl >= 7.58 (modern TLS/HTTP support) - jq >= 1.6 (robust JSON parsing) |
| Node.js (JavaScript) | Node >= 18 (for global fetch) |
| JavaScript | - Chrome / Edge >= 80 - Firefox >= 74 - Safari >= 13.1 |
| PHP | PHP >= 7.4 (for modern TLS/compat), ext-curl (recommended) or allow_url_fopen=On + ext-openssl, ext-json |
| Python | Python >= 3.10 (for f-strings), requests >= 2.20.0 |
| Java | Java 11+ (for HttpClient), Jackson Databind >= 2.12.0 |
Overview
The JavaScript Camera Kit provides a complete in-browser camera solution designed for high-accuracy face-based imaging tasks. It includes:
- Camera permission handling
- Real-time face detection
- Automatic face quality validation (lighting, pose, angle, distance)
- Guided capture UI
- Multi-step capture flows for advanced hair/face tasks
- Support for both base64 and blob output formats
The module is particularly optimized for AI-driven image analysis, such as AI Skin Analysis (SD/HD), AI Face Tone Analysis, and hair-related analysis.
Download the JS Camera Kit
Include the JS Camera Kit SDK via CDN:
https://plugins-media.makeupar.com/v2.2-camera-kit/sdk.js
Once loaded, the SDK installs a global YMK object.
Quick Start Example
The following sample demonstrates:
- Loading the JS Camera Kit SDK
- Implementing
window.ymkAsyncInit - Initializing the module
- Opening the camera
- Receiving captured images
<!DOCTYPE html>
<html lang="en">
<head>
<meta charset="UTF-8" />
<meta name="viewport" content="width=device-width, initial-scale=1.0" />
<title>Camera Kit Sample</title>
</head>
<body>
<script>
window.ymkAsyncInit = function() {
YMK.addEventListener('loaded', function() {
/* Module fully loaded and ready */
});
YMK.addEventListener('faceDetectionCaptured', function(capturedResult) {
/* Display all captured images */
const container = document.getElementById('captured-results');
container.innerHTML = '';
for (const image of capturedResult.images) {
const img = document.createElement('img');
img.src = typeof image.image === 'string'
? image.image
: URL.createObjectURL(image.image);
container.appendChild(img);
}
});
};
function openCameraKit() {
YMK.init({
faceDetectionMode: 'earring',
imageFormat: 'base64',
language: 'enu',
});
YMK.openCameraKit();
}
</script>
<!-- Load SDK -->
<script>
window.addEventListener('load', function() {
(function(d) {
const s = d.createElement('script');
s.type = 'text/javascript';
s.async = true;
s.src = 'https://plugins-media.makeupar.com/v2.2-camera-kit/sdk.js';
d.getElementsByTagName('script')[0].parentNode.insertBefore(s, null);
})(document);
});
</script>
<button onClick="openCameraKit()">Open Camera Kit</button>
<div id="YMK-module"></div>
<h3>Captured Results:</h3>
<div id="captured-results"></div>
</body>
</html>
Prerequisites
You must define the asynchronous initialization entry point:
<script>
window.ymkAsyncInit = function() {
YMK.init(); // default settings
};
</script>
Additional requirements:
| Requirement | Description |
|---|---|
| Browser | Must support getUserMedia |
| HTTPS | Required on most browsers for webcam access |
<div id="YMK-module"> |
Mandatory mount point for the UI |
Integration Guide
Step 1 — Initialize the Module
Call YMK.init() before calling YMK.openCameraKit():
YMK.init({
faceDetectionMode: 'earring',
imageFormat: 'base64',
language: 'enu'
});
Supported Detection Modes
| Mode | Description |
|---|---|
makeup |
Standard camera mode for virtual cosmetic try-on |
skincare |
Standard skin analysis mode, close-up face capture |
hdskincare |
HD Skin capture using webcams with ≥ 2560px width |
shadefinder |
Skin Tone Analysis front-face capture |
facereshape |
AI Face Reshape capture |
hairlength |
Full hair-length capture (from a distance) |
hairfrizziness |
3-phase capture: front, right-turn, left-turn |
hairtype |
Same 3-phase multi-angle capture flow |
ring |
Hand capture for ring try‑on |
wrist |
Wrist capture for watch or bracelet try‑on |
necklace |
Selfie capture for necklace try-on |
earring |
Selfie capture for earring try-on |
Step 2 — Add Event Handlers
Event examples:
YMK.addEventListener('faceQualityChanged', function(q) {
console.log('Quality updated:', q);
});
See the full Events List below.
Step 3 — Open Camera Kit
YMK.openCameraKit();
This automatically:
- Shows the UI
- Opens webcam
- Begins real-time face quality monitoring
- Automatically captures when conditions are acceptable
Step 4 — Receiving Captured Result
Captured images arrive via:
YMK.addEventListener('faceDetectionCaptured', function(result) {
console.log(result.images);
});
Step 5 — Close Module
YMK.close();
API Reference
YMK.init(args)
Configures module appearance, detection mode, language, and capture format.
Arguments
args.faceDetectionMode
Detection flow to use.
Values:
"makeup" | "skincare" | "hdskincare" | "shadefinder" | "facereshape" | "hairlength" | "hairfrizziness" | "hairtype" | "ring" | "wrist" | "necklace" | "earring"
Default: "skincare"
args.width
Pixel width of module container. Default:
360(screens ≥ 500px)screen width(screens < 500px)
Allowed: 300–1920
args.height
Pixel height of module container. Default:
480(screens ≥ 500px)min(screen.height, innerHeight)for smaller screens
Allowed: 300–1920
args.language
UI language.
Available: "chs", "cht", "deu", "enu", "esp", "fra", "jpn", "kor", "ptb", "ita"
Default: "enu"
args.imageFormat
Format returned via faceDetectionCaptured.
"base64" or "blob"
Default: "base64"
args.disableCameraResolutionCheck
Allow running even if webcam does not meet required resolution.
Default: false
Other API Methods
YMK.openCameraKit()
Opens the module and begins detection.
YMK.addEventListener(eventName, callback)
Registers event callbacks.
Returns: EventListenerIdentifier
YMK.removeEventListener(id)
Removes listener by identifier.
YMK.isLoaded()
Returns whether livestream or photo is drawn on canvas.
Returns: boolean
YMK.pause()
Pauses the webcam stream.
YMK.resume(restartWebcam = false)
Resumes webcam after pause.
YMK.getInfo()
Returns current module info:
{
"fps": 30
}
YMK.close()
Closes module and camera.
Events Reference
Lifecycle Events
| Event | Description |
|---|---|
opened |
Module opened |
loading |
Loading progress (0–100) |
loaded |
Camera stream loaded onto canvas |
closed |
Module closed |
Camera Events
| Event | Description |
|---|---|
cameraOpened |
Webcam opened |
cameraClosed |
Webcam closed |
cameraFailed |
Permission denied or no webcam Error code:* "error_resolution_unsupported"* "error_permission_denied"* "error_access_failed" |
faceQualityChanged
Fires continuously during detection.
{
"hasFace": true,
"position": "good",
"frontal": "good",
"lighting": "ok"
}
- Field Descriptions
| Field | Values | Meaning |
|---|---|---|
hasFace |
true/false |
Whether face is detected |
position |
"good", "notgood", "toosmall", "outofboundary" |
Face distance/size quality |
frontal |
"good", "notgood" |
Whether user is facing forward |
lighting |
"good", "ok", "notgood" |
Lighting strength |
Necklace/Earring
| Field | Values | Meaning |
|---|---|---|
hasFace |
true/false |
Whether face is detected |
pose |
"good", "notgood" |
Face pose quality |
size |
"good", "notgood" |
Face size quality |
Wrist/Ring
| Field | Values | Meaning |
|---|---|---|
hasFace |
true/false |
Whether face is detected |
position |
"good", "notgood" |
Hand position quality |
pose |
"good", "notgood" |
Hand pose quality |
Minimum Recommended Quality
const minQuality = {
hasFace: true,
area: "good",
frontal: "good",
lighting: "ok"
};
faceDetectionStarted
User enters detection UI.
faceDetectionCaptured
This event is fired after all required face quality validation checks have passed and the Camera Kit has successfully completed the capture workflow.
Depending on the selected faceDetectionMode, the event may contain one or multiple captured images (e.g., multi-angle capture for hair modes).
Callback Arguments
capturedResult — Object
The result object containing all successfully captured images and metadata.
Field Definitions
mode — string
Indicates the active faceDetectionMode used for capturing.
Possible values include:
"makeup" | "skincare" | "hdskincare" | "shadefinder" | "facereshape" | "hairlength" | "hairfrizziness" | "hairtype" | "ring" | "wrist" | "necklace" | "earring"
This value corresponds directly to the configuration set in YMK.init({ faceDetectionMode }).
images — Array
ImageObject Structure
| Field | Type | Description |
|---|---|---|
phase |
integer | The zero-based index representing the capture step. Examples: • Skincare = 0 • Hair frizziness sequence = 0 (front), 1 (right turn), 2 (left turn) |
image |
string or Blob | The captured image. • Base64 string if args.imageFormat = "base64" • Binary Blob if args.imageFormat = "blob" |
width |
integer | Pixel width of the captured image. |
height |
integer | Pixel height of the captured image. |
Notes
- The number of images varies depending on
faceDetectionMode.- Example:
"hairfrizziness"and"hairtype"typically produce three images.
- Example:
- Image resolution may differ from device to device.
The actual pixel size depends on:
- The user's webcam maximum resolution
- The constraints and recommended settings for the selected mode
- All images are guaranteed to meet the minimum face quality requirements before this event is dispatched.
Configuration Notes
Quality Requirements
- Ensure correct distance
- Ensure frontal face angle
- Provide sufficient lighting (avoid shadows)
Multi-Phase Capture
Modes like hairtype or hairfrizziness require:
- Front face
- Turn right
- Turn left
Ensure event handling is in place.
Create a new file.
To upload a new file, you'll first need to use the File API. It will give you a URL – use that URL to upload your file. Once the upload is finished, you can use the file_id from the same response to start using our AI features.
Authorizations:
Request Body schema: application/jsonrequired
required | Array of objects |
Responses
Request samples
- Payload
- curl
- Node.js
- JavaScript
- PHP
- Python
- Java
{- "files": [
- {
- "content_type": "image/jpg",
- "file_name": "my-selfie.jpg",
- "file_size": 50000
}
]
}Response samples
- 200
- 400
- 401
{- "status": 200,
- "data": {
- "files": [
- {
- "content_type": "image/jpg",
- "file_name": "my-selfie.jpg",
- "file_id": "U8aqJbsXGT537jtGnEDFHqxdDXqh8+oTF/cSkLimzuvVwMP+Jb1XbjPsf7ZgUgLY",
- "requests": [
- {
- "headers": {
- "Content-Type": "image/jpg",
- "Content-Length": 50000
}, - "method": "PUT"
}
]
}
]
}
}Run an AI 2D Virtual Try On Earring task.
Once you start an AI task, you need to keep polling at given polling_interval to check its status until it shows either success or error because if you don't, the task will time out and when you try to check the status later, you'll get an InvalidTaskId error even if the task did finish successfully and your units will still be consumed.
Authorizations:
Request Body schema: application/jsonrequired
| src_file_url required | string Url of the file to run task. The url should be publicly accessible. |
| srcmsk_file_url | string Url of the source mask file to run task. The url should be publicly accessible. |
| ref_file_urls required | Array of strings Url of the reference file to run task. The url should be publicly accessible. |
| refmsk_file_urls | Array of strings Url of the reference mask file to run task. The url should be publicly accessible. |
required | object Contain source photo informations. |
required | Array of objects |
Responses
Request samples
- Payload
- curl
- Node.js
- JavaScript
- PHP
- Python
- Java
{- "source_info": {
}, - "object_infos": [
- {
- "parameter": {
- "earring_need_remove_background": true,
- "earring_anchor_point": null,
- "earring_wearing_location": null,
- "earring_scale": null,
- "earring_is_right_ear": true,
- "earring_occluded_type": 0,
- "earring_shadow_intensity": 0.5,
- "earring_ambient_light_intensity": 0.5
}
}
]
}Response samples
- 200
- 400
- 401
{- "status": 200,
- "data": {
- "task_id": "grH0CvsgXuAIHLUzD0V1Ol34hoet3R1tvdbtiVHrDb6_UqCLKIejAIajwxrhOAfe"
}
}Check the status of a AI 2D Virtual Try On Earring task.
Authorizations:
path Parameters
| task_id required | string Example: grH0CvsgXuAIHLUzD0V1Ol34hoet3R1tvdbtiVHrDb6_UqCLKIejAIajwxrhOAfe ID of task to check |
Responses
Request samples
- curl
- Node.js
- JavaScript
- PHP
- Python
- Java
curl --request GET \ --url https://yce-api-01.makeupar.com/s2s/v2.0/task/2d-vto/earring/grH0CvsgXuAIHLUzD0V1Ol34hoet3R1tvdbtiVHrDb6_UqCLKIejAIajwxrhOAfe \ --header 'Authorization: Bearer <access_token for v1, API Key for v2>'
Response samples
- 200
- 400
- 401
- 500
{- "status": 200,
- "data": {
- "task_status": "running",
- "error": "exceed_max_filesize",
- "error_message": "string",
}
}AI Necklace Virtual Try-On
Luxurious Look and Feel with State-of-the-Art Virtual Try-On for Necklace Precise AI neck and clavicle tracking gives users an ultra-realistic AR try-on experience, recreating the luxurious look and feel of physical necklace sampling.
Create realistic and dynamic necklace vitual try-on from a 2D image, no expensive 3D modelling required. Our advanced algorithms create lifelike virtual try-on necklace SKUs with sophisticated lighting effects and physically accurate motions.
This guide walks you through:
- Endpoint:
/s2s/v2.0/file/2d-vto/necklace - Authentication: All requests require an
Authorization: Bearer YOUR_API_KEY - Workflow:
- Prepare a selfie image: Uploading an image or provide a valid image URL
- Prepare a necklace image: Uploading an image or provide a valid image URL of a necklace product
- Fire an AI task and Retrieve Task ID: Capture the
task_idfrom the response. - Poll Status (
GET): Use thetask_idto check the status of the task. Continue polling untiltask_statusis"success"or"error".
API Playground
Interactively explore and test the API using our official playground:
API Playground: http://yce.makeupar.com/api-console/en/api-playground/ai-necklace-virtual-try-on/
Authentication
- Include your API key in the request header using Bearer Token:
You can find your API Key at https://yce.makeupar.com/api-console/en/api-keys/.Authorization: Bearer YOUR_API_KEY
1. Upload an Image
You may upload a file directly to the server or provide a valid image URL in the VTO task payload.
Upload Endpoint
POST /s2s/v2.0/file/2d-vto/necklace
Alternatively, skip this step if you already have a public image URL.
You may upload a file directly to the URL provided in the response from the File API and then use the corresponding src_file_id returned by the File API to invoke the AI task later. Or provide a valid image URL in the VTO task payload as src_file_url. The src_file_id or src_file_url will serve as the virtual try-on target.
You must also provide another necklace product image as a reference using ref_file_ids or ref_file_urls to be applied to your src_file_id or src_file_url.
The AI engine supports automatic background removal for your selfie. However, you may provide an occlusion mask image file for your neck (srcmsk_file_id or srcmsk_file_url) to fine-tune the segmentation.
2. Create a Necklace VTO Task and Poll for Results
Once you have an image and a template ID, create a task. The API processes the request asynchronously. You must poll the task status until it reaches success or error.
Create Task Endpoint
POST /s2s/v2.0/task/2d-vto/necklace
Polling Endpoint
GET /s2s/v2.0/task/2d-vto/necklace/{task_id}
AI Necklace Virtual Try-On Specification
Supported Necklace View A front-facing image of the necklace worn, with the background removed.

Supported Selfie View A front-facing selfie with the neck clearly visible and unobstructed. Horizontal head rotation is supported within 20 degrees. The head size should be proportionate, and the neck width should occupy at least 15 per cent of the image width.
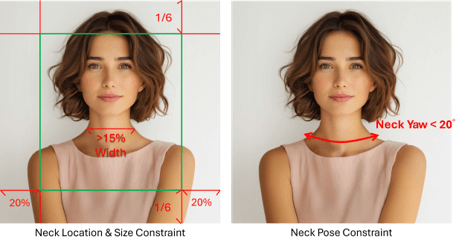
necklace_wearing_location: array of two points (optional) Specifies the target locations in the photo where the necklace should be placed. Default: null (engine default)
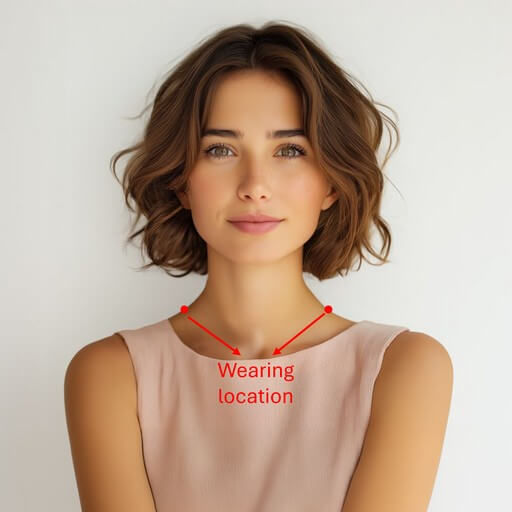
necklace_shadow_intensity: float (0.0 to 1.0) Controls the shadow strength: 0.0 represents no shadow 1.0 represents maximum shadow Default value: 0.15
necklace_ambient_light_intensity: float (0.0 to 1.0) Defines how much the lighting references the selfie image: 0.0 ignores the selfie image lighting 1.0 fully matches the selfie image lighting and shadow rendering Default value: 1.0
necklace_anchor_point: array of two points in pixel coordinate (optional) Specifies the anchor points for the left and right visible ends of the necklace chain in the product image, used for alignment. Default: null (engine default)
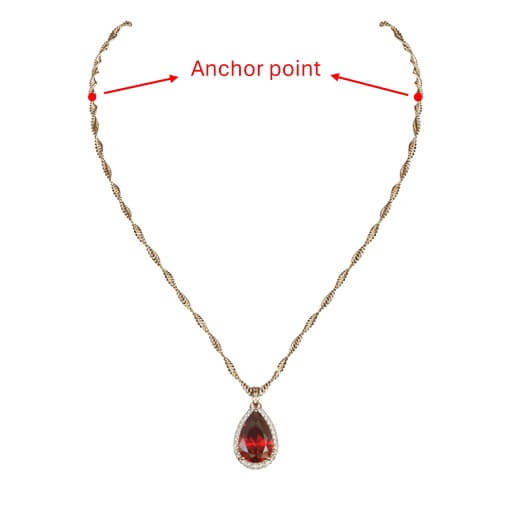
Supported Formats & Dimensions
| AI Feature | Supported Dimensions | Supported File Size | Supported Formats |
|---|---|---|---|
| AI Necklace Virtual Try-On | long side <= 4096 | < 10MB | jpg/jpeg/png |
Error Codes
| Error Code | Description |
|---|---|
| RUNTIME_ERROR | An unexpected error occurred dunecklace runtime |
| PHOTO_DETECTION_FAIL | The user photo could not be processed correctly, for example no neck detected |
| OBJECT_DETECTION_FAIL | The object photo could not be processed correctly, for example no product detected |
| PHOTO_CHECK_INVALID | The pose or size of the user photo is invalid |
| INPUT_ERROR | The input file format is incorrect |
| INPUT_MAIN_IMAGE_EMPTY | A user image is required |
Environment & Dependency
| Sample Code Language / Tool | Recommended Runtime Versions |
|---|---|
| cURL | - bash >= 3.2 - curl >= 7.58 (modern TLS/HTTP support) - jq >= 1.6 (robust JSON parsing) |
| Node.js (JavaScript) | Node >= 18 (for global fetch) |
| JavaScript | - Chrome / Edge >= 80 - Firefox >= 74 - Safari >= 13.1 |
| PHP | PHP >= 7.4 (for modern TLS/compat), ext-curl (recommended) or allow_url_fopen=On + ext-openssl, ext-json |
| Python | Python >= 3.10 (for f-strings), requests >= 2.20.0 |
| Java | Java 11+ (for HttpClient), Jackson Databind >= 2.12.0 |
Overview
The JavaScript Camera Kit provides a complete in-browser camera solution designed for high-accuracy face-based imaging tasks. It includes:
- Camera permission handling
- Real-time face detection
- Automatic face quality validation (lighting, pose, angle, distance)
- Guided capture UI
- Multi-step capture flows for advanced hair/face tasks
- Support for both base64 and blob output formats
The module is particularly optimized for AI-driven image analysis, such as AI Skin Analysis (SD/HD), AI Face Tone Analysis, and hair-related analysis.
Download the JS Camera Kit
Include the JS Camera Kit SDK via CDN:
https://plugins-media.makeupar.com/v2.2-camera-kit/sdk.js
Once loaded, the SDK installs a global YMK object.
Quick Start Example
The following sample demonstrates:
- Loading the JS Camera Kit SDK
- Implementing
window.ymkAsyncInit - Initializing the module
- Opening the camera
- Receiving captured images
<!DOCTYPE html>
<html lang="en">
<head>
<meta charset="UTF-8" />
<meta name="viewport" content="width=device-width, initial-scale=1.0" />
<title>Camera Kit Sample</title>
</head>
<body>
<script>
window.ymkAsyncInit = function() {
YMK.addEventListener('loaded', function() {
/* Module fully loaded and ready */
});
YMK.addEventListener('faceDetectionCaptured', function(capturedResult) {
/* Display all captured images */
const container = document.getElementById('captured-results');
container.innerHTML = '';
for (const image of capturedResult.images) {
const img = document.createElement('img');
img.src = typeof image.image === 'string'
? image.image
: URL.createObjectURL(image.image);
container.appendChild(img);
}
});
};
function openCameraKit() {
YMK.init({
faceDetectionMode: 'necklace',
imageFormat: 'base64',
language: 'enu',
});
YMK.openCameraKit();
}
</script>
<!-- Load SDK -->
<script>
window.addEventListener('load', function() {
(function(d) {
const s = d.createElement('script');
s.type = 'text/javascript';
s.async = true;
s.src = 'https://plugins-media.makeupar.com/v2.2-camera-kit/sdk.js';
d.getElementsByTagName('script')[0].parentNode.insertBefore(s, null);
})(document);
});
</script>
<button onClick="openCameraKit()">Open Camera Kit</button>
<div id="YMK-module"></div>
<h3>Captured Results:</h3>
<div id="captured-results"></div>
</body>
</html>
Prerequisites
You must define the asynchronous initialization entry point:
<script>
window.ymkAsyncInit = function() {
YMK.init(); // default settings
};
</script>
Additional requirements:
| Requirement | Description |
|---|---|
| Browser | Must support getUserMedia |
| HTTPS | Required on most browsers for webcam access |
<div id="YMK-module"> |
Mandatory mount point for the UI |
Integration Guide
Step 1 — Initialize the Module
Call YMK.init() before calling YMK.openCameraKit():
YMK.init({
faceDetectionMode: 'necklace',
imageFormat: 'base64',
language: 'enu'
});
Supported Detection Modes
| Mode | Description |
|---|---|
makeup |
Standard camera mode for virtual cosmetic try-on |
skincare |
Standard skin analysis mode, close-up face capture |
hdskincare |
HD Skin capture using webcams with ≥ 2560px width |
shadefinder |
Skin Tone Analysis front-face capture |
facereshape |
AI Face Reshape capture |
hairlength |
Full hair-length capture (from a distance) |
hairfrizziness |
3-phase capture: front, right-turn, left-turn |
hairtype |
Same 3-phase multi-angle capture flow |
ring |
Hand capture for ring try‑on |
wrist |
Wrist capture for watch or bracelet try‑on |
necklace |
Selfie capture for necklace try-on |
earring |
Selfie capture for earring try-on |
Step 2 — Add Event Handlers
Event examples:
YMK.addEventListener('faceQualityChanged', function(q) {
console.log('Quality updated:', q);
});
See the full Events List below.
Step 3 — Open Camera Kit
YMK.openCameraKit();
This automatically:
- Shows the UI
- Opens webcam
- Begins real-time face quality monitoring
- Automatically captures when conditions are acceptable
Step 4 — Receiving Captured Result
Captured images arrive via:
YMK.addEventListener('faceDetectionCaptured', function(result) {
console.log(result.images);
});
Step 5 — Close Module
YMK.close();
API Reference
YMK.init(args)
Configures module appearance, detection mode, language, and capture format.
Arguments
args.faceDetectionMode
Detection flow to use.
Values:
"makeup" | "skincare" | "hdskincare" | "shadefinder" | "facereshape" | "hairlength" | "hairfrizziness" | "hairtype" | "ring" | "wrist" | "necklace" | "earring"
Default: "skincare"
args.width
Pixel width of module container. Default:
360(screens ≥ 500px)screen width(screens < 500px)
Allowed: 300–1920
args.height
Pixel height of module container. Default:
480(screens ≥ 500px)min(screen.height, innerHeight)for smaller screens
Allowed: 300–1920
args.language
UI language.
Available: "chs", "cht", "deu", "enu", "esp", "fra", "jpn", "kor", "ptb", "ita"
Default: "enu"
args.imageFormat
Format returned via faceDetectionCaptured.
"base64" or "blob"
Default: "base64"
args.disableCameraResolutionCheck
Allow running even if webcam does not meet required resolution.
Default: false
Other API Methods
YMK.openCameraKit()
Opens the module and begins detection.
YMK.addEventListener(eventName, callback)
Registers event callbacks.
Returns: EventListenerIdentifier
YMK.removeEventListener(id)
Removes listener by identifier.
YMK.isLoaded()
Returns whether livestream or photo is drawn on canvas.
Returns: boolean
YMK.pause()
Pauses the webcam stream.
YMK.resume(restartWebcam = false)
Resumes webcam after pause.
YMK.getInfo()
Returns current module info:
{
"fps": 30
}
YMK.close()
Closes module and camera.
Events Reference
Lifecycle Events
| Event | Description |
|---|---|
opened |
Module opened |
loading |
Loading progress (0–100) |
loaded |
Camera stream loaded onto canvas |
closed |
Module closed |
Camera Events
| Event | Description |
|---|---|
cameraOpened |
Webcam opened |
cameraClosed |
Webcam closed |
cameraFailed |
Permission denied or no webcam Error code:* "error_resolution_unsupported"* "error_permission_denied"* "error_access_failed" |
faceQualityChanged
Fires continuously during detection.
{
"hasFace": true,
"position": "good",
"frontal": "good",
"lighting": "ok"
}
- Field Descriptions
| Field | Values | Meaning |
|---|---|---|
hasFace |
true/false |
Whether face is detected |
position |
"good", "notgood", "toosmall", "outofboundary" |
Face distance/size quality |
frontal |
"good", "notgood" |
Whether user is facing forward |
lighting |
"good", "ok", "notgood" |
Lighting strength |
Necklace/Earring
| Field | Values | Meaning |
|---|---|---|
hasFace |
true/false |
Whether face is detected |
pose |
"good", "notgood" |
Face pose quality |
size |
"good", "notgood" |
Face size quality |
Wrist/Ring
| Field | Values | Meaning |
|---|---|---|
hasFace |
true/false |
Whether face is detected |
position |
"good", "notgood" |
Hand position quality |
pose |
"good", "notgood" |
Hand pose quality |
Minimum Recommended Quality
const minQuality = {
hasFace: true,
area: "good",
frontal: "good",
lighting: "ok"
};
faceDetectionStarted
User enters detection UI.
faceDetectionCaptured
This event is fired after all required face quality validation checks have passed and the Camera Kit has successfully completed the capture workflow.
Depending on the selected faceDetectionMode, the event may contain one or multiple captured images (e.g., multi-angle capture for hair modes).
Callback Arguments
capturedResult — Object
The result object containing all successfully captured images and metadata.
Field Definitions
mode — string
Indicates the active faceDetectionMode used for capturing.
Possible values include:
"makeup" | "skincare" | "hdskincare" | "shadefinder" | "facereshape" | "hairlength" | "hairfrizziness" | "hairtype" | "ring" | "wrist" | "necklace" | "earring"
This value corresponds directly to the configuration set in YMK.init({ faceDetectionMode }).
images — Array
ImageObject Structure
| Field | Type | Description |
|---|---|---|
phase |
integer | The zero-based index representing the capture step. Examples: • Skincare = 0 • Hair frizziness sequence = 0 (front), 1 (right turn), 2 (left turn) |
image |
string or Blob | The captured image. • Base64 string if args.imageFormat = "base64" • Binary Blob if args.imageFormat = "blob" |
width |
integer | Pixel width of the captured image. |
height |
integer | Pixel height of the captured image. |
Notes
- The number of images varies depending on
faceDetectionMode.- Example:
"hairfrizziness"and"hairtype"typically produce three images.
- Example:
- Image resolution may differ from device to device.
The actual pixel size depends on:
- The user's webcam maximum resolution
- The constraints and recommended settings for the selected mode
- All images are guaranteed to meet the minimum face quality requirements before this event is dispatched.
Configuration Notes
Quality Requirements
- Ensure correct distance
- Ensure frontal face angle
- Provide sufficient lighting (avoid shadows)
Multi-Phase Capture
Modes like hairtype or hairfrizziness require:
- Front face
- Turn right
- Turn left
Ensure event handling is in place.
Create a new file.
To upload a new file, you'll first need to use the File API. It will give you a URL – use that URL to upload your file. Once the upload is finished, you can use the file_id from the same response to start using our AI features.
Authorizations:
Request Body schema: application/jsonrequired
required | Array of objects |
Responses
Request samples
- Payload
- curl
- Node.js
- JavaScript
- PHP
- Python
- Java
{- "files": [
- {
- "content_type": "image/jpg",
- "file_name": "my-selfie.jpg",
- "file_size": 50000
}
]
}Response samples
- 200
- 400
- 401
{- "status": 200,
- "data": {
- "files": [
- {
- "content_type": "image/jpg",
- "file_name": "my-selfie.jpg",
- "file_id": "U8aqJbsXGT537jtGnEDFHqxdDXqh8+oTF/cSkLimzuvVwMP+Jb1XbjPsf7ZgUgLY",
- "requests": [
- {
- "headers": {
- "Content-Type": "image/jpg",
- "Content-Length": 50000
}, - "method": "PUT"
}
]
}
]
}
}Run an AI 2D Virtual Try On Necklace task.
Once you start an AI task, you need to keep polling at given polling_interval to check its status until it shows either success or error because if you don't, the task will time out and when you try to check the status later, you'll get an InvalidTaskId error even if the task did finish successfully and your units will still be consumed.
Authorizations:
Request Body schema: application/jsonrequired
| src_file_url required | string Url of the file to run task. The url should be publicly accessible. |
| srcmsk_file_url | string Url of the source mask file to run task. The url should be publicly accessible. |
| ref_file_urls required | Array of strings Url of the reference file to run task. The url should be publicly accessible. |
required | object Contain source photo informations. |
required | Array of objects |
Responses
Request samples
- Payload
- curl
- Node.js
- JavaScript
- PHP
- Python
- Java
{- "source_info": {
}, - "object_infos": [
- {
- "parameter": {
- "necklace_need_remove_background": true,
- "necklace_anchor_point": null,
- "necklace_wearing_location": null,
- "necklace_shadow_intensity": 0.5,
- "necklace_ambient_light_intensity": 0.5
}
}
]
}Response samples
- 200
- 400
- 401
{- "status": 200,
- "data": {
- "task_id": "grH0CvsgXuAIHLUzD0V1Ol34hoet3R1tvdbtiVHrDb6_UqCLKIejAIajwxrhOAfe"
}
}Check the status of a AI 2D Virtual Try On Necklace task.
Authorizations:
path Parameters
| task_id required | string Example: grH0CvsgXuAIHLUzD0V1Ol34hoet3R1tvdbtiVHrDb6_UqCLKIejAIajwxrhOAfe ID of task to check |
Responses
Request samples
- curl
- Node.js
- JavaScript
- PHP
- Python
- Java
curl --request GET \ --url https://yce-api-01.makeupar.com/s2s/v2.0/task/2d-vto/necklace/grH0CvsgXuAIHLUzD0V1Ol34hoet3R1tvdbtiVHrDb6_UqCLKIejAIajwxrhOAfe \ --header 'Authorization: Bearer <access_token for v1, API Key for v2>'
Response samples
- 200
- 400
- 401
- 500
{- "status": 200,
- "data": {
- "task_status": "running",
- "error": "exceed_max_filesize",
- "error_message": "string",
}
}AI Hair Color
Explore a wide range of hair colors with our hair color changer! Try the hair color you've always dreamed of and experiment with new shades you’ve never tried before. Easily adjust the intensity of your chosen color with sliders for a customized look.
Upload Your Image
Upload the photo you want to change hair color for.
Choose Preset Colors or Customize by Pattern and Palettes
Choose from predefined color presets or fine tune by adjusting the ombre coverage and blend for unlimited possibilities!
Warning: If both a preset and pattern + palettes are specified, the preset will take priority.
Warning: Your source image needs to contain the hair section for dyeing, so double-check before applying. Make sure your source image includes the hair area you want to dye — it's your responsibility to get it right.


Supported Formats & Dimensions
| AI Feature | Supported Dimensions | Supported File Size | Supported Formats |
|---|---|---|---|
| AI Hair Color | long side < 1920, face width >= 100 | < 10MB | jpg/jpeg/png |
Error Codes
| Error Code | Description |
|---|---|
| error_below_min_image_size | the size of the source image is smaller than minimum (expect: width >= 100px, height >= 100px) |
| error_exceed_max_image_size | the size of the source image is larger than maximum (expect: width < 1920px, height < 1080px) |
Environment & Dependency
| Sample Code Language / Tool | Recommended Runtime Versions |
|---|---|
| cURL | - bash >= 3.2 - curl >= 7.58 (modern TLS/HTTP support) - jq >= 1.6 (robust JSON parsing) |
| Node.js (JavaScript) | Node >= 18 (for global fetch) |
| JavaScript | - Chrome / Edge >= 80 - Firefox >= 74 - Safari >= 13.1 |
| PHP | PHP >= 7.4 (for modern TLS/compat), ext-curl (recommended) or allow_url_fopen=On + ext-openssl, ext-json |
| Python | Python >= 3.10 (for f-strings), requests >= 2.20.0 |
| Java | Java 11+ (for HttpClient), Jackson Databind >= 2.12.0 |
Create a new file.
To upload a new file, you'll first need to use the File API. It will give you a URL – use that URL to upload your file. Once the upload is finished, you can use the file_id from the same response to start using our AI features.
Authorizations:
Request Body schema: application/jsonrequired
required | Array of objects |
Responses
Request samples
- Payload
- curl
- Node.js
- JavaScript
- PHP
- Python
- Java
{- "files": [
- {
- "content_type": "image/jpg",
- "file_name": "my-selfie.jpg",
- "file_size": 50000
}
]
}Response samples
- 200
- 400
- 401
{- "status": 200,
- "data": {
- "files": [
- {
- "content_type": "image/jpg",
- "file_name": "my-selfie.jpg",
- "file_id": "U8aqJbsXGT537jtGnEDFHqxdDXqh8+oTF/cSkLimzuvVwMP+Jb1XbjPsf7ZgUgLY",
- "requests": [
- {
- "headers": {
- "Content-Type": "image/jpg",
- "Content-Length": 50000
}, - "method": "PUT"
}
]
}
]
}
}Run a Hair Color task.
Once you start an AI task, you need to keep polling at given polling_interval to check its status until it shows either success or error because if you don't, the task will time out and when you try to check the status later, you'll get an InvalidTaskId error even if the task did finish successfully and your units will still be consumed.
Authorizations:
Request Body schema: application/jsonrequired
| src_file_url required | string Url of the file to run task. The url should be publicly accessible. |
| preset | string Enum: "Jet Black" "Chocolate Brown" "Honey Blonde" "Platinum Blonde" "Ash Gray" "Rose Gold" "Burgundy" "Copper Red" "Lavender" "Teal Blue" "Dark Brown/Caramel Blonde" "Jet Black/Silver Gray" "Ash Brown/Lavender" "Rose Gold/Peach Blonde" "Burgundy/Magenta Pink" "Deep Blue/Teal Green" "Plum Purple/Pastel Lilac" "Copper Red/Golden Blonde" "Dark Gray/Ice Blonde" "Midnight Blue/Denim Blue" (optional; required if neither "pattern" nor "palettes" is provided) Default hair color preset. Available for full mode: ['Jet Black', 'Chocolate Brown', 'Honey Blonde', 'Platinum Blonde', 'Ash Gray', 'Rose Gold', 'Burgundy', 'Copper Red', 'Lavender', 'Teal Blue'] Available for ombre mode: ['Dark Brown/Caramel Blonde', 'Jet Black/Silver Gray', 'Ash Brown/Lavender', 'Rose Gold/Peach Blonde', 'Burgundy/Magenta Pink', 'Deep Blue/Teal Green', 'Plum Purple/Pastel Lilac', 'Copper Red/Golden Blonde', 'Dark Gray/Ice Blonde', 'Midnight Blue/Denim Blue'] |
object (optional; required if "preset" is not provided) | |
Array of objects [ 1 .. 2 ] items (optional; required if "preset" is not provided) Array length 1 for full mode, 2 for ombre mode |
Responses
Request samples
- Payload
- curl
- Node.js
- JavaScript
- PHP
- Python
- Java
{- "preset": "Jet Black",
- "pattern": {
- "name": "ombre",
- "blend_strength": 100,
- "line_offset": -0.99,
- "coloring_section": "top"
}, - "palettes": [
- {
- "color": "string",
- "color_intensity": 100,
- "shine_intensity": 100
}
]
}Response samples
- 200
- 400
- 401
{- "status": 200,
- "data": {
- "task_id": "grH0CvsgXuAIHLUzD0V1Ol34hoet3R1tvdbtiVHrDb6_UqCLKIejAIajwxrhOAfe"
}
}Check a Hair Color task status.
Authorizations:
path Parameters
| task_id required | string Example: grH0CvsgXuAIHLUzD0V1Ol34hoet3R1tvdbtiVHrDb6_UqCLKIejAIajwxrhOAfe ID of task to check |
Responses
Request samples
- curl
- Node.js
- JavaScript
- PHP
- Python
- Java
curl --request GET \ --url https://yce-api-01.makeupar.com/s2s/v2.0/task/hair-color/grH0CvsgXuAIHLUzD0V1Ol34hoet3R1tvdbtiVHrDb6_UqCLKIejAIajwxrhOAfe \ --header 'Authorization: Bearer <access_token for v1, API Key for v2>'
Response samples
- 200
- 400
- 401
- 500
{- "status": 200,
- "data": {
- "task_status": "running",
- "error": "exceed_max_filesize",
- "error_message": "string",
}
}AI Hairstyle Generator
Using the latest AI technology to try a wide variety of hairstyles, catering to both women and men, meeting different gender and style preference. Discover a world of styles: curly, long, buzz cut, and more. Our AI-powered hair changer lets you experiment effortlessly. Find your ideal hairstyle now!

API Playground
You can use the API Playground to test the AI Hairstyle Generator feature. This allows you to experiment with your ideas and gain a better understanding of the try-on process.
Access the API Playground at: https://yce.makeupar.com/api-console/en/api-playground/ai-hair-style-generator/
API Workflow
This guide walks you through:
Workflow for AI Hairstyle Generator API:
Endpoint: /s2s/v2.0/file/hair-transfer
Authentication Required: Authorization: Bearer YOUR_API_KEY
Workflow Steps:
Image Upload Preparation:
- The process begins with preparing a selfie.
List predefined templates or using your own reference photo Choose Reference Source You have two options for styling references:
| Option | Use Case | Implementation Tip |
|---|---|---|
Predefined Templates (template_id) |
Quick start (e.g., "Curly Bob", "Side-Swept Bangs") | Call /s2s/v2.1/task/template/hair-transfer and pick template_id. |
Custom Reference Image (ref_file_url / ref_file_id) |
User uploads own style photo or uses provided image link | Upload via same file API; Use ref_file_url if your reference image is already hosted online. |
Initiate AI Task and Obtain Task ID:
- Send the uploaded image along with the style configuration via an HTTP POST request to
/s2s/v2.0/file/hair-transfer. - Await a unique task ID in the response, which identifies this interaction.
- Send the uploaded image along with the style configuration via an HTTP POST request to
Poll Task Status (Continuous Check):
- Use the obtained
task_idto periodically poll the task status using an HTTP GET request (e.g.,GET /task/${task_id}). - Continuously monitor for:
Task_status = "success"(process completed).Task_status = "error"(resolve or retry if applicable).
- Update the workflow accordingly once the status transitions to success.
- Use the obtained
This structured workflow ensures efficient integration with user inputs, automated monitoring of tasks, and seamless retrieval of results.
Authentication
- Include your API key in the request header using Bearer Token:
You can find your API Key at https://yce.makeupar.com/api-console/en/api-keys/.Authorization: Bearer YOUR_API_KEY
API Usage Guide
This guide explains how to upload images, prepare reference images, and create virtual try-on tasks using the AI Hairstyle Generator API.
Step 1. Upload a File Using the File API or provide a valid image URL
Use the File API (/s2s/v2.1/file/hair-transfer) to upload a target user image.
Alternatively, skip step 1 to 3 if you already have a public image URL.
Image Requirements:
- Upload a high-resolution selfie photo.
- Ensure the photo clearly shows the entire body.
- Avoid backgrounds with multiple people or distracting objects.
Example Request:
curl --request POST \
--url https://yce-api-01.makeupar.com/s2s/v2.1/file/hair-transfer \
--header 'Authorization: Bearer YOUR_API_KEY' \
--header 'content-type: application/json' \
--data '{
"files": [
{
"content_type": "image/jpg",
"file_name": "selfie_01_3dbd1b6683.jpg",
"file_size": 547541
}
]
}'
Step 2. Retrieve File API Response
The response includes:
file_idfor creating an AI task.requests.urlfor uploading the actual image file.
Sample Response:
{
"status": 200,
"data": {
"files": [
{
"content_type": "image/jpg",
"file_name": "full_body_photo_01_3dbd1b6683.jpg",
"file_id": "SaGaqpDgKwFrVBgMpQMA3HY0LeqdT9/13W5TOD8/u/FfjK3xgCQ+hRt9MJXBFaud",
"requests": [
{
"method": "PUT",
"url": "https://yce-us.s3-accelerate.amazonaws.com/demo/ttl30/...signature...",
"headers": {
"Content-Length": "547541",
"Content-Type": "image/jpg"
}
}
]
}
]
}
}
Step 3. Upload Image to Provided URL
Use the requests.url from the File API response to upload the image:
curl --location --request PUT 'https://yce-us.s3-accelerate.amazonaws.com/demo/ttl30/...signature...' \
--header 'Content-Type: image/jpg' \
--header 'Content-Length: 547541' \
--data-binary @'./full_body_photo_01_3dbd1b6683.jpg'
Step 4. Prepare a Reference Image
4.1 Fetch Predefined Image Templates
Use the Template API (/s2s/v2.1/task/template/hair-transfer) to retrieve a list of predefined reference templates:
curl --request GET \
--url 'https://yce-api-01.makeupar.com/s2s/v2.1/task/template/hair-transfer?page_size=20&starting_token=13045969587275114' \
--header 'Authorization: Bearer YOUR_API_KEY'
4.2 Upload a Reference Image
You can:
- Upload an reference image using the File API (
/s2s/v2.1/file/hair-transfer), or - Provide a valid image URL.
Supported Images:
- Another selfie photo as an reference image.
Refer to File Specs and Errors for detailed specifications.
Step 5. Create an AI Hairstyle Generator Task
Use the AI Task API (/s2s/v2.1/task/hair-transfer) to create a virtual try-on task.
Parameters:
- For the user image:
src_file_idorsrc_file_url. - For the reference image:
ref_file_id,ref_file_url, ortemplate_id.
Example Request:
curl --request POST \
--url https://yce-api-01.makeupar.com/s2s/v2.1/task/hair-transfer \
--header 'Authorization: Bearer YOUR_API_KEY' \
--header 'content-type: application/json' \
--data '{
"src_file_url": "https://plugins-media.makeupar.com/strapi/assets/selfie_03_cccd5d4803.jpeg",
"ref_file_url": "https://plugins-media.makeupar.com/strapi/assets/style_reference_full_body_01_5a000d999f.png"
}'
Sample Response:
{
"status": 200,
"data": {
"task_id": "SaGaqpDgKwFrVBgMpQMA3HY0LeqdT9_13W5TOD8_u_GPi6NqQ3dhlmN-6ntFwhzT"
}
}
Step 6. Poll for Task Result
Use the task ID to check the status:
curl --request GET \
--url https://yce-api-01.makeupar.com/s2s/v2.1/task/hair-transfer/<YOUR_TASK_ID> \
--header 'Authorization: Bearer YOUR_API_KEY' \
--header 'content-type: application/json'
Step 7. Retrieve Result
A successful response includes a download URL for the result image:
{
"status": 200,
"data": {
"error": null,
"results": {
"url": "https://yce-us.s3-accelerate.amazonaws.com/demo/ttl30/...signature..."
},
"task_status": "success"
}
}
Invalid API Key error response:
{
"status": 401,
"error": "Unauthorized",
"error_code": "InvalidAccessToken"
}
Use cases:
Use case:

Suggestions for How to Shoot:

Supported Formats & Dimensions
| AI Feature | Supported Dimensions | Supported File Size | Supported Formats |
|---|---|---|---|
| AI Hairstyle Generator | long side <= 1024, face width >= 128, face pose: -10 < pitch < +10, -45 < yaw < +45, -15 < roll < +15, single face only, need to show full face | < 10MB | jpg/jpeg |
Error Codes
| Error Code | Description |
|---|---|
| error_no_shoulder | Shoulders are not visible in the source image |
| error_large_face_angle | The face angle in the uploaded image is too large |
| error_insufficient_landmarks | Cannot detect sufficient face or body landmarks in the source image |
| error_hair_too_short | Input hair is too short |
| error_face_pose | The face pose of source image is unsupported |
Environment & Dependency
| Sample Code Language / Tool | Recommended Runtime Versions |
|---|---|
| cURL | - bash >= 3.2 - curl >= 7.58 (modern TLS/HTTP support) - jq >= 1.6 (robust JSON parsing) |
| Node.js (JavaScript) | Node >= 18 (for global fetch) |
| JavaScript | - Chrome / Edge >= 80 - Firefox >= 74 - Safari >= 13.1 |
| PHP | PHP >= 7.4 (for modern TLS/compat), ext-curl (recommended) or allow_url_fopen=On + ext-openssl, ext-json |
| Python | Python >= 3.10 (for f-strings), requests >= 2.20.0 |
| Java | Java 11+ (for HttpClient), Jackson Databind >= 2.12.0 |
Q: Can I try on a custom hairstyle?
A: Absolutely, you can try on a custom hairstyle using your own reference photo. The AI Hairstyle Generator supports two methods for specifying the desired hairstyle:
Upload your own reference image You may upload a high-resolution selfie or style photo (e.g., someone wearing the target hairstyle) via the File API (
/s2s/v2.1/file/hair-transfer). After uploading, use the returnedfile_idor public URL as the reference source when creating the AI task.Provide a valid image URL If your reference image is already hosted online (e.g., on your own server or CDN), you can directly supply its HTTPS URL in the request body under the field
ref_file_url.
When submitting the task via /s2s/v2.1/task/hair-transfer, include either:
src_file_id(your selfie) andref_file_id(your custom reference image), orsrc_file_urlandref_file_url.
Ensure both images meet the specified requirements:
- Supported format: JPG/JPEG only
- File size under 10 MB
- Long side ≤ 1024 pixels
- Face width ≥ 128 pixels
- Head pose within allowed range (pitch: −10° to +10°, yaw: −45° to +45°, roll: −15° to +15°)
- Single face visible, full frontal view with clear hair visibility
This flexibility allows you to apply virtually any hairstyle from a photo reference, not just predefined templates.
Create a new file.
To upload a new file, you'll first need to use the File API. It will give you a URL – use that URL to upload your file. Once the upload is finished, you can use the file_id from the same response to start using our AI features.
Authorizations:
Request Body schema: application/jsonrequired
required | Array of objects |
Responses
Request samples
- Payload
- curl
- Node.js
- JavaScript
- PHP
- Python
- Java
{- "files": [
- {
- "content_type": "image/jpg",
- "file_name": "my-selfie.jpg",
- "file_size": 50000
}
]
}Response samples
- 200
- 400
- 401
{- "status": 200,
- "data": {
- "files": [
- {
- "content_type": "image/jpg",
- "file_name": "my-selfie.jpg",
- "file_id": "U8aqJbsXGT537jtGnEDFHqxdDXqh8+oTF/cSkLimzuvVwMP+Jb1XbjPsf7ZgUgLY",
- "requests": [
- {
- "headers": {
- "Content-Type": "image/jpg",
- "Content-Length": 50000
}, - "method": "PUT"
}
]
}
]
}
}List predefined templates.
Authorizations:
query Parameters
| page_size | integer Example: page_size=20 Number of results to return in this page. Valid value should be between 1 and 20. Default 20. |
| starting_token | string Example: starting_token=13045969587275114 Token for current page. Start with |
Responses
Request samples
- curl
- Node.js
- JavaScript
- PHP
- Python
- Java
curl --request GET \ --url 'https://yce-api-01.makeupar.com/s2s/v2.0/task/template/hair-style?page_size=20&starting_token=13045969587275114' \ --header 'Authorization: Bearer <access_token for v1, API Key for v2>'
Response samples
- 200
- 400
- 401
{- "status": 200,
- "data": {
- "templates": [
- {
- "id": "good_template_001",
- "thumb": "string",
- "title": "string",
- "category_name": "string",
- "keep_users_color": true
}
], - "next_token": 13045969587275114
}
}Run an AI Hairstyle Generator task.
Once you start an AI task, you need to keep polling at given polling_interval to check its status until it shows either success or error because if you don't, the task will time out and when you try to check the status later, you'll get an InvalidTaskId error even if the task did finish successfully and your units will still be consumed.
Authorizations:
Request Body schema: application/jsonrequired
| src_file_url required | string Url of the file to run task. The url should be publicly accessible. |
| template_id required | string ID of the template. List predefined templates first, and use the id of a template. |
Responses
Request samples
- Payload
- curl
- Node.js
- JavaScript
- PHP
- Python
- Java
{- "template_id": "good_template_001"
}Response samples
- 200
- 400
- 401
{- "status": 200,
- "data": {
- "task_id": "grH0CvsgXuAIHLUzD0V1Ol34hoet3R1tvdbtiVHrDb6_UqCLKIejAIajwxrhOAfe"
}
}Check the status of a AI Hairstyle Generator task.
Authorizations:
path Parameters
| task_id required | string Example: grH0CvsgXuAIHLUzD0V1Ol34hoet3R1tvdbtiVHrDb6_UqCLKIejAIajwxrhOAfe ID of task to check |
Responses
Request samples
- curl
- Node.js
- JavaScript
- PHP
- Python
- Java
curl --request GET \ --url https://yce-api-01.makeupar.com/s2s/v2.0/task/hair-style/grH0CvsgXuAIHLUzD0V1Ol34hoet3R1tvdbtiVHrDb6_UqCLKIejAIajwxrhOAfe \ --header 'Authorization: Bearer <access_token for v1, API Key for v2>'
Response samples
- 200
- 400
- 401
- 500
{- "status": 200,
- "data": {
- "task_status": "running",
- "error": "exceed_max_filesize",
- "error_message": "string",
}
}Create a new file for AI Hairstyle Generator task with reference.
To upload a new file, you'll first need to use the File API. It will give you a URL – use that URL to upload your file. Once the upload is finished, you can use the file_id from the same response to start using our AI features.
Authorizations:
Request Body schema: application/jsonrequired
required | Array of objects |
Responses
Request samples
- Payload
- curl
- Node.js
- JavaScript
- PHP
- Python
- Java
{- "files": [
- {
- "content_type": "image/jpg",
- "file_name": "my-selfie.jpg",
- "file_size": 50000
}
]
}Response samples
- 200
- 400
- 401
{- "status": 200,
- "data": {
- "files": [
- {
- "content_type": "image/jpg",
- "file_name": "my-selfie.jpg",
- "file_id": "U8aqJbsXGT537jtGnEDFHqxdDXqh8+oTF/cSkLimzuvVwMP+Jb1XbjPsf7ZgUgLY",
- "requests": [
- {
- "headers": {
- "Content-Type": "image/jpg",
- "Content-Length": 50000
}, - "method": "PUT"
}
]
}
]
}
}Run an AI Hairstyle Generator task with reference.
Once you start an AI task, you need to keep polling at given polling_interval to check its status until it shows either success or error because if you don't, the task will time out and when you try to check the status later, you'll get an InvalidTaskId error even if the task did finish successfully and your units will still be consumed.
Authorizations:
Request Body schema: application/jsonrequired
| src_file_url required | string Url of the file to run task. The url should be publicly accessible. |
| ref_file_url required | string Url of the reference file to run task. The url should be publicly accessible. |
Responses
Request samples
- Payload
- curl
- Node.js
- JavaScript
- PHP
- Python
- Java
{
}Response samples
- 200
- 400
- 401
{- "status": 200,
- "data": {
- "task_id": "grH0CvsgXuAIHLUzD0V1Ol34hoet3R1tvdbtiVHrDb6_UqCLKIejAIajwxrhOAfe"
}
}Check the status of a AI Hairstyle Generator task with reference.
Authorizations:
path Parameters
| task_id required | string Example: grH0CvsgXuAIHLUzD0V1Ol34hoet3R1tvdbtiVHrDb6_UqCLKIejAIajwxrhOAfe ID of task to check |
Responses
Request samples
- curl
- Node.js
- JavaScript
- PHP
- Python
- Java
curl --request GET \ --url https://yce-api-01.makeupar.com/s2s/v2.0/task/hair-transfer/grH0CvsgXuAIHLUzD0V1Ol34hoet3R1tvdbtiVHrDb6_UqCLKIejAIajwxrhOAfe \ --header 'Authorization: Bearer <access_token for v1, API Key for v2>'
Response samples
- 200
- 400
- 401
- 500
{- "status": 200,
- "data": {
- "task_status": "running",
- "error": "exceed_max_filesize",
- "error_message": "string",
}
}Create a new file for AI Hairstyle Generator V2.1 task.
To upload a new file, you'll first need to use the File API. It will give you a URL – use that URL to upload your file. Once the upload is finished, you can use the file_id from the same response to start using our AI features.
Authorizations:
Request Body schema: application/jsonrequired
required | Array of objects |
Responses
Request samples
- Payload
- curl
- Node.js
- JavaScript
- PHP
- Python
- Java
{- "files": [
- {
- "content_type": "image/jpg",
- "file_name": "my-selfie.jpg",
- "file_size": 50000
}
]
}Response samples
- 200
- 400
- 401
{- "status": 200,
- "data": {
- "files": [
- {
- "content_type": "image/jpg",
- "file_name": "my-selfie.jpg",
- "file_id": "U8aqJbsXGT537jtGnEDFHqxdDXqh8+oTF/cSkLimzuvVwMP+Jb1XbjPsf7ZgUgLY",
- "requests": [
- {
- "headers": {
- "Content-Type": "image/jpg",
- "Content-Length": 50000
}, - "method": "PUT"
}
]
}
]
}
}List predefined templates v2.1.
Authorizations:
query Parameters
| page_size | integer Example: page_size=20 Number of results to return in this page. Valid value should be between 1 and 20. Default 20. |
| starting_token | string Example: starting_token=13045969587275114 Token for current page. Start with |
Responses
Request samples
- curl
- Node.js
- JavaScript
- PHP
- Python
- Java
curl --request GET \ --url 'https://yce-api-01.makeupar.com/s2s/v2.1/task/template/hair-transfer?page_size=20&starting_token=13045969587275114' \ --header 'Authorization: Bearer <access_token for v1, API Key for v2>'
Response samples
- 200
- 400
- 401
{- "status": 200,
- "data": {
- "templates": [
- {
- "id": "good_template_001",
- "thumb": "string",
- "title": "string",
- "category_name": "string",
- "keep_users_color": true
}
], - "next_token": 13045969587275114
}
}Run an AI Hairstyle Generator v2.1 task.
Once you start an AI task, you need to keep polling at given polling_interval to check its status until it shows either success or error because if you don't, the task will time out and when you try to check the status later, you'll get an InvalidTaskId error even if the task did finish successfully and your units will still be consumed.
Authorizations:
Request Body schema: application/jsonrequired
| src_file_url required | string Url of the file to run task. The url should be publicly accessible. |
| ref_file_url required | string Url of the reference file to run task. The url should be publicly accessible. |
Responses
Request samples
- Payload
- curl
- Node.js
- JavaScript
- PHP
- Python
- Java
{
}Response samples
- 200
- 400
- 401
{- "status": 200,
- "data": {
- "task_id": "grH0CvsgXuAIHLUzD0V1Ol34hoet3R1tvdbtiVHrDb6_UqCLKIejAIajwxrhOAfe"
}
}Check the status of a AI Hairstyle Generator v2.1 task.
Authorizations:
path Parameters
| task_id required | string Example: grH0CvsgXuAIHLUzD0V1Ol34hoet3R1tvdbtiVHrDb6_UqCLKIejAIajwxrhOAfe ID of task to check |
Responses
Request samples
- curl
- Node.js
- JavaScript
- PHP
- Python
- Java
curl --request GET \ --url https://yce-api-01.makeupar.com/s2s/v2.1/task/hair-transfer/grH0CvsgXuAIHLUzD0V1Ol34hoet3R1tvdbtiVHrDb6_UqCLKIejAIajwxrhOAfe \ --header 'Authorization: Bearer <access_token for v1, API Key for v2>'
Response samples
- 200
- 400
- 401
- 500
{- "status": 200,
- "data": {
- "task_status": "running",
- "error": "exceed_max_filesize",
- "error_message": "string",
}
}AI Hair Extension
Discover Your Perfect Hair Extension Match with AI Experiment with a variety of lengths—from long to extra-long—styles, colors, and bangs, all from the comfort of your device. No more guessing games—see exactly how each hair extension style looks on you with the advanced Generative AI. Make informed styling decisions before committing to a new look. With the advanced Hair Extension Try-On, which naturally blends with your current hair length, it’s the perfect time to experiment with super-long styles.
Use case:


Suggestions for How to Shoot:
Supported Formats & Dimensions
| AI Feature | Supported Dimensions | Supported File Size | Supported Formats |
|---|---|---|---|
| AI Hair Extension | long side <= 1024, face width >= 128, face pose: -10 < pitch < +10, -45 < yaw < +45, -15 < roll < +15, single face only, need to show full face | < 10MB | jpg/jpeg |
Error Codes
| Error Code | Description |
|---|---|
| error_no_shoulder | Shoulders are not visible in the source image |
| error_large_face_angle | The face angle in the uploaded image is too large |
| error_insufficient_landmarks | Cannot detect sufficient face or body landmarks in the source image |
| error_hair_too_short | Input hair is too short |
| error_face_pose | The face pose of source image is unsupported |
| error_bald_image | Input hairstyle is bald |
Create a new file.
To upload a new file, you'll first need to use the File API. It will give you a URL – use that URL to upload your file. Once the upload is finished, you can use the file_id from the same response to start using our AI features.
Authorizations:
Request Body schema: application/jsonrequired
required | Array of objects |
Responses
Request samples
- Payload
- curl
- Node.js
- JavaScript
- PHP
- Python
- Java
{- "files": [
- {
- "content_type": "image/jpg",
- "file_name": "my-selfie.jpg",
- "file_size": 50000
}
]
}Response samples
- 200
- 400
- 401
{- "status": 200,
- "data": {
- "files": [
- {
- "content_type": "image/jpg",
- "file_name": "my-selfie.jpg",
- "file_id": "U8aqJbsXGT537jtGnEDFHqxdDXqh8+oTF/cSkLimzuvVwMP+Jb1XbjPsf7ZgUgLY",
- "requests": [
- {
- "headers": {
- "Content-Type": "image/jpg",
- "Content-Length": 50000
}, - "method": "PUT"
}
]
}
]
}
}List predefined templates.
Authorizations:
query Parameters
| page_size | integer Example: page_size=20 Number of results to return in this page. Valid value should be between 1 and 20. Default 20. |
| starting_token | string Example: starting_token=13045969587275114 Token for current page. Start with |
Responses
Request samples
- curl
- Node.js
- JavaScript
- PHP
- Python
- Java
curl --request GET \ --url 'https://yce-api-01.makeupar.com/s2s/v2.0/task/template/hair-ext?page_size=20&starting_token=13045969587275114' \ --header 'Authorization: Bearer <access_token for v1, API Key for v2>'
Response samples
- 200
- 400
- 401
{- "status": 200,
- "data": {
- "templates": [
- {
- "id": "good_template_001",
- "thumb": "string",
- "title": "string",
- "category_name": "string"
}
], - "next_token": 13045969587275114
}
}Run an AI Hair Extension task.
Once you start an AI task, you need to keep polling at given polling_interval to check its status until it shows either success or error because if you don't, the task will time out and when you try to check the status later, you'll get an InvalidTaskId error even if the task did finish successfully and your units will still be consumed.
Authorizations:
Request Body schema: application/jsonrequired
| src_file_url required | string Url of the file to run task. The url should be publicly accessible. |
| template_id required | string ID of the template. List predefined templates first, and use the id of a template. |
Responses
Request samples
- Payload
- curl
- Node.js
- JavaScript
- PHP
- Python
- Java
{- "template_id": "good_template_001"
}Response samples
- 200
- 400
- 401
{- "status": 200,
- "data": {
- "task_id": "grH0CvsgXuAIHLUzD0V1Ol34hoet3R1tvdbtiVHrDb6_UqCLKIejAIajwxrhOAfe"
}
}Check the status of a AI Hair Extension task.
Authorizations:
path Parameters
| task_id required | string Example: grH0CvsgXuAIHLUzD0V1Ol34hoet3R1tvdbtiVHrDb6_UqCLKIejAIajwxrhOAfe ID of task to check |
Responses
Request samples
- curl
- Node.js
- JavaScript
- PHP
- Python
- Java
curl --request GET \ --url https://yce-api-01.makeupar.com/s2s/v2.0/task/hair-ext/grH0CvsgXuAIHLUzD0V1Ol34hoet3R1tvdbtiVHrDb6_UqCLKIejAIajwxrhOAfe \ --header 'Authorization: Bearer <access_token for v1, API Key for v2>'
Response samples
- 200
- 400
- 401
- 500
{- "status": 200,
- "data": {
- "task_status": "running",
- "error": "exceed_max_filesize",
- "error_message": "string",
}
}AI Hair Bang Generator
Try on Your Perfect Hair Bangs with AI Realistic Looks: Experiment with realistic bangs and discover the style that best complements your face. Versatile Styling Options: Explore a wide range of bangs styles to suit every personality and occasion. Effortless Experience: Enjoy a user-friendly interface that makes trying new bangs easy and fun.
Want to see more Hair Bang styles? Please refer to https://yce.makeupar.com/bangs-filter.
Use case:


Suggestions for How to Shoot:
Supported Formats & Dimensions
| AI Feature | Supported Dimensions | Supported File Size | Supported Formats |
|---|---|---|---|
| AI Hair Bang Generator | long side <= 1024, face width >= 128, face pose: -10 < pitch < +10, -45 < yaw < +45, -15 < roll < +15, single face only, need to show full face | < 10MB | jpg/jpeg/png |
Error Codes
| Error Code | Description |
|---|---|
| error_no_shoulder | Shoulders are not visible in the source image |
| error_large_face_angle | The face angle in the uploaded image is too large |
| error_insufficient_landmarks | Cannot detect sufficient face or body landmarks in the source image |
| error_hair_too_short | Input hair is too short |
| error_face_pose | The face pose of source image is unsupported |
| error_bald_image | Input hairstyle is bald |
Create a new file.
To upload a new file, you'll first need to use the File API. It will give you a URL – use that URL to upload your file. Once the upload is finished, you can use the file_id from the same response to start using our AI features.
Authorizations:
Request Body schema: application/jsonrequired
required | Array of objects |
Responses
Request samples
- Payload
- curl
- Node.js
- JavaScript
- PHP
- Python
- Java
{- "files": [
- {
- "content_type": "image/jpg",
- "file_name": "my-selfie.jpg",
- "file_size": 50000
}
]
}Response samples
- 200
- 400
- 401
{- "status": 200,
- "data": {
- "files": [
- {
- "content_type": "image/jpg",
- "file_name": "my-selfie.jpg",
- "file_id": "U8aqJbsXGT537jtGnEDFHqxdDXqh8+oTF/cSkLimzuvVwMP+Jb1XbjPsf7ZgUgLY",
- "requests": [
- {
- "headers": {
- "Content-Type": "image/jpg",
- "Content-Length": 50000
}, - "method": "PUT"
}
]
}
]
}
}List predefined templates.
Authorizations:
query Parameters
| page_size | integer Example: page_size=20 Number of results to return in this page. Valid value should be between 1 and 20. Default 20. |
| starting_token | string Example: starting_token=13045969587275114 Token for current page. Start with |
Responses
Request samples
- curl
- Node.js
- JavaScript
- PHP
- Python
- Java
curl --request GET \ --url 'https://yce-api-01.makeupar.com/s2s/v2.0/task/template/hair-bang?page_size=20&starting_token=13045969587275114' \ --header 'Authorization: Bearer <access_token for v1, API Key for v2>'
Response samples
- 200
- 400
- 401
{- "status": 200,
- "data": {
- "templates": [
- {
- "id": "good_template_001",
- "thumb": "string",
- "title": "string",
- "category_name": "string"
}
], - "next_token": 13045969587275114
}
}Run an AI Hair Bang Generator task.
Once you start an AI task, you need to keep polling at given polling_interval to check its status until it shows either success or error because if you don't, the task will time out and when you try to check the status later, you'll get an InvalidTaskId error even if the task did finish successfully and your units will still be consumed.
Authorizations:
Request Body schema: application/jsonrequired
| src_file_url required | string Url of the file to run task. The url should be publicly accessible. |
| template_id required | string ID of the template. List predefined templates first, and use the id of a template. |
Responses
Request samples
- Payload
- curl
- Node.js
- JavaScript
- PHP
- Python
- Java
{- "template_id": "good_template_001"
}Response samples
- 200
- 400
- 401
{- "status": 200,
- "data": {
- "task_id": "grH0CvsgXuAIHLUzD0V1Ol34hoet3R1tvdbtiVHrDb6_UqCLKIejAIajwxrhOAfe"
}
}Check the status of a AI Hair Bang Generator task.
Authorizations:
path Parameters
| task_id required | string Example: grH0CvsgXuAIHLUzD0V1Ol34hoet3R1tvdbtiVHrDb6_UqCLKIejAIajwxrhOAfe ID of task to check |
Responses
Request samples
- curl
- Node.js
- JavaScript
- PHP
- Python
- Java
curl --request GET \ --url https://yce-api-01.makeupar.com/s2s/v2.0/task/hair-bang/grH0CvsgXuAIHLUzD0V1Ol34hoet3R1tvdbtiVHrDb6_UqCLKIejAIajwxrhOAfe \ --header 'Authorization: Bearer <access_token for v1, API Key for v2>'
Response samples
- 200
- 400
- 401
- 500
{- "status": 200,
- "data": {
- "task_status": "running",
- "error": "exceed_max_filesize",
- "error_message": "string",
}
}AI Hair Volume Generator
Enhance Your Look with Fuller, More Voluminous Hair Instantly! Add natural volume to fine or thinning hair. Seamlessly fill gaps or add hair with AI. Works for all hair types: straight, curly, thin. Perfect for dating profiles, resumes & more. Our AI tool helps you achieve perfect hair volume and density in all your photos, whether for personal, professional, or social use. Say goodbye to bad hair days in pictures and hello to fresh, voluminous hair every time.
Use case:


Suggestions for How to Shoot:
Supported Formats & Dimensions
| AI Feature | Supported Dimensions | Supported File Size | Supported Formats |
|---|---|---|---|
| AI Hair Volume Generator | long side <= 1024, face width >= 128, face pose: -10 < pitch < +10, -45 < yaw < +45, -15 < roll < +15, single face only, need to show full face | < 10MB | jpg/jpeg/png |
Error Codes
| Error Code | Description |
|---|---|
| error_no_shoulder | Shoulders are not visible in the source image |
| error_large_face_angle | The face angle in the uploaded image is too large |
| error_insufficient_landmarks | Cannot detect sufficient face or body landmarks in the source image |
| error_hair_too_short | Input hair is too short |
| error_face_pose | The face pose of source image is unsupported |
| error_bald_image | Input hairstyle is bald |
Create a new file.
To upload a new file, you'll first need to use the File API. It will give you a URL – use that URL to upload your file. Once the upload is finished, you can use the file_id from the same response to start using our AI features.
Authorizations:
Request Body schema: application/jsonrequired
required | Array of objects |
Responses
Request samples
- Payload
- curl
- Node.js
- JavaScript
- PHP
- Python
- Java
{- "files": [
- {
- "content_type": "image/jpg",
- "file_name": "my-selfie.jpg",
- "file_size": 50000
}
]
}Response samples
- 200
- 400
- 401
{- "status": 200,
- "data": {
- "files": [
- {
- "content_type": "image/jpg",
- "file_name": "my-selfie.jpg",
- "file_id": "U8aqJbsXGT537jtGnEDFHqxdDXqh8+oTF/cSkLimzuvVwMP+Jb1XbjPsf7ZgUgLY",
- "requests": [
- {
- "headers": {
- "Content-Type": "image/jpg",
- "Content-Length": 50000
}, - "method": "PUT"
}
]
}
]
}
}List predefined templates.
Authorizations:
query Parameters
| page_size | integer Example: page_size=20 Number of results to return in this page. Valid value should be between 1 and 20. Default 20. |
| starting_token | string Example: starting_token=13045969587275114 Token for current page. Start with |
Responses
Request samples
- curl
- Node.js
- JavaScript
- PHP
- Python
- Java
curl --request GET \ --url 'https://yce-api-01.makeupar.com/s2s/v2.0/task/template/hair-vol?page_size=20&starting_token=13045969587275114' \ --header 'Authorization: Bearer <access_token for v1, API Key for v2>'
Response samples
- 200
- 400
- 401
{- "status": 200,
- "data": {
- "templates": [
- {
- "id": "good_template_001",
- "thumb": "string",
- "title": "string",
- "category_name": "string"
}
], - "next_token": 13045969587275114
}
}Run an AI Hair Volume Generator task.
Once you start an AI task, you need to keep polling at given polling_interval to check its status until it shows either success or error because if you don't, the task will time out and when you try to check the status later, you'll get an InvalidTaskId error even if the task did finish successfully and your units will still be consumed.
Authorizations:
Request Body schema: application/jsonrequired
| src_file_url required | string Url of the file to run task. The url should be publicly accessible. |
| template_id required | string ID of the template. List predefined templates first, and use the id of a template. |
Responses
Request samples
- Payload
- curl
- Node.js
- JavaScript
- PHP
- Python
- Java
{- "template_id": "good_template_001"
}Response samples
- 200
- 400
- 401
{- "status": 200,
- "data": {
- "task_id": "grH0CvsgXuAIHLUzD0V1Ol34hoet3R1tvdbtiVHrDb6_UqCLKIejAIajwxrhOAfe"
}
}Check the status of a AI Hair Volume Generator task.
Authorizations:
path Parameters
| task_id required | string Example: grH0CvsgXuAIHLUzD0V1Ol34hoet3R1tvdbtiVHrDb6_UqCLKIejAIajwxrhOAfe ID of task to check |
Responses
Request samples
- curl
- Node.js
- JavaScript
- PHP
- Python
- Java
curl --request GET \ --url https://yce-api-01.makeupar.com/s2s/v2.0/task/hair-vol/grH0CvsgXuAIHLUzD0V1Ol34hoet3R1tvdbtiVHrDb6_UqCLKIejAIajwxrhOAfe \ --header 'Authorization: Bearer <access_token for v1, API Key for v2>'
Response samples
- 200
- 400
- 401
- 500
{- "status": 200,
- "data": {
- "task_status": "running",
- "error": "exceed_max_filesize",
- "error_message": "string",
}
}AI Wavy Hair
Whether you're dreaming of bouncy ringlets, loose waves, or a bold curly statement, the YouCam API’s curly hair filter lets you experiment with a fresh, fabulous hairstyle in seconds—all from the comfort of home.
Whether you’re testing a soft wave or a wild afro, YouCam delivers precision and realism that other tools can’t match. It’s perfect for anyone wanting to experiment nobel hairstyle risk-free and make people look forward to their next salon visit.


Suggestions for How to Shoot:
Supported Formats & Dimensions
| AI Feature | Supported Dimensions | Supported File Size | Supported Formats |
|---|---|---|---|
| AI Wavy Hair | long side <= 1024, face width >= 128, face pose: -10 < pitch < +10, -45 < yaw < +45, -15 < roll < +15, single face only, need to show full face | < 10MB | jpg/jpeg/png |
Error Codes
| Error Code | Description |
|---|---|
| error_no_shoulder | Shoulders are not visible in the source image |
| error_large_face_angle | The face angle in the uploaded image is too large |
| error_insufficient_landmarks | Cannot detect sufficient face or body landmarks in the source image |
| error_hair_too_short | Input hair is too short |
| error_face_pose | The face pose of source image is unsupported |
Create a new file.
To upload a new file, you'll first need to use the File API. It will give you a URL – use that URL to upload your file. Once the upload is finished, you can use the file_id from the same response to start using our AI features.
Authorizations:
Request Body schema: application/jsonrequired
required | Array of objects |
Responses
Request samples
- Payload
- curl
- Node.js
- JavaScript
- PHP
- Python
- Java
{- "files": [
- {
- "content_type": "image/jpg",
- "file_name": "my-selfie.jpg",
- "file_size": 50000
}
]
}Response samples
- 200
- 400
- 401
{- "status": 200,
- "data": {
- "files": [
- {
- "content_type": "image/jpg",
- "file_name": "my-selfie.jpg",
- "file_id": "U8aqJbsXGT537jtGnEDFHqxdDXqh8+oTF/cSkLimzuvVwMP+Jb1XbjPsf7ZgUgLY",
- "requests": [
- {
- "headers": {
- "Content-Type": "image/jpg",
- "Content-Length": 50000
}, - "method": "PUT"
}
]
}
]
}
}List predefined templates.
Authorizations:
query Parameters
| page_size | integer Example: page_size=20 Number of results to return in this page. Valid value should be between 1 and 20. Default 20. |
| starting_token | string Example: starting_token=13045969587275114 Token for current page. Start with |
Responses
Request samples
- curl
- Node.js
- JavaScript
- PHP
- Python
- Java
curl --request GET \ --url 'https://yce-api-01.makeupar.com/s2s/v2.0/task/template/hair-curl?page_size=20&starting_token=13045969587275114' \ --header 'Authorization: Bearer <access_token for v1, API Key for v2>'
Response samples
- 200
- 400
- 401
{- "status": 200,
- "data": {
- "templates": [
- {
- "id": "good_template_001",
- "thumb": "string",
- "title": "string",
- "category_name": "string"
}
], - "next_token": 13045969587275114
}
}Run an AI Wavy Hair task.
Once you start an AI task, you need to keep polling at given polling_interval to check its status until it shows either success or error because if you don't, the task will time out and when you try to check the status later, you'll get an InvalidTaskId error even if the task did finish successfully and your units will still be consumed.
Authorizations:
Request Body schema: application/jsonrequired
| src_file_url required | string Url of the file to run task. The url should be publicly accessible. |
| template_id required | string ID of the template. List predefined templates first, and use the id of a template. |
Responses
Request samples
- Payload
- curl
- Node.js
- JavaScript
- PHP
- Python
- Java
{- "template_id": "good_template_001"
}Response samples
- 200
- 400
- 401
{- "status": 200,
- "data": {
- "task_id": "grH0CvsgXuAIHLUzD0V1Ol34hoet3R1tvdbtiVHrDb6_UqCLKIejAIajwxrhOAfe"
}
}Check the status of a AI Wavy Hair task.
Authorizations:
path Parameters
| task_id required | string Example: grH0CvsgXuAIHLUzD0V1Ol34hoet3R1tvdbtiVHrDb6_UqCLKIejAIajwxrhOAfe ID of task to check |
Responses
Request samples
- curl
- Node.js
- JavaScript
- PHP
- Python
- Java
curl --request GET \ --url https://yce-api-01.makeupar.com/s2s/v2.0/task/hair-curl/grH0CvsgXuAIHLUzD0V1Ol34hoet3R1tvdbtiVHrDb6_UqCLKIejAIajwxrhOAfe \ --header 'Authorization: Bearer <access_token for v1, API Key for v2>'
Response samples
- 200
- 400
- 401
- 500
{- "status": 200,
- "data": {
- "task_status": "running",
- "error": "exceed_max_filesize",
- "error_message": "string",
}
}AI Hair Length Detection
AI Hair Length Measurement offers haircare brands and salons a quick solution to analyze and measure hair length, enabling informed decisions for personalized products and services. Our AI is meticulously trained on a vast dataset of diverse images to ensure precise and reliable hair length detection. By analyzing thousands of images of various hair types and styles, it precisely identifies and categorizes five distinct hair lengths, from above-the-ear to mid-back, with exceptional accuracy.

How to Take Photos for AI Hair Length Detection
- Take a selfie facing forward
- Just one clear shot, looking straight into the camera. Leave your hair down so it falls over your chest, and make sure you're staring directly ahead for that front-on view.
- Instead, use the JS Camera Kit to take a photo. Just leave your hair down so it falls over your chest. Don't tie it up.
How to Detect Hair Length by AI
Using the /s2s/v1.1/file/hair-length-detection API, please upload the following assets:
- Your selfie photo.
Execute AI task /s2s/v1.0/task/hair-length-detection Run the hair-length detection task by sending one front facing selfie image. Use it's file ID as the source input for the AI.
Polling to check the status of a task until it succeed or error This task_id is used to monitor the task's status through polling GET 'task/hair-length-detection' to retrieve the current engine status. Until the engine completes the task, the status will remain 'running', and no units will be consumed during this stage.
| Thumbnail | Hair Length Classification | Description |
|---|---|---|
 |
Above-Ear Length | Hair that falls just above the ear, offering a sleek and stylish look that frames the face nicely. |
 |
Ear-Length | Hair that reaches the earlobe, providing a chic and versatile style that's easy to maintain. |
 |
Short Hair | Hair that is cut above the shoulders, ideal for a fresh, modern look that’s both bold and low-maintenance. |
 |
Medium-Length | Hair that falls around the collarbone, offering a balanced style that’s perfect for both updos and loose waves. |
 |
Long Hair | Long hair that exudes elegance, providing a classic appearance with numerous styling options. |
Result Arguments
- term: result is a string showing the detected hair length type. Here lists all the possible result strings in an array:
["above the ears", "ear length", "ear length or longer", "short hair", "short hair or longer", "above chest", "above chest or longer", "long hair"]
Suggestions for How to Shoot

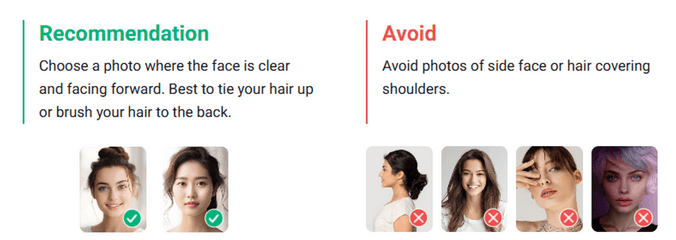
Supported Formats & Dimensions
| Type | Supported Dimensions | Supported File Size | Supported Formats |
|---|---|---|---|
| AI Hair Length Detection | The image must be at least 100 pixels wide and tall, and no more than 4096 pixels in either dimension. If one side of your image is longer than 1080 pixels, it will be resized automatically to fit within that limit for analysis. | < 10MB | jpg/png |
Error Codes
| Error Code | Description |
|---|---|
| error_below_min_image_size | If your image is smaller than 100 pixels in width or height, it's too small to use |
| error_face_position_invalid | Your face needs to be fully visible in the image, without any parts cut off |
| error_face_position_too_small | The face in your photo is too small to analyze properly |
| error_face_position_out_of_boundary | Your face is either too large or partially outside the edges of the photo |
| error_insufficient_lighting | The lighting is too dim, which makes analysis difficult |
| error_face_angle_invalid | Your face angle isn't quite right. For front-facing shots, keep your head within 10 degrees of straight. For side-facing shots, the angle should be more than 15 degrees |
Environment & Dependency
| Sample Code Language / Tool | Recommended Runtime Versions |
|---|---|
| cURL | - bash >= 3.2 - curl >= 7.58 (modern TLS/HTTP support) - jq >= 1.6 (robust JSON parsing) |
| Node.js (JavaScript) | Node >= 18 (for global fetch) |
| JavaScript | - Chrome / Edge >= 80 - Firefox >= 74 - Safari >= 13.1 |
| PHP | PHP >= 7.4 (for modern TLS/compat), ext-curl (recommended) or allow_url_fopen=On + ext-openssl, ext-json |
| Python | Python >= 3.10 (for f-strings), requests >= 2.20.0 |
| Java | Java 11+ (for HttpClient), Jackson Databind >= 2.12.0 |
Overview
The JavaScript Camera Kit provides a complete in-browser camera solution designed for high-accuracy face-based imaging tasks. It includes:
- Camera permission handling
- Real-time face detection
- Automatic face quality validation (lighting, pose, angle, distance)
- Guided capture UI
- Multi-step capture flows for advanced hair/face tasks
- Support for both base64 and blob output formats
The module is particularly optimized for AI-driven image analysis, such as AI Skin Analysis (SD/HD), AI Face Tone Analysis, and hair-related analysis.
Download the JS Camera Kit
Include the JS Camera Kit SDK via CDN:
https://plugins-media.makeupar.com/v2.2-camera-kit/sdk.js
Once loaded, the SDK installs a global YMK object.
Quick Start Example
The following sample demonstrates:
- Loading the JS Camera Kit SDK
- Implementing
window.ymkAsyncInit - Initializing the module
- Opening the camera
- Receiving captured images
<!DOCTYPE html>
<html lang="en">
<head>
<meta charset="UTF-8" />
<meta name="viewport" content="width=device-width, initial-scale=1.0" />
<title>Camera Kit Sample</title>
</head>
<body>
<script>
window.ymkAsyncInit = function() {
YMK.addEventListener('loaded', function() {
/* Module fully loaded and ready */
});
YMK.addEventListener('faceDetectionCaptured', function(capturedResult) {
/* Display all captured images */
const container = document.getElementById('captured-results');
container.innerHTML = '';
for (const image of capturedResult.images) {
const img = document.createElement('img');
img.src = typeof image.image === 'string'
? image.image
: URL.createObjectURL(image.image);
container.appendChild(img);
}
});
};
function openCameraKit() {
YMK.init({
faceDetectionMode: 'hairlength',
imageFormat: 'base64',
language: 'enu',
});
YMK.openCameraKit();
}
</script>
<!-- Load SDK -->
<script>
window.addEventListener('load', function() {
(function(d) {
const s = d.createElement('script');
s.type = 'text/javascript';
s.async = true;
s.src = 'https://plugins-media.makeupar.com/v2.2-camera-kit/sdk.js';
d.getElementsByTagName('script')[0].parentNode.insertBefore(s, null);
})(document);
});
</script>
<button onClick="openCameraKit()">Open Camera Kit</button>
<div id="YMK-module"></div>
<h3>Captured Results:</h3>
<div id="captured-results"></div>
</body>
</html>
Prerequisites
You must define the asynchronous initialization entry point:
<script>
window.ymkAsyncInit = function() {
YMK.init(); // default settings
};
</script>
Additional requirements:
| Requirement | Description |
|---|---|
| Browser | Must support getUserMedia |
| HTTPS | Required on most browsers for webcam access |
<div id="YMK-module"> |
Mandatory mount point for the UI |
Integration Guide
Step 1 — Initialize the Module
Call YMK.init() before calling YMK.openCameraKit():
YMK.init({
faceDetectionMode: 'hairlength',
imageFormat: 'base64',
language: 'enu'
});
Supported Detection Modes
| Mode | Description |
|---|---|
makeup |
Standard camera mode for virtual cosmetic try-on |
skincare |
Standard skin analysis mode, close-up face capture |
hdskincare |
HD Skin capture using webcams with ≥ 2560px width |
shadefinder |
Skin Tone Analysis front-face capture |
facereshape |
AI Face Reshape capture |
hairlength |
Full hair-length capture (from a distance) |
hairfrizziness |
3-phase capture: front, right-turn, left-turn |
hairtype |
Same 3-phase multi-angle capture flow |
ring |
Hand capture for ring try‑on |
wrist |
Wrist capture for watch or bracelet try‑on |
necklace |
Selfie capture for necklace try-on |
earring |
Selfie capture for earring try-on |
Step 2 — Add Event Handlers
Event examples:
YMK.addEventListener('faceQualityChanged', function(q) {
console.log('Quality updated:', q);
});
See the full Events List below.
Step 3 — Open Camera Kit
YMK.openCameraKit();
This automatically:
- Shows the UI
- Opens webcam
- Begins real-time face quality monitoring
- Automatically captures when conditions are acceptable
Step 4 — Receiving Captured Result
Captured images arrive via:
YMK.addEventListener('faceDetectionCaptured', function(result) {
console.log(result.images);
});
Step 5 — Close Module
YMK.close();
API Reference
YMK.init(args)
Configures module appearance, detection mode, language, and capture format.
Arguments
args.faceDetectionMode
Detection flow to use.
Values:
"makeup" | "skincare" | "hdskincare" | "shadefinder" | "facereshape" | "hairlength" | "hairfrizziness" | "hairtype" | "ring" | "wrist" | "necklace" | "earring"
Default: "skincare"
args.width
Pixel width of module container. Default:
360(screens ≥ 500px)screen width(screens < 500px)
Allowed: 300–1920
args.height
Pixel height of module container. Default:
480(screens ≥ 500px)min(screen.height, innerHeight)for smaller screens
Allowed: 300–1920
args.language
UI language.
Available: "chs", "cht", "deu", "enu", "esp", "fra", "jpn", "kor", "ptb", "ita"
Default: "enu"
args.imageFormat
Format returned via faceDetectionCaptured.
"base64" or "blob"
Default: "base64"
args.disableCameraResolutionCheck
Allow running even if webcam does not meet required resolution.
Default: false
Other API Methods
YMK.openCameraKit()
Opens the module and begins detection.
YMK.addEventListener(eventName, callback)
Registers event callbacks.
Returns: EventListenerIdentifier
YMK.removeEventListener(id)
Removes listener by identifier.
YMK.isLoaded()
Returns whether livestream or photo is drawn on canvas.
Returns: boolean
YMK.pause()
Pauses the webcam stream.
YMK.resume(restartWebcam = false)
Resumes webcam after pause.
YMK.getInfo()
Returns current module info:
{
"fps": 30
}
YMK.close()
Closes module and camera.
Events Reference
Lifecycle Events
| Event | Description |
|---|---|
opened |
Module opened |
loading |
Loading progress (0–100) |
loaded |
Camera stream loaded onto canvas |
closed |
Module closed |
Camera Events
| Event | Description |
|---|---|
cameraOpened |
Webcam opened |
cameraClosed |
Webcam closed |
cameraFailed |
Permission denied or no webcam Error code:* "error_resolution_unsupported"* "error_permission_denied"* "error_access_failed" |
faceQualityChanged
Fires continuously during detection.
{
"hasFace": true,
"position": "good",
"frontal": "good",
"lighting": "ok"
}
- Field Descriptions
| Field | Values | Meaning |
|---|---|---|
hasFace |
true/false |
Whether face is detected |
position |
"good", "notgood", "toosmall", "outofboundary" |
Face distance/size quality |
frontal |
"good", "notgood" |
Whether user is facing forward |
lighting |
"good", "ok", "notgood" |
Lighting strength |
Necklace/Earring
| Field | Values | Meaning |
|---|---|---|
hasFace |
true/false |
Whether face is detected |
pose |
"good", "notgood" |
Face pose quality |
size |
"good", "notgood" |
Face size quality |
Wrist/Ring
| Field | Values | Meaning |
|---|---|---|
hasFace |
true/false |
Whether face is detected |
position |
"good", "notgood" |
Hand position quality |
pose |
"good", "notgood" |
Hand pose quality |
Minimum Recommended Quality
const minQuality = {
hasFace: true,
area: "good",
frontal: "good",
lighting: "ok"
};
faceDetectionStarted
User enters detection UI.
faceDetectionCaptured
This event is fired after all required face quality validation checks have passed and the Camera Kit has successfully completed the capture workflow.
Depending on the selected faceDetectionMode, the event may contain one or multiple captured images (e.g., multi-angle capture for hair modes).
Callback Arguments
capturedResult — Object
The result object containing all successfully captured images and metadata.
Field Definitions
mode — string
Indicates the active faceDetectionMode used for capturing.
Possible values include:
"makeup" | "skincare" | "hdskincare" | "shadefinder" | "facereshape" | "hairlength" | "hairfrizziness" | "hairtype" | "ring" | "wrist" | "necklace" | "earring"
This value corresponds directly to the configuration set in YMK.init({ faceDetectionMode }).
images — Array
ImageObject Structure
| Field | Type | Description |
|---|---|---|
phase |
integer | The zero-based index representing the capture step. Examples: • Skincare = 0 • Hair frizziness sequence = 0 (front), 1 (right turn), 2 (left turn) |
image |
string or Blob | The captured image. • Base64 string if args.imageFormat = "base64" • Binary Blob if args.imageFormat = "blob" |
width |
integer | Pixel width of the captured image. |
height |
integer | Pixel height of the captured image. |
Notes
- The number of images varies depending on
faceDetectionMode.- Example:
"hairfrizziness"and"hairtype"typically produce three images.
- Example:
- Image resolution may differ from device to device.
The actual pixel size depends on:
- The user's webcam maximum resolution
- The constraints and recommended settings for the selected mode
- All images are guaranteed to meet the minimum face quality requirements before this event is dispatched.
Configuration Notes
Quality Requirements
- Ensure correct distance
- Ensure frontal face angle
- Provide sufficient lighting (avoid shadows)
Multi-Phase Capture
Modes like hairtype or hairfrizziness require:
- Front face
- Turn right
- Turn left
Ensure event handling is in place.
Create a new file.
To upload a new file, you'll first need to use the File API. It will give you a URL – use that URL to upload your file. Once the upload is finished, you can use the file_id from the same response to start using our AI features.
Authorizations:
Request Body schema: application/jsonrequired
required | Array of objects |
Responses
Request samples
- Payload
- curl
- Node.js
- JavaScript
- PHP
- Python
- Java
{- "files": [
- {
- "content_type": "image/jpg",
- "file_name": "my-selfie.jpg",
- "file_size": 50000
}
]
}Response samples
- 200
- 400
- 401
{- "status": 200,
- "data": {
- "files": [
- {
- "content_type": "image/jpg",
- "file_name": "my-selfie.jpg",
- "file_id": "U8aqJbsXGT537jtGnEDFHqxdDXqh8+oTF/cSkLimzuvVwMP+Jb1XbjPsf7ZgUgLY",
- "requests": [
- {
- "headers": {
- "Content-Type": "image/jpg",
- "Content-Length": 50000
}, - "method": "PUT"
}
]
}
]
}
}Run an Hair Length Detection task.
Once you start an AI task, you need to keep polling at given polling_interval to check its status until it shows either success or error because if you don't, the task will time out and when you try to check the status later, you'll get an InvalidTaskId error even if the task did finish successfully and your units will still be consumed.
Authorizations:
Request Body schema: application/jsonrequired
| src_file_url required | string Url of the file to run task. The url should be publicly accessible. |
Responses
Request samples
- Payload
- curl
- Node.js
- JavaScript
- PHP
- Python
- Java
{
}Response samples
- 200
- 400
- 401
{- "status": 200,
- "data": {
- "task_id": "grH0CvsgXuAIHLUzD0V1Ol34hoet3R1tvdbtiVHrDb6_UqCLKIejAIajwxrhOAfe"
}
}Check an Hair Length Detection task status.
Authorizations:
path Parameters
| task_id required | string Example: grH0CvsgXuAIHLUzD0V1Ol34hoet3R1tvdbtiVHrDb6_UqCLKIejAIajwxrhOAfe ID of task to check |
Responses
Request samples
- curl
- Node.js
- JavaScript
- PHP
- Python
- Java
curl --request GET \ --url https://yce-api-01.makeupar.com/s2s/v2.0/task/hair-length-detection/grH0CvsgXuAIHLUzD0V1Ol34hoet3R1tvdbtiVHrDb6_UqCLKIejAIajwxrhOAfe \ --header 'Authorization: Bearer <access_token for v1, API Key for v2>'
Response samples
- 200
- 400
- 401
- 500
{- "status": 200,
- "data": {
- "task_status": "running",
- "error": "exceed_max_filesize",
- "error_message": "string",
- "results": {
- "hair_length": {
- "term": "above the ears"
}
}
}
}AI Hair Type Detection
Imagine having an AI hair expert in your pocket. Our tech dives into your hair's texture, thickness, and curl pattern, picking from ten unique curl shapes and sorting them into nine clear types, from Straight to Super Kinky. You get a full hair profile, and brands can use those insights to deliver spot-on product recommendations and tips just for you.
How to Take Photos for AI Hair Type Detection
- Take 3 Photos from left, front facing to right.
- Just snap three quick selfies. One facing straight ahead, one turning about 45 degrees to the left, and one turning 45 degrees to the right. We're trying to catch the full look of your hair from all sides. Make sure your whole face and the upper boundary of your hair are clearly visible in each photo. Your face should take up around 50% to 80% of the image width. Not too small, not too close. That way, it's sharp enough for analysis. When you turn for the side shots, rotate your head left and right like you're saying 'no' (that's called yaw rotation). Keep your head level with no tilting up, down, or sideways. Skip any back or top-down angles because those wont work for us.
- You can utilize the JS Camera Kit to snap photos. Make sure your hair is not tied up and let it hang in front of your chest. Turn your head to the right and hold still, and turn to the left to get 3 images to be analyzed.
How to Detect Hair Type by AI
Using the /s2s/v1.1/file/hair-type-detection API, please upload the following assets:
- Photos from the front, the right side, and the left side.
Execute AI task /s2s/v1.0/task/hair-type-detection Run the hair-type detection task by sending in three images: one from the front, one from the right side, and one from the left side. Use their file IDs as the source inputs for the AI.
Polling to check the status of a task until it succeed or error This task_id is used to monitor the task's status through polling GET 'task/hair-type-detection' to retrieve the current engine status. Until the engine completes the task, the status will remain 'running', and no units will be consumed during this stage.
| Category | Thumbnail | Hair Type Classification | Description |
|---|---|---|---|
| 1 |  |
Straight | This hair type is characterized by strands that lack natural curls and typically fall straight from the root to the tip |
| 2A |  |
Slight Wavy | This hair type features subtle, delicate waves with a smooth and tousled texture, but lacks volume at the roots |
| 2B |  |
Medium Wavy | This hair type that showcases natural S-shaped waves that typically begin in the middle of the hair shaft and delicately hug the head, creating a subtle and sophisticated dimension |
| 2C |  |
Thick Wavy | The waves in this hair type are characterized by a coarse texture and are shaped like the letter "S", starting at the root and continuing down the length of the hair. This hair type is prone to frizz |
| 3A |  |
Loose Curls | These curls are big, relaxed, and bouncy, and have a noticeable sheen from roots to ends |
| 3B |  |
Medium Curls | This hair type consists of coarse, springy ringlets that are prone to frizz |
| 3C |  |
Tight Curls | These curls boast a dense and compact corkscrew shape, lending them plenty of volume |
| 4A |  |
Kinky Soft | This hair type is characterized by tightly packed, springy S-shaped coils |
| 4B |  |
Coily | Densely packed coils tightly wound into sharp, zigzag angles |
| 4C |  |
Extremely Coily | This hair type is characterized by tight, fluffy coils that are more susceptible to breakage |
Result Arguments
- mapping: result is a string showing the detected hair type category. Here lists all the possible result strings in an array:
["1 to 2a", "2a to 2b", "2b to 2c", "2c to 3a", "3a to 3b", "3b to 3c", "3c to 4a", "4a to 4b", "4b to 4c"] - term: a one-to-one mapping string between hair type categories and their classifications. Here lists all the possible result strings in an array:
["Straight to Slight Wavy", "Slight to Medium Wavy", "Medium to Thick Wavy", "Thick Wavy to Loose Curls", "Loose to Medium Curls", "Medium to Tight Curls", "Tight Curls to Kinky Soft", "Kinky Soft to Coily", "Coily to Extremely Coily"]
Suggestions for How to Shoot

Supported Formats & Dimensions
| Type | Supported Dimensions | Supported File Size | Supported Formats |
|---|---|---|---|
| AI Hair Type Detection | The image must be at least 100 pixels wide and tall, and no more than 4096 pixels in either dimension. If one side of your image is longer than 1080 pixels, it will be resized automatically to fit within that limit for analysis. | < 10MB | jpg/png |
Error Codes
| Error Code | Description |
|---|---|
| error_mismatch_image_size | Make sure all your face photos (front, left, and right) are the same size |
| error_below_min_image_size | If your image is smaller than 100 pixels in width or height, it's too small to use |
| error_face_position_invalid | Your face needs to be fully visible in the image, without any parts cut off |
| error_face_position_too_small | The face in your photo is too small to analyze properly |
| error_face_position_out_of_boundary | Your face is either too large or partially outside the edges of the photo |
| error_insufficient_lighting | The lighting is too dim, which makes analysis difficult |
| error_face_angle_invalid | Your face angle isn't quite right. For front-facing shots, keep your head within 10 degrees of straight. For side-facing shots, the angle should be more than 15 degrees |
Environment & Dependency
| Sample Code Language / Tool | Recommended Runtime Versions |
|---|---|
| cURL | - bash >= 3.2 - curl >= 7.58 (modern TLS/HTTP support) - jq >= 1.6 (robust JSON parsing) |
| Node.js (JavaScript) | Node >= 18 (for global fetch) |
| JavaScript | - Chrome / Edge >= 80 - Firefox >= 74 - Safari >= 13.1 |
| PHP | PHP >= 7.4 (for modern TLS/compat), ext-curl (recommended) or allow_url_fopen=On + ext-openssl, ext-json |
| Python | Python >= 3.10 (for f-strings), requests >= 2.20.0 |
| Java | Java 11+ (for HttpClient), Jackson Databind >= 2.12.0 |
Overview
The JavaScript Camera Kit provides a complete in-browser camera solution designed for high-accuracy face-based imaging tasks. It includes:
- Camera permission handling
- Real-time face detection
- Automatic face quality validation (lighting, pose, angle, distance)
- Guided capture UI
- Multi-step capture flows for advanced hair/face tasks
- Support for both base64 and blob output formats
The module is particularly optimized for AI-driven image analysis, such as AI Skin Analysis (SD/HD), AI Face Tone Analysis, and hair-related analysis.
Download the JS Camera Kit
Include the JS Camera Kit SDK via CDN:
https://plugins-media.makeupar.com/v2.2-camera-kit/sdk.js
Once loaded, the SDK installs a global YMK object.
Quick Start Example
The following sample demonstrates:
- Loading the JS Camera Kit SDK
- Implementing
window.ymkAsyncInit - Initializing the module
- Opening the camera
- Receiving captured images
<!DOCTYPE html>
<html lang="en">
<head>
<meta charset="UTF-8" />
<meta name="viewport" content="width=device-width, initial-scale=1.0" />
<title>Camera Kit Sample</title>
</head>
<body>
<script>
window.ymkAsyncInit = function() {
YMK.addEventListener('loaded', function() {
/* Module fully loaded and ready */
});
YMK.addEventListener('faceDetectionCaptured', function(capturedResult) {
/* Display all captured images */
const container = document.getElementById('captured-results');
container.innerHTML = '';
for (const image of capturedResult.images) {
const img = document.createElement('img');
img.src = typeof image.image === 'string'
? image.image
: URL.createObjectURL(image.image);
container.appendChild(img);
}
});
};
function openCameraKit() {
YMK.init({
faceDetectionMode: 'hairtype',
imageFormat: 'base64',
language: 'enu',
});
YMK.openCameraKit();
}
</script>
<!-- Load SDK -->
<script>
window.addEventListener('load', function() {
(function(d) {
const s = d.createElement('script');
s.type = 'text/javascript';
s.async = true;
s.src = 'https://plugins-media.makeupar.com/v2.2-camera-kit/sdk.js';
d.getElementsByTagName('script')[0].parentNode.insertBefore(s, null);
})(document);
});
</script>
<button onClick="openCameraKit()">Open Camera Kit</button>
<div id="YMK-module"></div>
<h3>Captured Results:</h3>
<div id="captured-results"></div>
</body>
</html>
Prerequisites
You must define the asynchronous initialization entry point:
<script>
window.ymkAsyncInit = function() {
YMK.init(); // default settings
};
</script>
Additional requirements:
| Requirement | Description |
|---|---|
| Browser | Must support getUserMedia |
| HTTPS | Required on most browsers for webcam access |
<div id="YMK-module"> |
Mandatory mount point for the UI |
Integration Guide
Step 1 — Initialize the Module
Call YMK.init() before calling YMK.openCameraKit():
YMK.init({
faceDetectionMode: 'hairtype',
imageFormat: 'base64',
language: 'enu'
});
Supported Detection Modes
| Mode | Description |
|---|---|
makeup |
Standard camera mode for virtual cosmetic try-on |
skincare |
Standard skin analysis mode, close-up face capture |
hdskincare |
HD Skin capture using webcams with ≥ 2560px width |
shadefinder |
Skin Tone Analysis front-face capture |
facereshape |
AI Face Reshape capture |
hairlength |
Full hair-length capture (from a distance) |
hairfrizziness |
3-phase capture: front, right-turn, left-turn |
hairtype |
Same 3-phase multi-angle capture flow |
ring |
Hand capture for ring try‑on |
wrist |
Wrist capture for watch or bracelet try‑on |
necklace |
Selfie capture for necklace try-on |
earring |
Selfie capture for earring try-on |
Step 2 — Add Event Handlers
Event examples:
YMK.addEventListener('faceQualityChanged', function(q) {
console.log('Quality updated:', q);
});
See the full Events List below.
Step 3 — Open Camera Kit
YMK.openCameraKit();
This automatically:
- Shows the UI
- Opens webcam
- Begins real-time face quality monitoring
- Automatically captures when conditions are acceptable
Step 4 — Receiving Captured Result
Captured images arrive via:
YMK.addEventListener('faceDetectionCaptured', function(result) {
console.log(result.images);
});
Step 5 — Close Module
YMK.close();
API Reference
YMK.init(args)
Configures module appearance, detection mode, language, and capture format.
Arguments
args.faceDetectionMode
Detection flow to use.
Values:
"makeup" | "skincare" | "hdskincare" | "shadefinder" | "facereshape" | "hairlength" | "hairfrizziness" | "hairtype" | "ring" | "wrist" | "necklace" | "earring"
Default: "skincare"
args.width
Pixel width of module container. Default:
360(screens ≥ 500px)screen width(screens < 500px)
Allowed: 300–1920
args.height
Pixel height of module container. Default:
480(screens ≥ 500px)min(screen.height, innerHeight)for smaller screens
Allowed: 300–1920
args.language
UI language.
Available: "chs", "cht", "deu", "enu", "esp", "fra", "jpn", "kor", "ptb", "ita"
Default: "enu"
args.imageFormat
Format returned via faceDetectionCaptured.
"base64" or "blob"
Default: "base64"
args.disableCameraResolutionCheck
Allow running even if webcam does not meet required resolution.
Default: false
Other API Methods
YMK.openCameraKit()
Opens the module and begins detection.
YMK.addEventListener(eventName, callback)
Registers event callbacks.
Returns: EventListenerIdentifier
YMK.removeEventListener(id)
Removes listener by identifier.
YMK.isLoaded()
Returns whether livestream or photo is drawn on canvas.
Returns: boolean
YMK.pause()
Pauses the webcam stream.
YMK.resume(restartWebcam = false)
Resumes webcam after pause.
YMK.getInfo()
Returns current module info:
{
"fps": 30
}
YMK.close()
Closes module and camera.
Events Reference
Lifecycle Events
| Event | Description |
|---|---|
opened |
Module opened |
loading |
Loading progress (0–100) |
loaded |
Camera stream loaded onto canvas |
closed |
Module closed |
Camera Events
| Event | Description |
|---|---|
cameraOpened |
Webcam opened |
cameraClosed |
Webcam closed |
cameraFailed |
Permission denied or no webcam Error code:* "error_resolution_unsupported"* "error_permission_denied"* "error_access_failed" |
faceQualityChanged
Fires continuously during detection.
{
"hasFace": true,
"position": "good",
"frontal": "good",
"lighting": "ok"
}
- Field Descriptions
| Field | Values | Meaning |
|---|---|---|
hasFace |
true/false |
Whether face is detected |
position |
"good", "notgood", "toosmall", "outofboundary" |
Face distance/size quality |
frontal |
"good", "notgood" |
Whether user is facing forward |
lighting |
"good", "ok", "notgood" |
Lighting strength |
Necklace/Earring
| Field | Values | Meaning |
|---|---|---|
hasFace |
true/false |
Whether face is detected |
pose |
"good", "notgood" |
Face pose quality |
size |
"good", "notgood" |
Face size quality |
Wrist/Ring
| Field | Values | Meaning |
|---|---|---|
hasFace |
true/false |
Whether face is detected |
position |
"good", "notgood" |
Hand position quality |
pose |
"good", "notgood" |
Hand pose quality |
Minimum Recommended Quality
const minQuality = {
hasFace: true,
area: "good",
frontal: "good",
lighting: "ok"
};
faceDetectionStarted
User enters detection UI.
faceDetectionCaptured
This event is fired after all required face quality validation checks have passed and the Camera Kit has successfully completed the capture workflow.
Depending on the selected faceDetectionMode, the event may contain one or multiple captured images (e.g., multi-angle capture for hair modes).
Callback Arguments
capturedResult — Object
The result object containing all successfully captured images and metadata.
Field Definitions
mode — string
Indicates the active faceDetectionMode used for capturing.
Possible values include:
"makeup" | "skincare" | "hdskincare" | "shadefinder" | "facereshape" | "hairlength" | "hairfrizziness" | "hairtype" | "ring" | "wrist" | "necklace" | "earring"
This value corresponds directly to the configuration set in YMK.init({ faceDetectionMode }).
images — Array
ImageObject Structure
| Field | Type | Description |
|---|---|---|
phase |
integer | The zero-based index representing the capture step. Examples: • Skincare = 0 • Hair frizziness sequence = 0 (front), 1 (right turn), 2 (left turn) |
image |
string or Blob | The captured image. • Base64 string if args.imageFormat = "base64" • Binary Blob if args.imageFormat = "blob" |
width |
integer | Pixel width of the captured image. |
height |
integer | Pixel height of the captured image. |
Notes
- The number of images varies depending on
faceDetectionMode.- Example:
"hairfrizziness"and"hairtype"typically produce three images.
- Example:
- Image resolution may differ from device to device.
The actual pixel size depends on:
- The user's webcam maximum resolution
- The constraints and recommended settings for the selected mode
- All images are guaranteed to meet the minimum face quality requirements before this event is dispatched.
Configuration Notes
Quality Requirements
- Ensure correct distance
- Ensure frontal face angle
- Provide sufficient lighting (avoid shadows)
Multi-Phase Capture
Modes like hairtype or hairfrizziness require:
- Front face
- Turn right
- Turn left
Ensure event handling is in place.
Create a new file.
To upload a new file, you'll first need to use the File API. It will give you a URL – use that URL to upload your file. Once the upload is finished, you can use the file_id from the same response to start using our AI features.
Authorizations:
Request Body schema: application/jsonrequired
required | Array of objects |
Responses
Request samples
- Payload
- curl
- Node.js
- JavaScript
- PHP
- Python
- Java
{- "files": [
- {
- "content_type": "image/jpg",
- "file_name": "my-selfie.jpg",
- "file_size": 50000
}
]
}Response samples
- 200
- 400
- 401
{- "status": 200,
- "data": {
- "files": [
- {
- "content_type": "image/jpg",
- "file_name": "my-selfie.jpg",
- "file_id": "U8aqJbsXGT537jtGnEDFHqxdDXqh8+oTF/cSkLimzuvVwMP+Jb1XbjPsf7ZgUgLY",
- "requests": [
- {
- "headers": {
- "Content-Type": "image/jpg",
- "Content-Length": 50000
}, - "method": "PUT"
}
]
}
]
}
}Run an Hair Type Detection task.
Once you start an AI task, you need to keep polling at given polling_interval to check its status until it shows either success or error because if you don't, the task will time out and when you try to check the status later, you'll get an InvalidTaskId error even if the task did finish successfully and your units will still be consumed.
Authorizations:
Request Body schema: application/jsonrequired
| src_file_urls required | Array of strings = 3 items The file URLs from upload file API. The file IDs for the sequence of source images are 'frontFace', 'rightFace', and 'leftFace'. Should provide either 'src_file_urls' or 'src_file_ids'. |
Responses
Request samples
- Payload
- curl
- Node.js
- JavaScript
- PHP
- Python
- Java
{- "src_file_urls": [
]
}Response samples
- 200
- 400
- 401
{- "status": 200,
- "data": {
- "task_id": "grH0CvsgXuAIHLUzD0V1Ol34hoet3R1tvdbtiVHrDb6_UqCLKIejAIajwxrhOAfe"
}
}Check an Hair Type Detection task status.
Authorizations:
path Parameters
| task_id required | string Example: grH0CvsgXuAIHLUzD0V1Ol34hoet3R1tvdbtiVHrDb6_UqCLKIejAIajwxrhOAfe ID of task to check |
Responses
Request samples
- curl
- Node.js
- JavaScript
- PHP
- Python
- Java
curl --request GET \ --url https://yce-api-01.makeupar.com/s2s/v2.0/task/hair-type-detection/grH0CvsgXuAIHLUzD0V1Ol34hoet3R1tvdbtiVHrDb6_UqCLKIejAIajwxrhOAfe \ --header 'Authorization: Bearer <access_token for v1, API Key for v2>'
Response samples
- 200
- 400
- 401
- 500
{- "status": 200,
- "data": {
- "task_status": "running",
- "error": "exceed_max_filesize",
- "error_message": "string",
- "results": {
- "hair_type": {
- "mapping": "1 to 2a",
- "term": "Straight to Slight Wavy"
}
}
}
}AI Hair Frizziness Detection
180° Full View Hair Frizz Analysis with Just 3 Photos
Our AI Frizzy Hair Analyzer delivers precise hair frizz analysis in seconds by simply uploading 3 photos—front, left, and right views of the hair.
This efficient process delivers accurate results in seconds, enabling businesses to offer tailored hair solutions and defrizz hair products based on hair frizz levels, without the need for time-consuming in-person consultations, complicated hair quizzes, or specialized hardware installations.

- Upload a Selfie You can provide the source image in one of two ways:
Use an Existing Public Image URL Instead of uploading, you may supply a publicly accessible image URL directly when initiating the AI task.
Upload via File API Use the endpoint:
POST /s2s/v2.0/file/hair-frizziness-detectionThis returns a
file_idfor subsequent task execution.- Important: Simply calling the File API does not upload your file. You must manually upload the file to the URL provided in the File API response. That URL is your upload destination, make sure the file is successfully transferred there before proceeding.
Before calling the AI API, ensure your file has been successfully uploaded. Use the File API to retrieve an upload URL, then upload your file to that location. Once the upload is complete, you'll receive a file_id in the response, this ID is what you'll use to access AI features related to that file.
Warning: Please note that, you will get an 500 Server Error / unknown_internal_error or 404 Not Found error when using AI APIs if you do not upload the file to the URL provided in the File API response.
Run an AI Task to Obtain a Task ID Execute the AI task using /s2s/v2.0/task/hair-frizziness-detection. For the target user image, provide either
src_file_urlorsrc_file_id. And a stypetemplate_idto apply and obtain atask_id.Poll to Check the Status of a Task Until It Succeeds or Fails Use the
task_idto monitor the task status by polling GET /s2s/v2.0/task/hair-frizziness-detection to retrieve the current engine status. Until the engine completes the task, the status will remain as running, and no units will be consumed during this stage. You can also implement a webhook to receive notifications when an AI task succeeds or fails. Refer to the Webhook section for details.Warning: Polling to check the status of a task within its retention period is mandatory. A task will time out if there is no polling request within the retention period, even if the task is processed successfully. Your units will still be consumed.
Warning: You will receive an InvalidTaskId error if you check the status of a timed-out task. Therefore, once you run an AI task, you must poll to check the status within the retention period until the status becomes either success or error.
Retrieve the Result of an AI Task Once Successful The task status will change to success after the engine processes your input file and generates the resulting image. You will receive a URL for the processed image.
Input format
 Upload 3 photos - front, left, and right views of the hair.
You can utilize the JS Camera Kit to implement a Javascript camera module to take 3 qualified photos.
Upload 3 photos - front, left, and right views of the hair.
You can utilize the JS Camera Kit to implement a Javascript camera module to take 3 qualified photos.
Output format
AI Frizzy Hair Analyzer assesses hair types and identifies 4 distinct degrees of hair frizz - from smooth hair to extremely frizzy hair, offering precise insights into hair frizz condition.
| Mapping (0–3) | Term | Description |
|---|---|---|
| 0 | Not Frizzy | Hair appears smooth with minimal or no visible frizz. |
| 1 | Slightly Frizzy | Light frizz visible; mild surface texture irregularities. |
| 2 | Frizzy | Noticeable frizz across hair; clear texture disruption. |
| 3 | Extreme Frizzy | Strong, widespread frizz; highly irregular hair texture. |

Sample Output
{
"mapping": 1, // number; the key to map of result, alternatives: [0, 1, 2, 3]
"term": "Slightly Frizzy" // string; 1-1 map to the "mapping", alternatives: ["Not Frizzy", "Slightly Frizzy", "Frizzy", "Extreme Frizzy"]
}
Supported Formats & Dimensions
| Type | Supported Dimensions | Supported File Size | Supported Formats |
|---|---|---|---|
| AI Hair Frizziness Detection | The image must be at least 100 pixels wide and tall, and no more than 4096 pixels in either dimension. If one side of your image is longer than 1080 pixels, it will be resized automatically to fit within that limit for analysis. | < 10MB | jpg/png |
Error Codes
| Error Code | Description |
|---|---|
| error_mismatch_image_size | Make sure all your face photos (front, left, and right) are the same size |
| error_below_min_image_size | If your image is smaller than 100 pixels in width or height, it's too small to use |
| error_face_position_invalid | Your face needs to be fully visible in the image, without any parts cut off |
| error_face_position_too_small | The face in your photo is too small to analyze properly |
| error_face_position_out_of_boundary | Your face is either too large or partially outside the edges of the photo |
| error_insufficient_lighting | The lighting is too dim, which makes analysis difficult |
| error_face_angle_invalid | Your face angle isn't quite right. For front-facing shots, keep your head within 10 degrees of straight. For side-facing shots, the angle should be more than 15 degrees |
Environment & Dependency
| Sample Code Language / Tool | Recommended Runtime Versions |
|---|---|
| cURL | - bash >= 3.2 - curl >= 7.58 (modern TLS/HTTP support) - jq >= 1.6 (robust JSON parsing) |
| Node.js (JavaScript) | Node >= 18 (for global fetch) |
| JavaScript | - Chrome / Edge >= 80 - Firefox >= 74 - Safari >= 13.1 |
| PHP | PHP >= 7.4 (for modern TLS/compat), ext-curl (recommended) or allow_url_fopen=On + ext-openssl, ext-json |
| Python | Python >= 3.10 (for f-strings), requests >= 2.20.0 |
| Java | Java 11+ (for HttpClient), Jackson Databind >= 2.12.0 |
Overview
The JavaScript Camera Kit provides a complete in-browser camera solution designed for high-accuracy face-based imaging tasks. It includes:
- Camera permission handling
- Real-time face detection
- Automatic face quality validation (lighting, pose, angle, distance)
- Guided capture UI
- Multi-step capture flows for advanced hair/face tasks
- Support for both base64 and blob output formats
The module is particularly optimized for AI-driven image analysis, such as AI Skin Analysis (SD/HD), AI Face Tone Analysis, and hair-related analysis.
Download the JS Camera Kit
Include the JS Camera Kit SDK via CDN:
https://plugins-media.makeupar.com/v2.2-camera-kit/sdk.js
Once loaded, the SDK installs a global YMK object.
Quick Start Example
The following sample demonstrates:
- Loading the JS Camera Kit SDK
- Implementing
window.ymkAsyncInit - Initializing the module
- Opening the camera
- Receiving captured images
<!DOCTYPE html>
<html lang="en">
<head>
<meta charset="UTF-8" />
<meta name="viewport" content="width=device-width, initial-scale=1.0" />
<title>Camera Kit Sample</title>
</head>
<body>
<script>
window.ymkAsyncInit = function() {
YMK.addEventListener('loaded', function() {
/* Module fully loaded and ready */
});
YMK.addEventListener('faceDetectionCaptured', function(capturedResult) {
/* Display all captured images */
const container = document.getElementById('captured-results');
container.innerHTML = '';
for (const image of capturedResult.images) {
const img = document.createElement('img');
img.src = typeof image.image === 'string'
? image.image
: URL.createObjectURL(image.image);
container.appendChild(img);
}
});
};
function openCameraKit() {
YMK.init({
faceDetectionMode: 'hairfrizziness',
imageFormat: 'base64',
language: 'enu',
});
YMK.openCameraKit();
}
</script>
<!-- Load SDK -->
<script>
window.addEventListener('load', function() {
(function(d) {
const s = d.createElement('script');
s.type = 'text/javascript';
s.async = true;
s.src = 'https://plugins-media.makeupar.com/v2.2-camera-kit/sdk.js';
d.getElementsByTagName('script')[0].parentNode.insertBefore(s, null);
})(document);
});
</script>
<button onClick="openCameraKit()">Open Camera Kit</button>
<div id="YMK-module"></div>
<h3>Captured Results:</h3>
<div id="captured-results"></div>
</body>
</html>
Prerequisites
You must define the asynchronous initialization entry point:
<script>
window.ymkAsyncInit = function() {
YMK.init(); // default settings
};
</script>
Additional requirements:
| Requirement | Description |
|---|---|
| Browser | Must support getUserMedia |
| HTTPS | Required on most browsers for webcam access |
<div id="YMK-module"> |
Mandatory mount point for the UI |
Integration Guide
Step 1 — Initialize the Module
Call YMK.init() before calling YMK.openCameraKit():
YMK.init({
faceDetectionMode: 'hairfrizziness',
imageFormat: 'base64',
language: 'enu'
});
Supported Detection Modes
| Mode | Description |
|---|---|
makeup |
Standard camera mode for virtual cosmetic try-on |
skincare |
Standard skin analysis mode, close-up face capture |
hdskincare |
HD Skin capture using webcams with ≥ 2560px width |
shadefinder |
Skin Tone Analysis front-face capture |
facereshape |
AI Face Reshape capture |
hairlength |
Full hair-length capture (from a distance) |
hairfrizziness |
3-phase capture: front, right-turn, left-turn |
hairtype |
Same 3-phase multi-angle capture flow |
ring |
Hand capture for ring try‑on |
wrist |
Wrist capture for watch or bracelet try‑on |
necklace |
Selfie capture for necklace try-on |
earring |
Selfie capture for earring try-on |
Step 2 — Add Event Handlers
Event examples:
YMK.addEventListener('faceQualityChanged', function(q) {
console.log('Quality updated:', q);
});
See the full Events List below.
Step 3 — Open Camera Kit
YMK.openCameraKit();
This automatically:
- Shows the UI
- Opens webcam
- Begins real-time face quality monitoring
- Automatically captures when conditions are acceptable
Step 4 — Receiving Captured Result
Captured images arrive via:
YMK.addEventListener('faceDetectionCaptured', function(result) {
console.log(result.images);
});
Step 5 — Close Module
YMK.close();
API Reference
YMK.init(args)
Configures module appearance, detection mode, language, and capture format.
Arguments
args.faceDetectionMode
Detection flow to use.
Values:
"makeup" | "skincare" | "hdskincare" | "shadefinder" | "facereshape" | "hairlength" | "hairfrizziness" | "hairtype" | "ring" | "wrist" | "necklace" | "earring"
Default: "skincare"
args.width
Pixel width of module container. Default:
360(screens ≥ 500px)screen width(screens < 500px)
Allowed: 300–1920
args.height
Pixel height of module container. Default:
480(screens ≥ 500px)min(screen.height, innerHeight)for smaller screens
Allowed: 300–1920
args.language
UI language.
Available: "chs", "cht", "deu", "enu", "esp", "fra", "jpn", "kor", "ptb", "ita"
Default: "enu"
args.imageFormat
Format returned via faceDetectionCaptured.
"base64" or "blob"
Default: "base64"
args.disableCameraResolutionCheck
Allow running even if webcam does not meet required resolution.
Default: false
Other API Methods
YMK.openCameraKit()
Opens the module and begins detection.
YMK.addEventListener(eventName, callback)
Registers event callbacks.
Returns: EventListenerIdentifier
YMK.removeEventListener(id)
Removes listener by identifier.
YMK.isLoaded()
Returns whether livestream or photo is drawn on canvas.
Returns: boolean
YMK.pause()
Pauses the webcam stream.
YMK.resume(restartWebcam = false)
Resumes webcam after pause.
YMK.getInfo()
Returns current module info:
{
"fps": 30
}
YMK.close()
Closes module and camera.
Events Reference
Lifecycle Events
| Event | Description |
|---|---|
opened |
Module opened |
loading |
Loading progress (0–100) |
loaded |
Camera stream loaded onto canvas |
closed |
Module closed |
Camera Events
| Event | Description |
|---|---|
cameraOpened |
Webcam opened |
cameraClosed |
Webcam closed |
cameraFailed |
Permission denied or no webcam Error code:* "error_resolution_unsupported"* "error_permission_denied"* "error_access_failed" |
faceQualityChanged
Fires continuously during detection.
{
"hasFace": true,
"position": "good",
"frontal": "good",
"lighting": "ok"
}
- Field Descriptions
| Field | Values | Meaning |
|---|---|---|
hasFace |
true/false |
Whether face is detected |
position |
"good", "notgood", "toosmall", "outofboundary" |
Face distance/size quality |
frontal |
"good", "notgood" |
Whether user is facing forward |
lighting |
"good", "ok", "notgood" |
Lighting strength |
Necklace/Earring
| Field | Values | Meaning |
|---|---|---|
hasFace |
true/false |
Whether face is detected |
pose |
"good", "notgood" |
Face pose quality |
size |
"good", "notgood" |
Face size quality |
Wrist/Ring
| Field | Values | Meaning |
|---|---|---|
hasFace |
true/false |
Whether face is detected |
position |
"good", "notgood" |
Hand position quality |
pose |
"good", "notgood" |
Hand pose quality |
Minimum Recommended Quality
const minQuality = {
hasFace: true,
area: "good",
frontal: "good",
lighting: "ok"
};
faceDetectionStarted
User enters detection UI.
faceDetectionCaptured
This event is fired after all required face quality validation checks have passed and the Camera Kit has successfully completed the capture workflow.
Depending on the selected faceDetectionMode, the event may contain one or multiple captured images (e.g., multi-angle capture for hair modes).
Callback Arguments
capturedResult — Object
The result object containing all successfully captured images and metadata.
Field Definitions
mode — string
Indicates the active faceDetectionMode used for capturing.
Possible values include:
"makeup" | "skincare" | "hdskincare" | "shadefinder" | "facereshape" | "hairlength" | "hairfrizziness" | "hairtype" | "ring" | "wrist" | "necklace" | "earring"
This value corresponds directly to the configuration set in YMK.init({ faceDetectionMode }).
images — Array
ImageObject Structure
| Field | Type | Description |
|---|---|---|
phase |
integer | The zero-based index representing the capture step. Examples: • Skincare = 0 • Hair frizziness sequence = 0 (front), 1 (right turn), 2 (left turn) |
image |
string or Blob | The captured image. • Base64 string if args.imageFormat = "base64" • Binary Blob if args.imageFormat = "blob" |
width |
integer | Pixel width of the captured image. |
height |
integer | Pixel height of the captured image. |
Notes
- The number of images varies depending on
faceDetectionMode.- Example:
"hairfrizziness"and"hairtype"typically produce three images.
- Example:
- Image resolution may differ from device to device.
The actual pixel size depends on:
- The user's webcam maximum resolution
- The constraints and recommended settings for the selected mode
- All images are guaranteed to meet the minimum face quality requirements before this event is dispatched.
Configuration Notes
Quality Requirements
- Ensure correct distance
- Ensure frontal face angle
- Provide sufficient lighting (avoid shadows)
Multi-Phase Capture
Modes like hairtype or hairfrizziness require:
- Front face
- Turn right
- Turn left
Ensure event handling is in place.
Create a new file.
To upload a new file, you'll first need to use the File API. It will give you a URL – use that URL to upload your file. Once the upload is finished, you can use the file_id from the same response to start using our AI features.
Authorizations:
Request Body schema: application/jsonrequired
required | Array of objects |
Responses
Request samples
- Payload
- curl
- Node.js
- JavaScript
- PHP
- Python
- Java
{- "files": [
- {
- "content_type": "image/jpg",
- "file_name": "my-selfie.jpg",
- "file_size": 50000
}
]
}Response samples
- 200
- 400
- 401
{- "status": 200,
- "data": {
- "files": [
- {
- "content_type": "image/jpg",
- "file_name": "my-selfie.jpg",
- "file_id": "U8aqJbsXGT537jtGnEDFHqxdDXqh8+oTF/cSkLimzuvVwMP+Jb1XbjPsf7ZgUgLY",
- "requests": [
- {
- "headers": {
- "Content-Type": "image/jpg",
- "Content-Length": 50000
}, - "method": "PUT"
}
]
}
]
}
}Run an Hair Frizziness Detection task.
Once you start an AI task, you need to keep polling at given polling_interval to check its status until it shows either success or error because if you don't, the task will time out and when you try to check the status later, you'll get an InvalidTaskId error even if the task did finish successfully and your units will still be consumed.
Authorizations:
Request Body schema: application/jsonrequired
| src_file_urls required | Array of strings = 3 items The file URLs from upload file API. The file IDs for the sequence of source images are 'frontFace', 'rightFace', and 'leftFace'. Should provide either 'src_file_urls' or 'src_file_ids'. |
Responses
Request samples
- Payload
- curl
- Node.js
- JavaScript
- PHP
- Python
- Java
{- "src_file_urls": [
]
}Response samples
- 200
- 400
- 401
{- "status": 200,
- "data": {
- "task_id": "grH0CvsgXuAIHLUzD0V1Ol34hoet3R1tvdbtiVHrDb6_UqCLKIejAIajwxrhOAfe"
}
}Check an Hair Frizziness Detection task status.
Authorizations:
path Parameters
| task_id required | string Example: grH0CvsgXuAIHLUzD0V1Ol34hoet3R1tvdbtiVHrDb6_UqCLKIejAIajwxrhOAfe ID of task to check |
Responses
Request samples
- curl
- Node.js
- JavaScript
- PHP
- Python
- Java
curl --request GET \ --url https://yce-api-01.makeupar.com/s2s/v2.0/task/hair-frizziness-detection/grH0CvsgXuAIHLUzD0V1Ol34hoet3R1tvdbtiVHrDb6_UqCLKIejAIajwxrhOAfe \ --header 'Authorization: Bearer <access_token for v1, API Key for v2>'
Response samples
- 200
- 400
- 401
- 500
{- "status": 200,
- "data": {
- "task_status": "running",
- "error": "exceed_max_filesize",
- "error_message": "string",
- "results": {
- "hair_frizziness": {
- "mapping": 0,
- "term": "Not Frizzy"
}
}
}
}Create a new file.
To upload a new file, you'll first need to use the File API. It will give you a URL – use that URL to upload your file. Once the upload is finished, you can use the file_id from the same response to start using our AI features.
Authorizations:
Request Body schema: application/jsonrequired
required | Array of objects |
Responses
Request samples
- Payload
- curl
- Node.js
- JavaScript
- PHP
- Python
- Java
{- "files": [
- {
- "content_type": "image/jpg",
- "file_name": "my-selfie.jpg",
- "file_size": 50000
}
]
}Response samples
- 200
- 400
- 401
{- "status": 200,
- "data": {
- "files": [
- {
- "content_type": "image/jpg",
- "file_name": "my-selfie.jpg",
- "file_id": "U8aqJbsXGT537jtGnEDFHqxdDXqh8+oTF/cSkLimzuvVwMP+Jb1XbjPsf7ZgUgLY",
- "requests": [
- {
- "headers": {
- "Content-Type": "image/jpg",
- "Content-Length": 50000
}, - "method": "PUT"
}
]
}
]
}
}Run an AI Hair Density Detection task.
Once you start an AI task, you need to keep polling at given polling_interval to check its status until it shows either success or error because if you don't, the task will time out and when you try to check the status later, you'll get an InvalidTaskId error even if the task did finish successfully and your units will still be consumed.
Authorizations:
Request Body schema: application/jsonrequired
| src_file_url required | string Url of the file to run task. The url should be publicly accessible. |
Responses
Request samples
- Payload
- curl
- Node.js
- JavaScript
- PHP
- Python
- Java
{
}Response samples
- 200
- 400
- 401
{- "status": 200,
- "data": {
- "task_id": "grH0CvsgXuAIHLUzD0V1Ol34hoet3R1tvdbtiVHrDb6_UqCLKIejAIajwxrhOAfe"
}
}Check the status of a AI Hair Density Detection task.
Authorizations:
path Parameters
| task_id required | string Example: grH0CvsgXuAIHLUzD0V1Ol34hoet3R1tvdbtiVHrDb6_UqCLKIejAIajwxrhOAfe ID of task to check |
Responses
Request samples
- curl
- Node.js
- JavaScript
- PHP
- Python
- Java
curl --request GET \ --url https://yce-api-01.makeupar.com/s2s/v2.0/task/hair-density-detection/grH0CvsgXuAIHLUzD0V1Ol34hoet3R1tvdbtiVHrDb6_UqCLKIejAIajwxrhOAfe \ --header 'Authorization: Bearer <access_token for v1, API Key for v2>'
Response samples
- 200
- 400
- 401
- 500
{- "status": 200,
- "data": {
- "task_status": "running",
- "error": "exceed_max_filesize",
- "error_message": "string",
- "results": {
- "timed": 0,
- "hair_density": {
- "mapping": "2.16",
- "term": "Extremely Low Density"
}
}
}
}AI Beard Style Generator
AI Simulation for Men's Beard Styles
The AI algorithm also empowers men to have the complete freedom to virtualy try different beard styles with the highly sophisticated beard simulation technology, including trim beard, stubble beard, full beard, circle beard, mustache, goatee, and others.
Shoppers can also see before and after results, without the commitment of putting a razor to the skin. The beard filters include mustache, short box, ducktail, circle and a dozen more.
- Upload a Selfie You can provide the source image in one of two ways:
Use an Existing Public Image URL Instead of uploading, you may supply a publicly accessible image URL directly when initiating the AI task.
Upload via File API Use the endpoint:
POST /s2s/v2.0/file/beard-styleThis returns a
file_idfor subsequent task execution.Important: Simply calling the File API does not upload your file. You must manually upload the file to the URL provided in the File API response. That URL is your upload destination, make sure the file is successfully transferred there before proceeding.
Before calling the AI API, ensure your file has been successfully uploaded. Use the File API to retrieve an upload URL, then upload your file to that location. Once the upload is complete, you'll receive a file_id in the response, this ID is what you'll use to access AI features related to that file.Warning: Please note that, you will get an 500 Server Error / unknown_internal_error or 404 Not Found error when using AI APIs if you do not upload the file to the URL provided in the File API response.
List Predefined Styles
- Use /s2s/v2.0/task/template/beard-style to fetch a predefined template list and select a
template_idto run an AI task.
- Use /s2s/v2.0/task/template/beard-style to fetch a predefined template list and select a
Run an AI Task to Obtain a Task ID Execute the AI task using /s2s/v2.0/task/beard-style. For the target user image, provide either
src_file_urlorsrc_file_id. And a stypetemplate_idto apply and obtain atask_id.Poll to Check the Status of a Task Until It Succeeds or Fails Use the
task_idto monitor the task status by polling GET /s2s/v2.0/task/beard-style to retrieve the current engine status. Until the engine completes the task, the status will remain as running, and no units will be consumed during this stage. You can also implement a webhook to receive notifications when an AI task succeeds or fails. Refer to the Webhook section for details.Warning: Polling to check the status of a task within its retention period is mandatory. A task will time out if there is no polling request within the retention period, even if the task is processed successfully. Your units will still be consumed.
Warning: You will receive an InvalidTaskId error if you check the status of a timed-out task. Therefore, once you run an AI task, you must poll to check the status within the retention period until the status becomes either success or error.
Retrieve the Result of an AI Task Once Successful The task status will change to success after the engine processes your input file and generates the resulting image. You will receive a URL for the processed image.
Supported Formats & Dimensions
| AI Feature | Supported Dimensions | Supported File Size | Supported Formats |
|---|---|---|---|
| AI Beardstyle Generator | Resolution: Long side < 1024 face width > 256 face pose: -30 < yaw < 30, single face only, need to show full face |
< 10MB | jpg/jpeg |
Error Codes
| Error Code | Description |
|---|---|
| error_no_face | Face are not visible in the source image |
| error_src_face_too_small | The face is too small |
| error_inference | Beard removal error or beard generation error |
| error_face_pose | The face pose of source image is unsupported |
Environment & Dependency
| Sample Code Language / Tool | Recommended Runtime Versions |
|---|---|
| cURL | - bash >= 3.2 - curl >= 7.58 (modern TLS/HTTP support) - jq >= 1.6 (robust JSON parsing) |
| Node.js (JavaScript) | Node >= 18 (for global fetch) |
| JavaScript | - Chrome / Edge >= 80 - Firefox >= 74 - Safari >= 13.1 |
| PHP | PHP >= 7.4 (for modern TLS/compat), ext-curl (recommended) or allow_url_fopen=On + ext-openssl, ext-json |
| Python | Python >= 3.10 (for f-strings), requests >= 2.20.0 |
| Java | Java 11+ (for HttpClient), Jackson Databind >= 2.12.0 |
Create a new file.
To upload a new file, you'll first need to use the File API. It will give you a URL – use that URL to upload your file. Once the upload is finished, you can use the file_id from the same response to start using our AI features.
Authorizations:
Request Body schema: application/jsonrequired
required | Array of objects |
Responses
Request samples
- Payload
- curl
- Node.js
- JavaScript
- PHP
- Python
- Java
{- "files": [
- {
- "content_type": "image/jpg",
- "file_name": "my-selfie.jpg",
- "file_size": 50000
}
]
}Response samples
- 200
- 400
- 401
{- "status": 200,
- "data": {
- "files": [
- {
- "content_type": "image/jpg",
- "file_name": "my-selfie.jpg",
- "file_id": "U8aqJbsXGT537jtGnEDFHqxdDXqh8+oTF/cSkLimzuvVwMP+Jb1XbjPsf7ZgUgLY",
- "requests": [
- {
- "headers": {
- "Content-Type": "image/jpg",
- "Content-Length": 50000
}, - "method": "PUT"
}
]
}
]
}
}List predefined templates.
Authorizations:
query Parameters
| page_size | integer Example: page_size=20 Number of results to return in this page. Valid value should be between 1 and 20. Default 20. |
| starting_token | string Example: starting_token=13045969587275114 Token for current page. Start with |
Responses
Request samples
- curl
- Node.js
- JavaScript
- PHP
- Python
- Java
curl --request GET \ --url 'https://yce-api-01.makeupar.com/s2s/v2.0/task/template/beard-style?page_size=20&starting_token=13045969587275114' \ --header 'Authorization: Bearer <access_token for v1, API Key for v2>'
Response samples
- 200
- 400
- 401
{- "status": 200,
- "data": {
- "templates": [
- {
- "id": "good_template_001",
- "thumb": "string",
- "title": "string",
- "category_name": "string"
}
], - "next_token": 13045969587275114
}
}Run an AI Beard Style Generator task.
Once you start an AI task, you need to keep polling at given polling_interval to check its status until it shows either success or error because if you don't, the task will time out and when you try to check the status later, you'll get an InvalidTaskId error even if the task did finish successfully and your units will still be consumed.
Authorizations:
Request Body schema: application/jsonrequired
| src_file_url required | string Url of the file to run task. The url should be publicly accessible. |
| template_id required | string ID of the template. List predefined templates first, and use the id of a template. |
Responses
Request samples
- Payload
- curl
- Node.js
- JavaScript
- PHP
- Python
- Java
{- "template_id": "good_template_001"
}Response samples
- 200
- 400
- 401
{- "status": 200,
- "data": {
- "task_id": "grH0CvsgXuAIHLUzD0V1Ol34hoet3R1tvdbtiVHrDb6_UqCLKIejAIajwxrhOAfe"
}
}Check the status of a AI Beard Style Generator task.
Authorizations:
path Parameters
| task_id required | string Example: grH0CvsgXuAIHLUzD0V1Ol34hoet3R1tvdbtiVHrDb6_UqCLKIejAIajwxrhOAfe ID of task to check |
Responses
Request samples
- curl
- Node.js
- JavaScript
- PHP
- Python
- Java
curl --request GET \ --url https://yce-api-01.makeupar.com/s2s/v2.0/task/beard-style/grH0CvsgXuAIHLUzD0V1Ol34hoet3R1tvdbtiVHrDb6_UqCLKIejAIajwxrhOAfe \ --header 'Authorization: Bearer <access_token for v1, API Key for v2>'
Response samples
- 200
- 400
- 401
- 500
{- "status": 200,
- "data": {
- "task_status": "running",
- "error": "exceed_max_filesize",
- "error_message": "string",
}
}Create a new file.
To upload a new file, you'll first need to use the File API. It will give you a URL – use that URL to upload your file. Once the upload is finished, you can use the file_id from the same response to start using our AI features.
Authorizations:
Request Body schema: application/jsonrequired
required | Array of objects |
Responses
Request samples
- Payload
- curl
- Node.js
- JavaScript
- PHP
- Python
- Java
{- "files": [
- {
- "content_type": "image/jpg",
- "file_name": "my-selfie.jpg",
- "file_size": 50000
}
]
}Response samples
- 200
- 400
- 401
{- "status": 200,
- "data": {
- "files": [
- {
- "content_type": "image/jpg",
- "file_name": "my-selfie.jpg",
- "file_id": "U8aqJbsXGT537jtGnEDFHqxdDXqh8+oTF/cSkLimzuvVwMP+Jb1XbjPsf7ZgUgLY",
- "requests": [
- {
- "headers": {
- "Content-Type": "image/jpg",
- "Content-Length": 50000
}, - "method": "PUT"
}
]
}
]
}
}Run an AI Object Removal Pro task.
Once you start an AI task, you need to keep polling at given polling_interval to check its status until it shows either success or error because if you don't, the task will time out and when you try to check the status later, you'll get an InvalidTaskId error even if the task did finish successfully and your units will still be consumed.
Authorizations:
Request Body schema: application/jsonrequired
| src_file_url required | string Url of the file to run task. The url should be publicly accessible. |
| msk_file_url required | string URL of the mask file. This should be a grey scale mask image with the exact same width and height with the input source file where white pixels indicate foreground and black pixels represent background. The URL should be publicly accessible. |
Responses
Request samples
- Payload
- curl
- Node.js
- JavaScript
- PHP
- Python
- Java
{
}
Response samples
- 200
- 400
- 401
{- "status": 200,
- "data": {
- "task_id": "grH0CvsgXuAIHLUzD0V1Ol34hoet3R1tvdbtiVHrDb6_UqCLKIejAIajwxrhOAfe"
}
}Check an AI Object Removal Pro task status.
Authorizations:
path Parameters
| task_id required | string Example: grH0CvsgXuAIHLUzD0V1Ol34hoet3R1tvdbtiVHrDb6_UqCLKIejAIajwxrhOAfe ID of task to check |
Responses
Request samples
- curl
- Node.js
- JavaScript
- PHP
- Python
- Java
curl --request GET \ --url https://yce-api-01.makeupar.com/s2s/v2.0/task/generative-fill/grH0CvsgXuAIHLUzD0V1Ol34hoet3R1tvdbtiVHrDb6_UqCLKIejAIajwxrhOAfe \ --header 'Authorization: Bearer <access_token for v1, API Key for v2>'
Response samples
- 200
- 400
- 401
- 500
{- "status": 200,
- "data": {
- "task_status": "running",
- "error": "exceed_max_filesize",
- "error_message": "string",
}
}AI Object Removal
Remove unwanted objects with precision from your photos while preserving intricate details. To use this amazing feature, simply input a photo along with a grayscale mask where white pixels indicate foreground elements and black pixels represent background areas. The AI Object Removal then leverages advanced algorithms to produce natural-looking images by effectively removing unwanted objects such as people, reflections, shadows, and other distractions from your photos.
Sample input:

Sample output:

Sample input:

Sample output:

Create a new file.
To upload a new file, you'll first need to use the File API. It will give you a URL – use that URL to upload your file. Once the upload is finished, you can use the file_id from the same response to start using our AI features.
Authorizations:
Request Body schema: application/jsonrequired
required | Array of objects |
Responses
Request samples
- Payload
- curl
- Node.js
- JavaScript
- PHP
- Python
- Java
{- "files": [
- {
- "content_type": "image/jpg",
- "file_name": "my-selfie.jpg",
- "file_size": 50000
}
]
}Response samples
- 200
- 400
- 401
{- "status": 200,
- "data": {
- "files": [
- {
- "content_type": "image/jpg",
- "file_name": "my-selfie.jpg",
- "file_id": "U8aqJbsXGT537jtGnEDFHqxdDXqh8+oTF/cSkLimzuvVwMP+Jb1XbjPsf7ZgUgLY",
- "requests": [
- {
- "headers": {
- "Content-Type": "image/jpg",
- "Content-Length": 50000
}, - "method": "PUT"
}
]
}
]
}
}Run an AI Object Removal task.
Once you start an AI task, you need to keep polling at given polling_interval to check its status until it shows either success or error because if you don't, the task will time out and when you try to check the status later, you'll get an InvalidTaskId error even if the task did finish successfully and your units will still be consumed.
Authorizations:
Request Body schema: application/jsonrequired
| src_file_url required | string Url of the file to run task. The url should be publicly accessible. |
| msk_file_url required | string URL of the mask file. This should be a grey scale mask image with the exact same width and height with the input source file where white pixels indicate foreground and black pixels represent background. The URL should be publicly accessible. |
Responses
Request samples
- Payload
- curl
- Node.js
- JavaScript
- PHP
- Python
- Java
{
}Response samples
- 200
- 400
- 401
{- "status": 200,
- "data": {
- "task_id": "grH0CvsgXuAIHLUzD0V1Ol34hoet3R1tvdbtiVHrDb6_UqCLKIejAIajwxrhOAfe"
}
}Check an AI Object Removal task status.
Authorizations:
path Parameters
| task_id required | string Example: grH0CvsgXuAIHLUzD0V1Ol34hoet3R1tvdbtiVHrDb6_UqCLKIejAIajwxrhOAfe ID of task to check |
Responses
Request samples
- curl
- Node.js
- JavaScript
- PHP
- Python
- Java
curl --request GET \ --url https://yce-api-01.makeupar.com/s2s/v2.0/task/obj-removal/grH0CvsgXuAIHLUzD0V1Ol34hoet3R1tvdbtiVHrDb6_UqCLKIejAIajwxrhOAfe \ --header 'Authorization: Bearer <access_token for v1, API Key for v2>'
Response samples
- 200
- 400
- 401
- 500
{- "status": 200,
- "data": {
- "task_status": "running",
- "error": "exceed_max_filesize",
- "error_message": "string",
}
}AI Photo Enhance
AI Photo Enhancer uses advanced AI and deep learning to analyze image details and improve resolution, making low-resolution images clear & fix motion blur.
- No More Pixelation: Eliminate pixelation for smoother, more defined images.
- Fix Blurry Photos: Remove blurriness to reveal sharper, crisper details.
- Enhance Quality: Bring out finer details, making every part of your image stand out.
- Sharpen Images: Increase sharpness for clearer and more vivid images.
- Improve Clarity: Boost overall clarity to make your photos look fresh and professional.
- Face Enhancement: Refine facial features for more lifelike, enhanced portraits in motional images.
Before sample:

After sample:

Before sample:

After sample:

Create a new file.
To upload a new file, you'll first need to use the File API. It will give you a URL – use that URL to upload your file. Once the upload is finished, you can use the file_id from the same response to start using our AI features.
Authorizations:
Request Body schema: application/jsonrequired
required | Array of objects |
Responses
Request samples
- Payload
- curl
- Node.js
- JavaScript
- PHP
- Python
- Java
{- "files": [
- {
- "content_type": "image/jpg",
- "file_name": "my-selfie.jpg",
- "file_size": 50000
}
]
}Response samples
- 200
- 400
- 401
{- "status": 200,
- "data": {
- "files": [
- {
- "content_type": "image/jpg",
- "file_name": "my-selfie.jpg",
- "file_id": "U8aqJbsXGT537jtGnEDFHqxdDXqh8+oTF/cSkLimzuvVwMP+Jb1XbjPsf7ZgUgLY",
- "requests": [
- {
- "headers": {
- "Content-Type": "image/jpg",
- "Content-Length": 50000
}, - "method": "PUT"
}
]
}
]
}
}Run an AI Photo Enhance task.
Once you start an AI task, you need to keep polling at given polling_interval to check its status until it shows either success or error because if you don't, the task will time out and when you try to check the status later, you'll get an InvalidTaskId error even if the task did finish successfully and your units will still be consumed.
Authorizations:
Request Body schema: application/jsonrequired
| src_file_url required | string Url of the file to run task. The url should be publicly accessible. |
| scale required | integer Enum: 1 2 4 Scaling ratio. Available values are 1, 2, 4. |
Responses
Request samples
- Payload
- curl
- Node.js
- JavaScript
- PHP
- Python
- Java
{- "scale": 1
}Response samples
- 200
- 400
- 401
{- "status": 200,
- "data": {
- "task_id": "grH0CvsgXuAIHLUzD0V1Ol34hoet3R1tvdbtiVHrDb6_UqCLKIejAIajwxrhOAfe"
}
}Check an AI Photo Enhance task status.
Authorizations:
path Parameters
| task_id required | string Example: grH0CvsgXuAIHLUzD0V1Ol34hoet3R1tvdbtiVHrDb6_UqCLKIejAIajwxrhOAfe ID of task to check |
Responses
Request samples
- curl
- Node.js
- JavaScript
- PHP
- Python
- Java
curl --request GET \ --url https://yce-api-01.makeupar.com/s2s/v2.0/task/enhance/grH0CvsgXuAIHLUzD0V1Ol34hoet3R1tvdbtiVHrDb6_UqCLKIejAIajwxrhOAfe \ --header 'Authorization: Bearer <access_token for v1, API Key for v2>'
Response samples
- 200
- 400
- 401
- 500
{- "status": 200,
- "data": {
- "task_status": "running",
- "error": "exceed_max_filesize",
- "error_message": "string",
}
}AI Photo Background Removal
Remove background from photo with impeccable accuracy, ensuring the high quality of images.
- Automatic Background Detection: : Uses AI to identify and separate the subject from the background.
- High Precision Editing: : Provides clean and precise edges around the subject.
- Supports various categories: People, Products, Animals, Cars, Graphics & more.
- Easy to chain with other AI tasks: The output file ID can be chained into other AI tasks in a flash.

How to run AI Photo Background Removal
Resize your source image Resize your photo to fit the supported dimensions. See details in File Specs & Errors
Upload file using the File API Using the v1.1/file/sod API to upload a target user image.
Image Requirements
- See details in File Specs & Errors.
Important: Simply calling the File API does not upload your file. You must manually upload the file to the URL provided in the File API response. That URL is your upload destination, make sure the file is successfully transferred there before proceeding.
Before calling the AI API, ensure your file has been successfully uploaded. Use the File API to retrieve an upload URL, then upload your file to that location. Once the upload is complete, you'll receive a file_id in the response, this ID is what you'll use to access AI features related to that file.Warning: Please note that, you will get an 500 Server Error / unknown_internal_error or 404 Not Found error when using AI APIs if you do not upload the file to the URL provided in the File API response.
Run an AI task Once the upload is complete, calling POST 'task/sod' with the File ID to execute the AI task and obtains a task_id to monitor.
Polling to check the status of a task until it succeed or error This task_id is used to monitor the task's status through polling GET 'task/sod' to retrieve the current engine status. Until the engine completes the task, the status will remain 'running', and no units will be consumed during this stage.
Warning: Please note that, Polling to check the status of a task based on it's polling_interval is mandotary. A task will be timed out if there is no polling request within the polling_interval, even if the task is processed succefully(Your unit(s) will be consumed).
Warning: You will get a InvalidTaskId error once you check the status of a timed out task. So, once you run an AI task, you need to polling to check the status within the polling_interval until the status become either success or error.
Get the result of an AI task once success The task will change to the 'success' status after the engine successfully processes your input file and generates the resulting image. You will get an url of the processed image and a dst_id that allow you to chain another AI task without re-upload the result image. Your units will only be consumed in this case. If the engine fails to process the task, the task's status will change to 'error' and no unit will be consumed. When deducting units, the system will prioritize those nearing expiration. If the expiration date is the same, it will deduct the units obtained on the earliest date.
Demonstrative scenarios:
Common implementation cases:
![]()
Inputs
Image
- Type:
image - Description: An image with clear foreground.
Real-world application (input):

Outputs
Foreground image
- Type:
image - Description: A background removed image.
Real-world application (output):

Supported Formats & Dimensions
| AI Feature | Supported Dimensions | File Size | Accepted formats |
|---|---|---|---|
| AI Photo Background Removal | Recommendations and limitations for both input and output images are as follows:Resolution: 4096 × 4096 pixels (longest side must not exceed 4096 pixels) | <10MB | JPG and PNG |
Error Codes
| Error Code | Description |
|---|---|
| exceed_max_filesize | Input file size exceeds the maximum limit |
| invalid_parameter | Invalid parameter value |
| error_download_image | Download source image error |
| error_download_mask | Download mask image error |
| error_decode_image | Decode source image error |
| error_decode_mask | Decode mask image error |
| error_download_video | Download source video error |
| error_decode_video | Decode source video error |
| error_nsfw_content_detected | NSFW content detected in source image |
| error_no_face | No face detected on source image |
| error_pose | Failed to detect pose on source image |
| error_face_parsing | Failed to do face segmentation on source image |
| error_inference | Inference pipeline error |
| exceed_nsfw_retry_limits | Exceed the retry limits to avoid generated NSFW image |
| error_upload | Upload result image error |
| error_multiple_people | Multiple people detected in the source image |
| error_no_shoulder | Shoulders are not visible in the source image |
| error_large_face_angle | The face angle in the uploaded image is too large |
| error_hair_too_short | Input hair is too short |
| error_unexpected_video_duration | Video durateion is not equal to the dstDuration |
| error_bald_image | Input hairstyle is bald |
| error_unsupport_ratio | The aspect ratio of input image is unsupported |
| unknown_internal_error | Others |
Create a new file.
To upload a new file, you'll first need to use the File API. It will give you a URL – use that URL to upload your file. Once the upload is finished, you can use the file_id from the same response to start using our AI features.
Authorizations:
Request Body schema: application/jsonrequired
required | Array of objects |
Responses
Request samples
- Payload
- curl
- Node.js
- JavaScript
- PHP
- Python
- Java
{- "files": [
- {
- "content_type": "image/jpg",
- "file_name": "my-selfie.jpg",
- "file_size": 50000
}
]
}Response samples
- 200
- 400
- 401
{- "status": 200,
- "data": {
- "files": [
- {
- "content_type": "image/jpg",
- "file_name": "my-selfie.jpg",
- "file_id": "U8aqJbsXGT537jtGnEDFHqxdDXqh8+oTF/cSkLimzuvVwMP+Jb1XbjPsf7ZgUgLY",
- "requests": [
- {
- "headers": {
- "Content-Type": "image/jpg",
- "Content-Length": 50000
}, - "method": "PUT"
}
]
}
]
}
}Run an AI Photo Background Removal task.
Once you start an AI task, you need to keep polling at given polling_interval to check its status until it shows either success or error because if you don't, the task will time out and when you try to check the status later, you'll get an InvalidTaskId error even if the task did finish successfully and your units will still be consumed.
Authorizations:
Request Body schema: application/jsonrequired
| src_file_url required | string Url of the file to run task. The url should be publicly accessible. |
Responses
Request samples
- Payload
- curl
- Node.js
- JavaScript
- PHP
- Python
- Java
{
}Response samples
- 200
- 400
- 401
{- "status": 200,
- "data": {
- "task_id": "grH0CvsgXuAIHLUzD0V1Ol34hoet3R1tvdbtiVHrDb6_UqCLKIejAIajwxrhOAfe"
}
}Check an AI Photo Background Removal task status.
Authorizations:
path Parameters
| task_id required | string Example: grH0CvsgXuAIHLUzD0V1Ol34hoet3R1tvdbtiVHrDb6_UqCLKIejAIajwxrhOAfe ID of task to check |
Responses
Request samples
- curl
- Node.js
- JavaScript
- PHP
- Python
- Java
curl --request GET \ --url https://yce-api-01.makeupar.com/s2s/v2.0/task/sod/grH0CvsgXuAIHLUzD0V1Ol34hoet3R1tvdbtiVHrDb6_UqCLKIejAIajwxrhOAfe \ --header 'Authorization: Bearer <access_token for v1, API Key for v2>'
Response samples
- 200
- 400
- 401
- 500
{- "status": 200,
- "data": {
- "task_status": "running",
- "error": "exceed_max_filesize",
- "error_message": "string",
}
}AI Photo Colorize
Using the latest AI technology to colorize black and white photos, old images, or repair them. With AI Photo Colorize, you can instantly generate 4 different colorized versions of your photos, each with unique color tones ranging from warm to cool. Utilizing deep learning technology, this tool transforms your black and white photos into vibrant color images within seconds.

Create a new file.
To upload a new file, you'll first need to use the File API. It will give you a URL – use that URL to upload your file. Once the upload is finished, you can use the file_id from the same response to start using our AI features.
Authorizations:
Request Body schema: application/jsonrequired
required | Array of objects |
Responses
Request samples
- Payload
- curl
- Node.js
- JavaScript
- PHP
- Python
- Java
{- "files": [
- {
- "content_type": "image/jpg",
- "file_name": "my-selfie.jpg",
- "file_size": 50000
}
]
}Response samples
- 200
- 400
- 401
{- "status": 200,
- "data": {
- "files": [
- {
- "content_type": "image/jpg",
- "file_name": "my-selfie.jpg",
- "file_id": "U8aqJbsXGT537jtGnEDFHqxdDXqh8+oTF/cSkLimzuvVwMP+Jb1XbjPsf7ZgUgLY",
- "requests": [
- {
- "headers": {
- "Content-Type": "image/jpg",
- "Content-Length": 50000
}, - "method": "PUT"
}
]
}
]
}
}Run an AI Photo Colorize task.
Once you start an AI task, you need to keep polling at given polling_interval to check its status until it shows either success or error because if you don't, the task will time out and when you try to check the status later, you'll get an InvalidTaskId error even if the task did finish successfully and your units will still be consumed.
Authorizations:
Request Body schema: application/jsonrequired
| src_file_url required | string Url of the file to run task. The url should be publicly accessible. |
Responses
Request samples
- Payload
- curl
- Node.js
- JavaScript
- PHP
- Python
- Java
{
}Response samples
- 200
- 400
- 401
{- "status": 200,
- "data": {
- "task_id": "grH0CvsgXuAIHLUzD0V1Ol34hoet3R1tvdbtiVHrDb6_UqCLKIejAIajwxrhOAfe"
}
}Check a AI Photo Colorize task status.
Authorizations:
path Parameters
| task_id required | string Example: grH0CvsgXuAIHLUzD0V1Ol34hoet3R1tvdbtiVHrDb6_UqCLKIejAIajwxrhOAfe ID of task to check |
Responses
Request samples
- curl
- Node.js
- JavaScript
- PHP
- Python
- Java
curl --request GET \ --url https://yce-api-01.makeupar.com/s2s/v2.0/task/colorize/grH0CvsgXuAIHLUzD0V1Ol34hoet3R1tvdbtiVHrDb6_UqCLKIejAIajwxrhOAfe \ --header 'Authorization: Bearer <access_token for v1, API Key for v2>'
Response samples
- 200
- 400
- 401
- 500
{- "status": 200,
- "data": {
- "task_status": "running",
- "error": "exceed_max_filesize",
- "error_message": "string",
- "results": {
- "output": [
]
}
}
}AI Image Generator
Discover the power of AI with our innovative text-to-image generator! Transform your ideas into stunning visuals instantly, experiment with prompts, explore unique styles like cartoons, oil paintings, or sketches, and let your creativity shine through. Whether you're an artist, designer, or creative soul, our tool offers endless possibilities to bring your vision to life. Add images as references to inspire new artistic directions while letting AI refine them into entirely original masterpieces.
Want more inspirations? Please refer to https://yce.makeupar.com/ai-art-generator.
Use cases:


Sample output:


List predefined templates.
Authorizations:
query Parameters
| page_size | integer Example: page_size=20 Number of results to return in this page. Valid value should be between 1 and 20. Default 20. |
| starting_token | string Example: starting_token=13045969587275114 Token for current page. Start with |
Responses
Request samples
- curl
- Node.js
- JavaScript
- PHP
- Python
- Java
curl --request GET \ --url 'https://yce-api-01.makeupar.com/s2s/v2.0/task/template/text-to-image?page_size=20&starting_token=13045969587275114' \ --header 'Authorization: Bearer <access_token for v1, API Key for v2>'
Response samples
- 200
- 400
- 401
{- "status": 200,
- "data": {
- "templates": [
- {
- "id": "good_template_001",
- "thumb": "string",
- "title": "string",
- "category_name": "string"
}
], - "next_token": 13045969587275114
}
}Run an AI Image Generator task.
Once you start an AI task, you need to keep polling at given polling_interval to check its status until it shows either success or error because if you don't, the task will time out and when you try to check the status later, you'll get an InvalidTaskId error even if the task did finish successfully and your units will still be consumed.
Authorizations:
Request Body schema: application/jsonrequired
| prompt required | string Prompt to generate image |
| negative_prompt | string Prompt what DO NOT want |
| template_id required | string ID of the template. List predefined templates first, and use the id of a template. |
| steps | integer Steps affect image quality and time of processing |
| cfg_scale | number CFG controls how closely the generated image follows text prompt |
| seed | Array of integers Each image is generated with a unique seed. Using same seed to recreate the same image. Only accept 1 seed. |
| width_ratio | integer The width of ratio of image. |
| height_ratio | integer The height of ratio of image. |
Responses
Request samples
- Payload
- curl
- Node.js
- JavaScript
- PHP
- Python
- Java
{- "prompt": "A little cat",
- "negative_prompt": "dog",
- "template_id": "good_template_001",
- "steps": 10,
- "cfg_scale": 4,
- "seed": [
- 3843718472198472
], - "width_ratio": 3,
- "height_ratio": 4
}Response samples
- 200
- 400
- 401
{- "status": 200,
- "data": {
- "task_id": "grH0CvsgXuAIHLUzD0V1Ol34hoet3R1tvdbtiVHrDb6_UqCLKIejAIajwxrhOAfe"
}
}Check a AI Image Generator task status.
Authorizations:
path Parameters
| task_id required | string Example: grH0CvsgXuAIHLUzD0V1Ol34hoet3R1tvdbtiVHrDb6_UqCLKIejAIajwxrhOAfe ID of task to check |
Responses
Request samples
- curl
- Node.js
- JavaScript
- PHP
- Python
- Java
curl --request GET \ --url https://yce-api-01.makeupar.com/s2s/v2.0/task/text-to-image/grH0CvsgXuAIHLUzD0V1Ol34hoet3R1tvdbtiVHrDb6_UqCLKIejAIajwxrhOAfe \ --header 'Authorization: Bearer <access_token for v1, API Key for v2>'
Response samples
- 200
- 400
- 401
- 500
{- "status": 200,
- "data": {
- "task_status": "running",
- "error": "exceed_max_filesize",
- "error_message": "string",
}
}AI Image Extender
Experience vibrant AI Outpainting with our cutting-edge AI Image Extender. Seamlessly expand images in any ratio, bringing out your creativity with our advanced AI technology. Preserve the highest quality while expanding your photos without compromising on style or aesthetics. Instantly transform your photos with one-click automatic background enlargement thanks to our user-friendly AI tool. Thanks to our advanced context-aware technology, we ensure a seamless and captivating experience for every viewer.

Whether you're aiming for Instagram glory or framing a digital masterpiece, select from a variety of sizes and ratios for that perfect fit. As you tweak and transform, our AI seamlessly weaves its magic, ensuring the expanded areas blend flawlessly with your original photo.

Create a new file.
To upload a new file, you'll first need to use the File API. It will give you a URL – use that URL to upload your file. Once the upload is finished, you can use the file_id from the same response to start using our AI features.
Authorizations:
Request Body schema: application/jsonrequired
required | Array of objects |
Responses
Request samples
- Payload
- curl
- Node.js
- JavaScript
- PHP
- Python
- Java
{- "files": [
- {
- "content_type": "image/jpg",
- "file_name": "my-selfie.jpg",
- "file_size": 50000
}
]
}Response samples
- 200
- 400
- 401
{- "status": 200,
- "data": {
- "files": [
- {
- "content_type": "image/jpg",
- "file_name": "my-selfie.jpg",
- "file_id": "U8aqJbsXGT537jtGnEDFHqxdDXqh8+oTF/cSkLimzuvVwMP+Jb1XbjPsf7ZgUgLY",
- "requests": [
- {
- "headers": {
- "Content-Type": "image/jpg",
- "Content-Length": 50000
}, - "method": "PUT"
}
]
}
]
}
}Run an AI Image Extender task.
Once you start an AI task, you need to keep polling at given polling_interval to check its status until it shows either success or error because if you don't, the task will time out and when you try to check the status later, you'll get an InvalidTaskId error even if the task did finish successfully and your units will still be consumed.
Authorizations:
Request Body schema: application/jsonrequired
The AI Image Extender API takes 3 key parameters to work, an input image, a pivot point and an output image. The size of output image should always be larger than the size of input image. And the recommeded size of output image should be less than two times of the size of input image to ensure better quality. The pivot point with location input_x and input_y is used to place the top-left of input image to the output image. You need to scale the input image by youself first if any of edges of the input image is larger than 4096. Or using the crop parameters to crop the input image. After cropping, you need to make sure the input image is completely inside the output image with your pivot point. It is your resposibility to provide correct pivot point and size of the output image. Otherwise, you may get unexpected results.
| src_file_url required | string Url of the file to run task. The url should be publicly accessible. |
| output_width required | integer [ 1 .. 4096 ] Output image height. value range: [1 - 4096] |
| output_height required | integer [ 1 .. 4096 ] Output image width. value range: [1 - 4096] |
| input_x required | integer [ 0 .. 4096 ] Source image left position in output image, where The indices are ordered from top to bottom, and from left to right. value range: [0 - 4096] |
| input_y required | integer [ 0 .. 4096 ] Source image top position in output image, where The indices are ordered from top to bottom, and from left to right. value range: [0 - 4096] |
| input_width required | integer [ 1 .. 4096 ] Source image width, input_x + input_width must ⇐ output_width. value range: [1 - 4096] |
| input_height required | integer [ 1 .. 4096 ] Source image height, input_y + input_height must ⇐ output_height. value range: [1 - 4096] |
| crop_input_x required | integer [ 0 .. 4096 ] Crop source image from x, where The indices are ordered from top to bottom, and from left to right. value range: [0 - 4096] |
| crop_input_y required | integer [ 0 .. 4096 ] Crop source image from y, where The indices are ordered from top to bottom, and from left to right. value range: [0 - 4096] |
| crop_input_width required | integer [ 1 .. 4096 ] Crop source image with width crop_input_width. value range: [1 - 4096] |
| crop_input_height required | integer [ 1 .. 4096 ] Crop source image with height crop_input_height. value range: [1 - 4096] |
Responses
Request samples
- Payload
- curl
- Node.js
- JavaScript
- PHP
- Python
- Java
{- "output_width": 960,
- "output_height": 1280,
- "input_x": 240,
- "input_y": 320,
- "input_width": 480,
- "input_height": 640,
- "crop_input_x": 0,
- "crop_input_y": 0,
- "crop_input_width": 480,
- "crop_input_height": 640
}Response samples
- 200
- 400
- 401
{- "status": 200,
- "data": {
- "task_id": "grH0CvsgXuAIHLUzD0V1Ol34hoet3R1tvdbtiVHrDb6_UqCLKIejAIajwxrhOAfe"
}
}Check an AI Image Extender task status.
Authorizations:
path Parameters
| task_id required | string Example: grH0CvsgXuAIHLUzD0V1Ol34hoet3R1tvdbtiVHrDb6_UqCLKIejAIajwxrhOAfe ID of task to check |
Responses
Request samples
- curl
- Node.js
- JavaScript
- PHP
- Python
- Java
curl --request GET \ --url https://yce-api-01.makeupar.com/s2s/v2.0/task/out-paint/grH0CvsgXuAIHLUzD0V1Ol34hoet3R1tvdbtiVHrDb6_UqCLKIejAIajwxrhOAfe \ --header 'Authorization: Bearer <access_token for v1, API Key for v2>'
Response samples
- 200
- 400
- 401
- 500
{- "status": 200,
- "data": {
- "task_status": "running",
- "error": "exceed_max_filesize",
- "error_message": "string",
}
}AI Photo Lighting
Brighten your images with Our AI image brightening tool effortlessly. With the legendary AI technology, lighten up any image of your choice. Brighten your dark photos or images with our AI Photo Lighting tool, illuminating your memories in a flash.
Before
 After
After
 Brighten low-light photos effortlessly using AI tool, bringing out stunning details and vibrant colors.
Before
 After
After
 Brighten your product pictures with AI Lighting tool for a captivating and stunning presentation.
Create a new file.
To upload a new file, you'll first need to use the File API. It will give you a URL – use that URL to upload your file. Once the upload is finished, you can use the file_id from the same response to start using our AI features.
Authorizations:
Request Body schema: application/jsonrequired
required | Array of objects |
Responses
Request samples
- Payload
- curl
- Node.js
- JavaScript
- PHP
- Python
- Java
{- "files": [
- {
- "content_type": "image/jpg",
- "file_name": "my-selfie.jpg",
- "file_size": 50000
}
]
}Response samples
- 200
- 400
- 401
{- "status": 200,
- "data": {
- "files": [
- {
- "content_type": "image/jpg",
- "file_name": "my-selfie.jpg",
- "file_id": "U8aqJbsXGT537jtGnEDFHqxdDXqh8+oTF/cSkLimzuvVwMP+Jb1XbjPsf7ZgUgLY",
- "requests": [
- {
- "headers": {
- "Content-Type": "image/jpg",
- "Content-Length": 50000
}, - "method": "PUT"
}
]
}
]
}
}Run an AI Photo Lighting task.
Once you start an AI task, you need to keep polling at given polling_interval to check its status until it shows either success or error because if you don't, the task will time out and when you try to check the status later, you'll get an InvalidTaskId error even if the task did finish successfully and your units will still be consumed.
Authorizations:
Request Body schema: application/jsonrequired
| src_file_url required | string Url of the file to run task. The url should be publicly accessible. |
Responses
Request samples
- Payload
- curl
- Node.js
- JavaScript
- PHP
- Python
- Java
{
}Response samples
- 200
- 400
- 401
{- "status": 200,
- "data": {
- "task_id": "grH0CvsgXuAIHLUzD0V1Ol34hoet3R1tvdbtiVHrDb6_UqCLKIejAIajwxrhOAfe"
}
}Check an AI Photo Lighting task status.
Authorizations:
path Parameters
| task_id required | string Example: grH0CvsgXuAIHLUzD0V1Ol34hoet3R1tvdbtiVHrDb6_UqCLKIejAIajwxrhOAfe ID of task to check |
Responses
Request samples
- curl
- Node.js
- JavaScript
- PHP
- Python
- Java
curl --request GET \ --url https://yce-api-01.makeupar.com/s2s/v2.0/task/lighting/grH0CvsgXuAIHLUzD0V1Ol34hoet3R1tvdbtiVHrDb6_UqCLKIejAIajwxrhOAfe \ --header 'Authorization: Bearer <access_token for v1, API Key for v2>'
Response samples
- 200
- 400
- 401
- 500
{- "status": 200,
- "data": {
- "task_status": "running",
- "error": "exceed_max_filesize",
- "error_message": "string",
}
}AI Color Correction
Perfect AI Color Correction let you automatically adjust saturation, temperature, and hue of photos with ease. Adjust white balance to correct color temperature, enhance saturation and make it vibrant, correct exposure level to balance brightness, remove color casts or tints, improve skin tones for a nature-looking portrait, enhance shadow and highlight details, remove noise and improve clarity, or even apply creative color grading effects all in one touch. With AI Color Correction, you can instantly generate 4 different color graded versions of your photos, each with unique color tones ranging from warm to cool within seconds.
Sample
Before:

After:

Before:

After

Create a new file.
To upload a new file, you'll first need to use the File API. It will give you a URL – use that URL to upload your file. Once the upload is finished, you can use the file_id from the same response to start using our AI features.
Authorizations:
Request Body schema: application/jsonrequired
required | Array of objects |
Responses
Request samples
- Payload
- curl
- Node.js
- JavaScript
- PHP
- Python
- Java
{- "files": [
- {
- "content_type": "image/jpg",
- "file_name": "my-selfie.jpg",
- "file_size": 50000
}
]
}Response samples
- 200
- 400
- 401
{- "status": 200,
- "data": {
- "files": [
- {
- "content_type": "image/jpg",
- "file_name": "my-selfie.jpg",
- "file_id": "U8aqJbsXGT537jtGnEDFHqxdDXqh8+oTF/cSkLimzuvVwMP+Jb1XbjPsf7ZgUgLY",
- "requests": [
- {
- "headers": {
- "Content-Type": "image/jpg",
- "Content-Length": 50000
}, - "method": "PUT"
}
]
}
]
}
}Run an AI Photo Color Correction task.
Once you start an AI task, you need to keep polling at given polling_interval to check its status until it shows either success or error because if you don't, the task will time out and when you try to check the status later, you'll get an InvalidTaskId error even if the task did finish successfully and your units will still be consumed.
Authorizations:
Request Body schema: application/jsonrequired
| src_file_url required | string Url of the file to run task. The url should be publicly accessible. |
Responses
Request samples
- Payload
- curl
- Node.js
- JavaScript
- PHP
- Python
- Java
{
}Response samples
- 200
- 400
- 401
{- "status": 200,
- "data": {
- "task_id": "grH0CvsgXuAIHLUzD0V1Ol34hoet3R1tvdbtiVHrDb6_UqCLKIejAIajwxrhOAfe"
}
}Check a AI Photo Color Correction task status.
Authorizations:
path Parameters
| task_id required | string Example: grH0CvsgXuAIHLUzD0V1Ol34hoet3R1tvdbtiVHrDb6_UqCLKIejAIajwxrhOAfe ID of task to check |
Responses
Request samples
- curl
- Node.js
- JavaScript
- PHP
- Python
- Java
curl --request GET \ --url https://yce-api-01.makeupar.com/s2s/v2.0/task/colorize/color-correct/grH0CvsgXuAIHLUzD0V1Ol34hoet3R1tvdbtiVHrDb6_UqCLKIejAIajwxrhOAfe \ --header 'Authorization: Bearer <access_token for v1, API Key for v2>'
Response samples
- 200
- 400
- 401
- 500
{- "status": 200,
- "data": {
- "task_status": "running",
- "error": "exceed_max_filesize",
- "error_message": "string",
- "results": {
- "output": [
]
}
}
}Al Replace
Replace unwanted elements with new objects using AI Replace. By using this API, you can instantly remove unwanted object from your photo and replace it with a new one just by using text. Eliminate anything from bags to cars and beyond.
Sample:

For content creators aiming to perfect their social media presence, AI Replace offers a hassle-free way to polish travel photos or promotional images. Remove and replace elements with ease, ensuring your content stands out.

Create stunning room mockups with AI Replace by filling empty spaces with aesthetically pleasing furniture and objects, transforming the perception of any space.

Create a new file.
To upload a new file, you'll first need to use the File API. It will give you a URL – use that URL to upload your file. Once the upload is finished, you can use the file_id from the same response to start using our AI features.
Authorizations:
Request Body schema: application/jsonrequired
required | Array of objects |
Responses
Request samples
- Payload
- curl
- Node.js
- JavaScript
- PHP
- Python
- Java
{- "files": [
- {
- "content_type": "image/jpg",
- "file_name": "my-selfie.jpg",
- "file_size": 50000
}
]
}Response samples
- 200
- 400
- 401
{- "status": 200,
- "data": {
- "files": [
- {
- "content_type": "image/jpg",
- "file_name": "my-selfie.jpg",
- "file_id": "U8aqJbsXGT537jtGnEDFHqxdDXqh8+oTF/cSkLimzuvVwMP+Jb1XbjPsf7ZgUgLY",
- "requests": [
- {
- "headers": {
- "Content-Type": "image/jpg",
- "Content-Length": 50000
}, - "method": "PUT"
}
]
}
]
}
}Run an AI Replace task.
Once you start an AI task, you need to keep polling at given polling_interval to check its status until it shows either success or error because if you don't, the task will time out and when you try to check the status later, you'll get an InvalidTaskId error even if the task did finish successfully and your units will still be consumed.
Authorizations:
Request Body schema: application/jsonrequired
| src_file_url required | string Url of the file to run task. The url should be publicly accessible. |
| msk_file_url required | string URL of the mask file. This should be a grey scale mask image with the exact same width and height with the input source file where white pixels indicate foreground and black pixels represent background. The URL should be publicly accessible. |
| prompt required | string Prompt for generating objects in the masked area. |
Responses
Request samples
- Payload
- curl
- Node.js
- JavaScript
- PHP
- Python
- Java
{- "prompt": "a cute cat"
}Response samples
- 200
- 400
- 401
{- "status": 200,
- "data": {
- "task_id": "grH0CvsgXuAIHLUzD0V1Ol34hoet3R1tvdbtiVHrDb6_UqCLKIejAIajwxrhOAfe"
}
}Check an AI Replace task status.
Authorizations:
path Parameters
| task_id required | string Example: grH0CvsgXuAIHLUzD0V1Ol34hoet3R1tvdbtiVHrDb6_UqCLKIejAIajwxrhOAfe ID of task to check |
Responses
Request samples
- curl
- Node.js
- JavaScript
- PHP
- Python
- Java
curl --request GET \ --url https://yce-api-01.makeupar.com/s2s/v2.0/task/obj-replace/grH0CvsgXuAIHLUzD0V1Ol34hoet3R1tvdbtiVHrDb6_UqCLKIejAIajwxrhOAfe \ --header 'Authorization: Bearer <access_token for v1, API Key for v2>'
Response samples
- 200
- 400
- 401
- 500
{- "status": 200,
- "data": {
- "task_status": "running",
- "error": "exceed_max_filesize",
- "error_message": "string",
}
}AI Photo Background Change
The AI Photo Background Change tool enhances photos by effortlessly isolating the subject from the background image, allowing for various application, including in business, to sharpen the focus on product subjects.
By using this API, you can easily extract a foreground mask from a input image. So that you can change the background using the mask by any other images or colors.
Sample
Before:

After:

Before:

After:

Create a new file.
To upload a new file, you'll first need to use the File API. It will give you a URL – use that URL to upload your file. Once the upload is finished, you can use the file_id from the same response to start using our AI features.
Authorizations:
Request Body schema: application/jsonrequired
required | Array of objects |
Responses
Request samples
- Payload
- curl
- Node.js
- JavaScript
- PHP
- Python
- Java
{- "files": [
- {
- "content_type": "image/jpg",
- "file_name": "my-selfie.jpg",
- "file_size": 50000
}
]
}Response samples
- 200
- 400
- 401
{- "status": 200,
- "data": {
- "files": [
- {
- "content_type": "image/jpg",
- "file_name": "my-selfie.jpg",
- "file_id": "U8aqJbsXGT537jtGnEDFHqxdDXqh8+oTF/cSkLimzuvVwMP+Jb1XbjPsf7ZgUgLY",
- "requests": [
- {
- "headers": {
- "Content-Type": "image/jpg",
- "Content-Length": 50000
}, - "method": "PUT"
}
]
}
]
}
}Run an AI photo Background Change task.
Once you start an AI task, you need to keep polling at given polling_interval to check its status until it shows either success or error because if you don't, the task will time out and when you try to check the status later, you'll get an InvalidTaskId error even if the task did finish successfully and your units will still be consumed.
Authorizations:
Request Body schema: application/jsonrequired
| src_file_url required | string Url of the file to run task. The url should be publicly accessible. |
Responses
Request samples
- Payload
- curl
- Node.js
- JavaScript
- PHP
- Python
- Java
{
}Response samples
- 200
- 400
- 401
{- "status": 200,
- "data": {
- "task_id": "grH0CvsgXuAIHLUzD0V1Ol34hoet3R1tvdbtiVHrDb6_UqCLKIejAIajwxrhOAfe"
}
}Check AI photo Background Change task status.
Authorizations:
path Parameters
| task_id required | string Example: grH0CvsgXuAIHLUzD0V1Ol34hoet3R1tvdbtiVHrDb6_UqCLKIejAIajwxrhOAfe ID of task to check |
Responses
Request samples
- curl
- Node.js
- JavaScript
- PHP
- Python
- Java
curl --request GET \ --url https://yce-api-01.makeupar.com/s2s/v2.0/task/sod/change-background/grH0CvsgXuAIHLUzD0V1Ol34hoet3R1tvdbtiVHrDb6_UqCLKIejAIajwxrhOAfe \ --header 'Authorization: Bearer <access_token for v1, API Key for v2>'
Response samples
- 200
- 400
- 401
- 500
{- "status": 200,
- "data": {
- "task_status": "running",
- "error": "exceed_max_filesize",
- "error_message": "string",
}
}Create a new file.
To upload a new file, you'll first need to use the File API. It will give you a URL – use that URL to upload your file. Once the upload is finished, you can use the file_id from the same response to start using our AI features.
Authorizations:
Request Body schema: application/jsonrequired
required | Array of objects |
Responses
Request samples
- Payload
- curl
- Node.js
- JavaScript
- PHP
- Python
- Java
{- "files": [
- {
- "content_type": "image/jpg",
- "file_name": "my-selfie.jpg",
- "file_size": 50000
}
]
}Response samples
- 200
- 400
- 401
{- "status": 200,
- "data": {
- "files": [
- {
- "content_type": "image/jpg",
- "file_name": "my-selfie.jpg",
- "file_id": "U8aqJbsXGT537jtGnEDFHqxdDXqh8+oTF/cSkLimzuvVwMP+Jb1XbjPsf7ZgUgLY",
- "requests": [
- {
- "headers": {
- "Content-Type": "image/jpg",
- "Content-Length": 50000
}, - "method": "PUT"
}
]
}
]
}
}List predefined AI photo Background Change V2 templates.
Authorizations:
query Parameters
| page_size | integer Example: page_size=20 Number of results to return in this page. Valid value should be between 1 and 20. Default 20. |
| starting_token | string Example: starting_token=13045969587275114 Token for current page. Start with |
Responses
Request samples
- curl
- Node.js
- JavaScript
- PHP
- Python
- Java
curl --request GET \ --url 'https://yce-api-01.makeupar.com/s2s/v2.0/task/template/bg-replace?page_size=20&starting_token=13045969587275114' \ --header 'Authorization: Bearer <access_token for v1, API Key for v2>'
Response samples
- 200
- 400
- 401
{- "status": 200,
- "data": {
- "templates": [
- {
- "id": "good_template_001",
- "thumb": "string",
- "title": "string",
- "category_name": "string"
}
], - "next_token": 13045969587275114
}
}Run an AI photo Background Change V2 task.
Once you start an AI task, you need to keep polling at given polling_interval to check its status until it shows either success or error because if you don't, the task will time out and when you try to check the status later, you'll get an InvalidTaskId error even if the task did finish successfully and your units will still be consumed.
Authorizations:
Request Body schema: application/jsonrequired
| src_file_url required | string Url of the file to run task. The url should be publicly accessible. |
| type | string Default: "prompt" Enum: "prompt" "template" How the background is generated. With |
| prompt | string Prompt to generate image background. |
| template_id | string ID of the template. List predefined templates first, and use the id of a template. |
Responses
Request samples
- Payload
- curl
- Node.js
- JavaScript
- PHP
- Python
- Java
{- "type": "prompt",
- "prompt": "A sunny beach with palm trees.",
- "template_id": "nature_cherryblossom"
}Response samples
- 200
- 400
- 401
{- "status": 200,
- "data": {
- "task_id": "grH0CvsgXuAIHLUzD0V1Ol34hoet3R1tvdbtiVHrDb6_UqCLKIejAIajwxrhOAfe"
}
}Check an AI photo Background Change V2 task status.
Authorizations:
path Parameters
| task_id required | string Example: grH0CvsgXuAIHLUzD0V1Ol34hoet3R1tvdbtiVHrDb6_UqCLKIejAIajwxrhOAfe ID of task to check |
Responses
Request samples
- curl
- Node.js
- JavaScript
- PHP
- Python
- Java
curl --request GET \ --url https://yce-api-01.makeupar.com/s2s/v2.0/task/bg-replace/grH0CvsgXuAIHLUzD0V1Ol34hoet3R1tvdbtiVHrDb6_UqCLKIejAIajwxrhOAfe \ --header 'Authorization: Bearer <access_token for v1, API Key for v2>'
Response samples
- 200
- 400
- 401
- 500
{- "status": 200,
- "data": {
- "task_status": "running",
- "error": "exceed_max_filesize",
- "error_message": "string",
}
}AI Photo Background Blur
The AI Photo Background Blur tool enhances photos by effortlessly isolating the subject from the background image, allowing for various application, including in bokeh simulation, to sharpen the focus on product subjects.
By using this API, you can easily extract a foreground mask from a input image. So that you can blur the background using the mask by any image blur algorithms like the gaussian blur or custom blur kernels.
Sample
Before:

After:

Before:

After:

Create a new file.
To upload a new file, you'll first need to use the File API. It will give you a URL – use that URL to upload your file. Once the upload is finished, you can use the file_id from the same response to start using our AI features.
Authorizations:
Request Body schema: application/jsonrequired
required | Array of objects |
Responses
Request samples
- Payload
- curl
- Node.js
- JavaScript
- PHP
- Python
- Java
{- "files": [
- {
- "content_type": "image/jpg",
- "file_name": "my-selfie.jpg",
- "file_size": 50000
}
]
}Response samples
- 200
- 400
- 401
{- "status": 200,
- "data": {
- "files": [
- {
- "content_type": "image/jpg",
- "file_name": "my-selfie.jpg",
- "file_id": "U8aqJbsXGT537jtGnEDFHqxdDXqh8+oTF/cSkLimzuvVwMP+Jb1XbjPsf7ZgUgLY",
- "requests": [
- {
- "headers": {
- "Content-Type": "image/jpg",
- "Content-Length": 50000
}, - "method": "PUT"
}
]
}
]
}
}Run an AI photo Background Blur task.
Once you start an AI task, you need to keep polling at given polling_interval to check its status until it shows either success or error because if you don't, the task will time out and when you try to check the status later, you'll get an InvalidTaskId error even if the task did finish successfully and your units will still be consumed.
Authorizations:
Request Body schema: application/jsonrequired
| src_file_url required | string Url of the file to run task. The url should be publicly accessible. |
Responses
Request samples
- Payload
- curl
- Node.js
- JavaScript
- PHP
- Python
- Java
{
}Response samples
- 200
- 400
- 401
{- "status": 200,
- "data": {
- "task_id": "grH0CvsgXuAIHLUzD0V1Ol34hoet3R1tvdbtiVHrDb6_UqCLKIejAIajwxrhOAfe"
}
}Check AI photo Background Blur task status.
Authorizations:
path Parameters
| task_id required | string Example: grH0CvsgXuAIHLUzD0V1Ol34hoet3R1tvdbtiVHrDb6_UqCLKIejAIajwxrhOAfe ID of task to check |
Responses
Request samples
- curl
- Node.js
- JavaScript
- PHP
- Python
- Java
curl --request GET \ --url https://yce-api-01.makeupar.com/s2s/v2.0/task/sod/blur-background/grH0CvsgXuAIHLUzD0V1Ol34hoet3R1tvdbtiVHrDb6_UqCLKIejAIajwxrhOAfe \ --header 'Authorization: Bearer <access_token for v1, API Key for v2>'
Response samples
- 200
- 400
- 401
- 500
{- "status": 200,
- "data": {
- "task_status": "running",
- "error": "exceed_max_filesize",
- "error_message": "string",
}
}AI Makeup Transfer
Just Upload a Desired Photo with the Look You Like! AI Makeup Transfer makes it easy and fun to experiment with different looks by letting you to upload desired photo to try them one by one. Have any makeup look you want to try now? Let us amaze you with AI Makeup Transfer!
First, upload a photo of yourself where your face and its features are clearly visible as the target image.
Then, upload a photo of your favorite makeup look as the reference image.
There you have it - an AI Makeup Transferred photo.
Samples:
![]()

Supported Formats & Dimensions
| AI Feature | Supported Dimensions | Supported File Size | Supported Formats |
|---|---|---|---|
| AI Makeup Transfer | 1024x1024 (long side <= 1024), single face only, need to show full face | < 10MB | jpg/jpeg/png |
Error Codes
| Error Code | Description |
|---|---|
| error_src_no_face | No face detected in the user image |
| error_ref_no_face | No face detected in the reference image |
| error_src_face_too_small | Face in the user image is too small |
| error_ref_face_too_small | Face in the reference image is too small |
| error_src_large_face_angle | Frontal face required in the user image |
| error_ref_large_face_angle | Frontal face required in the reference image |
| error_src_eye_closed | Eye is closed in the user image |
| error_ref_eye_closed | Eye is closed in the reference image |
| error_src_eye_occluded | Eye is occluded in the user image |
| error_ref_eye_occluded | Eye is occluded in the reference image |
| error_src_lip_occluded | Lip is occluded in the user image |
| error_ref_lip_occluded | Lip is occluded in the reference image |
| error_inappropriate_ref_case01 | For both eyes, hair is too close to eye or skin region beside eyetail is not large enough in the reference image |
| error_inappropriate_ref_case02 | For one eye, hair is too close to eye or skin region beside eyetail is not large enough in the reference image. The other one is not frontal enough in the reference image |
Create a new file.
To upload a new file, you'll first need to use the File API. It will give you a URL – use that URL to upload your file. Once the upload is finished, you can use the file_id from the same response to start using our AI features.
Authorizations:
Request Body schema: application/jsonrequired
required | Array of objects |
Responses
Request samples
- Payload
- curl
- Node.js
- JavaScript
- PHP
- Python
- Java
{- "files": [
- {
- "content_type": "image/jpg",
- "file_name": "my-selfie.jpg",
- "file_size": 50000
}
]
}Response samples
- 200
- 400
- 401
{- "status": 200,
- "data": {
- "files": [
- {
- "content_type": "image/jpg",
- "file_name": "my-selfie.jpg",
- "file_id": "U8aqJbsXGT537jtGnEDFHqxdDXqh8+oTF/cSkLimzuvVwMP+Jb1XbjPsf7ZgUgLY",
- "requests": [
- {
- "headers": {
- "Content-Type": "image/jpg",
- "Content-Length": 50000
}, - "method": "PUT"
}
]
}
]
}
}Run an AI Makeup Transfer task.
Once you start an AI task, you need to keep polling at given polling_interval to check its status until it shows either success or error because if you don't, the task will time out and when you try to check the status later, you'll get an InvalidTaskId error even if the task did finish successfully and your units will still be consumed.
Authorizations:
Request Body schema: application/jsonrequired
| src_file_url required | string Url of the file to run task. The url should be publicly accessible. |
| ref_file_url required | string Url of the reference file to run task. The url should be publicly accessible. |
Responses
Request samples
- Payload
- curl
- Node.js
- JavaScript
- PHP
- Python
- Java
{
}Response samples
- 200
- 400
- 401
{- "status": 200,
- "data": {
- "task_id": "grH0CvsgXuAIHLUzD0V1Ol34hoet3R1tvdbtiVHrDb6_UqCLKIejAIajwxrhOAfe"
}
}Check a AI Makeup Transfer task status.
Authorizations:
path Parameters
| task_id required | string Example: grH0CvsgXuAIHLUzD0V1Ol34hoet3R1tvdbtiVHrDb6_UqCLKIejAIajwxrhOAfe ID of task to check |
Responses
Request samples
- curl
- Node.js
- JavaScript
- PHP
- Python
- Java
curl --request GET \ --url https://yce-api-01.makeupar.com/s2s/v2.0/task/mu-transfer/grH0CvsgXuAIHLUzD0V1Ol34hoet3R1tvdbtiVHrDb6_UqCLKIejAIajwxrhOAfe \ --header 'Authorization: Bearer <access_token for v1, API Key for v2>'
Response samples
- 200
- 400
- 401
- 500
{- "status": 200,
- "data": {
- "task_status": "running",
- "error": "exceed_max_filesize",
- "error_message": "string",
}
}AI Face Swap
Using AI Face Swap for hyper-realistic effect with multiple faces supported. Our face swap artificial intelligence supports swapping one or multiple faces. Either for creating funny pictures of faces, or need a professional tool, we've got you covered.
How to implement AI Face Swap
Step 1: Obtain credentials
- You need a Client ID (Your API Key) and RSA public key (Your Secret Key) from the API Console .
- These are used to generate an encrypted ID token for authentication.
Step 2: Authenticate and get an access token
Construct a string containing your client ID and a current timestamp.
client_id=YOUR_CLIENT_ID×tamp=UNIX_TIMESTAMPEncrypt this string with your RSA public key.
Send a request to:
POST https://yce-api-01.makeupar.com/s2s/v1.0/client/auth Content-Type: application/jsonBody:
{ "client_id": "YOUR_CLIENT_ID", "id_token": "ENCRYPTED_STRING" }The response contains an access_token. Keep it safe, as you will need it for subsequent calls.
Step 3: Upload source and reference images
Request upload URLs from the API:
POST https://yce-api-01.makeupar.com/s2s/v1.1/file/face-swap Authorization: Bearer ACCESS_TOKEN Content-Type: application/jsonBody:
{ "files": [ { "file_name": "target.jpg", "file_size": 123456, "content_type": "image/jpeg" } ] }The response provides a pre-signed upload URL and a
file_id.Upload your file with an HTTP PUT request to the given URL.
Store the
file_idfor later use. Repeat this for both target and reference images.
Step 4: Pre-process the target image (face detection)
Create a pre-process task:
POST https://yce-api-01.makeupar.com/s2s/v1.0/task/face-swap/pre-process Authorization: Bearer ACCESS_TOKEN Content-Type: application/jsonBody:
{ "request_id": 1, "payload": { "file_sets": { "src_ids": ["TARGET_FILE_ID"] }, "actions": [ { "id": 0 } ] } }The API returns a
task_id.Poll task status at:
GET https://yce-api-01.makeupar.com/s2s/v1.0/task/face-swap/pre-process?task_id=TASK_IDWhen finished, you receive a list of detected faces with bounding boxes.
Step 5: Run the face swap task
Define which reference image will substitute each source image The
face_mappingarray defines how faces in the Source Image are replaced by faces from the Reference Images. It acts as a link list connecting detected faces in the source to specific reference images.Structure
Each element in the array is an object containing two properties:
Parameter Type Description positionintegerThe index of the face detected in the Source Image (e.g., 0, 1, 2). indexintegerThe index of the face image in the Reference Image List to swap with. Logic Rules
- Index Mapping: The
indexmaps directly to the order of images provided in your reference list.0: First Reference Image.1: Second Reference Image.
- Skipping Swaps: To skip swapping a specific face detected in the source, set both
indexandpositionto-1. - Array Order: The order of objects in the array should match based on
position.
Example Use Case
Scenario:
- Reference List: 2 images provided (Image A, Image B).
- Source Image: Contains 3 faces detected (Face 0, Face 1, Face 2).
Goal:
- Swap Face 0 (Source) with Image 1 (Reference).
- Skip swapping Face 1 (Source).
- Swap Face 2 (Source) with Image 0 (Reference).
Configuration:
"face_mapping": [ { "index": 1, // Use the second reference image "position": 0 // Apply to the first detected face in source }, { "index": -1, // Skip swapping "position": -1 // Skip swapping }, { "index": 0, // Use the first reference image "position": 2 // Apply to the third detected face in source } ]- Index Mapping: The
Send the main task request:
POST https://yce-api-01.makeupar.com/s2s/v1.0/task/face-swap Authorization: Bearer ACCESS_TOKEN Content-Type: application/jsonBody:
{ "request_id": 2, "payload": { "file_sets": { "src_ids": ["TARGET_FILE_ID"], "ref_ids": ["REFERENCE_FILE_ID"] }, "actions": [ { "id": 0, "params": { "face_mapping": [ { "index": 0, "position": 0 }, { "index": -1, "position": -1 } ] } } ] } }The response returns a
task_id.
Step 6: Poll task status and retrieve result
It’s necessary to implement a timed loop that queries the task status at regular intervals within the allowed polling window.
Poll at:
GET https://yce-api-01.makeupar.com/s2s/v1.0/task/face-swap?task_id=TASK_IDWhen
statusissuccess, the response contains a URL for the generated image.Download or display the image from that URL.
Step 7: Integrate into your platform
- On a web frontend, you can directly implement this with JavaScript using fetch or Axios.
- On a backend (Node.js, Python, Java, PHP, etc.), you can use the same endpoints with standard HTTP libraries.
- Always secure the client credentials and perform authentication safely. Avoid embedding private keys directly in client-side code in production.
- Implement retry and error handling since the tasks run asynchronously.
Debugging Guide
Invalid TaskId Error Why: You’ll receive an InvalidTaskId error if you attempt to check the status of a task that has timed out. Therefore, once an AI task is initiated, you’ll need to poll for its status within the polling_interval until the status changes to either success or error. Solution: To avoid the task becoming invalid, it’s necessary to implement a timed loop that queries the task status at regular intervals within the allowed polling window.
Why are some faces not detected in my source image Why: Reason: The face must be clearly visible, not covered or obstructed, and large enough within the image Solution: Try taking a photo where the face appears larger and is clearly visible without any covering or obstruction
Real-world examples:
Multiple faces swap sample:

Single face swap sample:

Suggestions for How to Shoot:
Supported Formats & Dimensions
| AI Feature | Supported Dimensions | Supported File Size | Supported Formats |
|---|---|---|---|
| AI Face Swap | Input and output: the long side must be less than or equal to 4096 pixels | < 10MB | jpg/jpeg/png |
Error Codes
| Error Code | Description |
|---|---|
| exceed_max_filesize | The input file size exceeds the maximum limit |
| invalid_parameter | The parameter value is invalid |
| error_download_image | There was an error downloading the source image |
| error_download_mask | There was an error downloading the mask image |
| error_decode_image | There was an error decoding the source image |
| error_decode_mask | There was an error decoding the mask image |
| error_download_video | There was an error downloading the source video |
| error_decode_video | There was an error decoding the source video |
| error_nsfw_content_detected | NSFW content was detected in the source image |
| error_no_face | No face was detected in the source image |
| error_pose | Failed to detect pose in the source image |
| error_face_parsing | Failed to perform face parsing on the source image |
| error_inference | An error occurred in the inference pipeline |
| exceed_nsfw_retry_limits | Retry limits exceeded to avoid generating NSFW image |
| error_upload | There was an error uploading the result image |
| error_multiple_people | People count exceeds the maximum limit |
| error_no_shoulder | Shoulders are not visible in the source image |
| error_large_face_angle | The face angle in the uploaded image is too large |
| error_unsupport_ratio | The aspect ratio of the input image is unsupported |
| unknown_internal_error | Other internal errors |
Create a new file.
To upload a new file, you'll first need to use the File API. It will give you a URL – use that URL to upload your file. Once the upload is finished, you can use the file_id from the same response to start using our AI features.
Authorizations:
Request Body schema: application/jsonrequired
required | Array of objects |
Responses
Request samples
- Payload
- curl
- Node.js
- JavaScript
- PHP
- Python
- Java
{- "files": [
- {
- "content_type": "image/jpg",
- "file_name": "my-selfie.jpg",
- "file_size": 50000
}
]
}Response samples
- 200
- 400
- 401
{- "status": 200,
- "data": {
- "files": [
- {
- "content_type": "image/jpg",
- "file_name": "my-selfie.jpg",
- "file_id": "U8aqJbsXGT537jtGnEDFHqxdDXqh8+oTF/cSkLimzuvVwMP+Jb1XbjPsf7ZgUgLY",
- "requests": [
- {
- "headers": {
- "Content-Type": "image/jpg",
- "Content-Length": 50000
}, - "method": "PUT"
}
]
}
]
}
}Run an AI Face Swap face detection task.
Once you start an AI task, you need to keep polling at given polling_interval to check its status until it shows either success or error because if you don't, the task will time out and when you try to check the status later, you'll get an InvalidTaskId error even if the task did finish successfully and your units will still be consumed.
Authorizations:
Request Body schema: application/jsonrequired
| src_file_url required | string Url of the file to run task. The url should be publicly accessible. |
Responses
Request samples
- Payload
- curl
- Node.js
- JavaScript
- PHP
- Python
- Java
{
}Response samples
- 200
- 400
- 401
{- "status": 200,
- "data": {
- "task_id": "grH0CvsgXuAIHLUzD0V1Ol34hoet3R1tvdbtiVHrDb6_UqCLKIejAIajwxrhOAfe"
}
}Check a AI Face Swap face detection task status.
Authorizations:
path Parameters
| task_id required | string Example: grH0CvsgXuAIHLUzD0V1Ol34hoet3R1tvdbtiVHrDb6_UqCLKIejAIajwxrhOAfe ID of task to check |
Responses
Request samples
- curl
- Node.js
- JavaScript
- PHP
- Python
- Java
curl --request GET \ --url https://yce-api-01.makeupar.com/s2s/v2.0/task/face-swap/pre-process/grH0CvsgXuAIHLUzD0V1Ol34hoet3R1tvdbtiVHrDb6_UqCLKIejAIajwxrhOAfe \ --header 'Authorization: Bearer <access_token for v1, API Key for v2>'
Response samples
- 200
- 400
- 401
- 500
{- "status": 200,
- "data": {
- "task_status": "running",
- "error": "exceed_max_filesize",
- "error_message": "string",
}
}Run an AI Face Swap task.
Once you start an AI task, you need to keep polling at given polling_interval to check its status until it shows either success or error because if you don't, the task will time out and when you try to check the status later, you'll get an InvalidTaskId error even if the task did finish successfully and your units will still be consumed.
Authorizations:
Request Body schema: application/jsonrequired
| src_file_url required | string Url of the file to run task. The url should be publicly accessible. |
| ref_file_urls required | Array of strings non-empty |
required | Array of objects The designated ref image id and face position information to be swapped for each detected face on target image. Logic Rules
Example Use Case Scenario: Reference List: 2 images provided (Image A, Image B). Source Image: Contains 3 faces detected (Face 0, Face 1, Face 2). Goal: Swap Face 0 (Source) with Image 1 (Reference). Skip swapping Face 1 (Source). Swap Face 2 (Source) with Image 0 (Reference). Configuration: "face_mapping": [ { "index": 1, // Use the second reference image "position": 0 // Apply to the first detected face in source }, { "index": -1, // Skip swapping "position": -1 // Skip swapping }, { "index": 0, // Use the first reference image "position": 2 // Apply to the third detected face in source } ] |
Responses
Request samples
- Payload
- curl
- Node.js
- JavaScript
- PHP
- Python
- Java
{- "face_mapping": [
- {
- "index": 0,
- "position": 0
}
]
}Response samples
- 200
- 400
- 401
{- "status": 200,
- "data": {
- "task_id": "grH0CvsgXuAIHLUzD0V1Ol34hoet3R1tvdbtiVHrDb6_UqCLKIejAIajwxrhOAfe"
}
}Check a AI Face Swap task status.
Authorizations:
path Parameters
| task_id required | string Example: grH0CvsgXuAIHLUzD0V1Ol34hoet3R1tvdbtiVHrDb6_UqCLKIejAIajwxrhOAfe ID of task to check |
Responses
Request samples
- curl
- Node.js
- JavaScript
- PHP
- Python
- Java
curl --request GET \ --url https://yce-api-01.makeupar.com/s2s/v2.0/task/face-swap/grH0CvsgXuAIHLUzD0V1Ol34hoet3R1tvdbtiVHrDb6_UqCLKIejAIajwxrhOAfe \ --header 'Authorization: Bearer <access_token for v1, API Key for v2>'
Response samples
- 200
- 400
- 401
- 500
{- "status": 200,
- "data": {
- "task_status": "running",
- "error": "exceed_max_filesize",
- "error_message": "string",
}
}AI Headshot Generator
Transform your photos into stunning professional deadshots with our AI Headshot Generator. Elevate your headshots quickly and effectively using our powerful AI tools designed to deliver professional-quality results.
- Variety of Styles: From polished LinkedIn headshots and professional business headshots to creative model headshots, our AI headshot generator helps you select the perfect look to suit your needs.
- Professional Results: Leveraging AI to ensure your headshots look natural and flattering, making a strong impression on potential employers and clients.
- Convenience: Generate multiple AI headshots anytime, anywhere, without the need for a photographer. Perfect for busy professionals.
For more AI Headshot styles, please refer to https://yce.makeupar.com/ai-headshot-generator.
Use cases:


Suggestions for How to Shoot:
Supported Formats & Dimensions
| AI Feature | Supported Dimensions | Supported File Size | Supported Formats |
|---|---|---|---|
| AI Headshot | Ensure the input image contains a single person with both shoulder points and a full face visible from OpenPose, and that its short side is ≤ 1024 pixels — otherwise, the engine will automatically resize it to 1024. Output: long side <= 1024 | < 10MB | jpg/jpeg/png |
Create a new file.
To upload a new file, you'll first need to use the File API. It will give you a URL – use that URL to upload your file. Once the upload is finished, you can use the file_id from the same response to start using our AI features.
Authorizations:
Request Body schema: application/jsonrequired
required | Array of objects |
Responses
Request samples
- Payload
- curl
- Node.js
- JavaScript
- PHP
- Python
- Java
{- "files": [
- {
- "content_type": "image/jpg",
- "file_name": "my-selfie.jpg",
- "file_size": 50000
}
]
}Response samples
- 200
- 400
- 401
{- "status": 200,
- "data": {
- "files": [
- {
- "content_type": "image/jpg",
- "file_name": "my-selfie.jpg",
- "file_id": "U8aqJbsXGT537jtGnEDFHqxdDXqh8+oTF/cSkLimzuvVwMP+Jb1XbjPsf7ZgUgLY",
- "requests": [
- {
- "headers": {
- "Content-Type": "image/jpg",
- "Content-Length": 50000
}, - "method": "PUT"
}
]
}
]
}
}List predefined templates.
Authorizations:
query Parameters
| page_size | integer Example: page_size=20 Number of results to return in this page. Valid value should be between 1 and 20. Default 20. |
| starting_token | string Example: starting_token=13045969587275114 Token for current page. Start with |
Responses
Request samples
- curl
- Node.js
- JavaScript
- PHP
- Python
- Java
curl --request GET \ --url 'https://yce-api-01.makeupar.com/s2s/v2.0/task/template/headshot?page_size=20&starting_token=13045969587275114' \ --header 'Authorization: Bearer <access_token for v1, API Key for v2>'
Response samples
- 200
- 400
- 401
{- "status": 200,
- "data": {
- "templates": [
- {
- "id": "good_template_001",
- "thumb": "string",
- "title": "string",
- "category_name": "string"
}
], - "next_token": 13045969587275114
}
}Run an AI Headshot Generator task.
Once you start an AI task, you need to keep polling at given polling_interval to check its status until it shows either success or error because if you don't, the task will time out and when you try to check the status later, you'll get an InvalidTaskId error even if the task did finish successfully and your units will still be consumed.
Authorizations:
Request Body schema: application/jsonrequired
| src_file_url required | string Url of the file to run task. The url should be publicly accessible. |
| template_id required | string ID of the template. List predefined templates first, and use the id of a template. |
| output_count required | integer [ 1 .. 200 ] The number of generated images. It must be between 1 to 200. |
Responses
Request samples
- Payload
- curl
- Node.js
- JavaScript
- PHP
- Python
- Java
{- "template_id": "good_template_001",
- "output_count": 20
}Response samples
- 200
- 400
- 401
{- "status": 200,
- "data": {
- "task_id": "grH0CvsgXuAIHLUzD0V1Ol34hoet3R1tvdbtiVHrDb6_UqCLKIejAIajwxrhOAfe"
}
}Check the status of the AI Headshot Generator task.
Authorizations:
path Parameters
| task_id required | string Example: grH0CvsgXuAIHLUzD0V1Ol34hoet3R1tvdbtiVHrDb6_UqCLKIejAIajwxrhOAfe ID of task to check |
Responses
Request samples
- curl
- Node.js
- JavaScript
- PHP
- Python
- Java
curl --request GET \ --url https://yce-api-01.makeupar.com/s2s/v2.0/task/headshot/grH0CvsgXuAIHLUzD0V1Ol34hoet3R1tvdbtiVHrDb6_UqCLKIejAIajwxrhOAfe \ --header 'Authorization: Bearer <access_token for v1, API Key for v2>'
Response samples
- 200
- 400
- 401
- 500
{- "status": 200,
- "data": {
- "task_status": "running",
- "error": "exceed_max_filesize",
- "error_message": "string",
}
}AI Avatar Generator
For the AI magic avatar tool, this app uses the technology of image-to-image. which means the avatar is generated based on your photo. Once the photos are selected by the users, the technology embedded in the app starts analyzing and learning the user's facial traits.
For more avatar styles, please refer to https://yce.makeupar.com/avatar
Use cases:
![]()

Suggestions for How to Shoot:
Create a new file.
To upload a new file, you'll first need to use the File API. It will give you a URL – use that URL to upload your file. Once the upload is finished, you can use the file_id from the same response to start using our AI features.
Authorizations:
Request Body schema: application/jsonrequired
required | Array of objects |
Responses
Request samples
- Payload
- curl
- Node.js
- JavaScript
- PHP
- Python
- Java
{- "files": [
- {
- "content_type": "image/jpg",
- "file_name": "my-selfie.jpg",
- "file_size": 50000
}
]
}Response samples
- 200
- 400
- 401
{- "status": 200,
- "data": {
- "files": [
- {
- "content_type": "image/jpg",
- "file_name": "my-selfie.jpg",
- "file_id": "U8aqJbsXGT537jtGnEDFHqxdDXqh8+oTF/cSkLimzuvVwMP+Jb1XbjPsf7ZgUgLY",
- "requests": [
- {
- "headers": {
- "Content-Type": "image/jpg",
- "Content-Length": 50000
}, - "method": "PUT"
}
]
}
]
}
}List predefined templates.
Authorizations:
query Parameters
| page_size | integer Example: page_size=20 Number of results to return in this page. Valid value should be between 1 and 20. Default 20. |
| starting_token | string Example: starting_token=13045969587275114 Token for current page. Start with |
Responses
Request samples
- curl
- Node.js
- JavaScript
- PHP
- Python
- Java
curl --request GET \ --url 'https://yce-api-01.makeupar.com/s2s/v2.0/task/template/ai-avatar?page_size=20&starting_token=13045969587275114' \ --header 'Authorization: Bearer <access_token for v1, API Key for v2>'
Response samples
- 200
- 400
- 401
{- "status": 200,
- "data": {
- "templates": [
- {
- "id": "good_template_001",
- "thumb": "string",
- "title": "string",
- "category_name": "string"
}
], - "next_token": 13045969587275114
}
}Run an AI Avatar task.
Once you start an AI task, you need to keep polling at given polling_interval to check its status until it shows either success or error because if you don't, the task will time out and when you try to check the status later, you'll get an InvalidTaskId error even if the task did finish successfully and your units will still be consumed.
Authorizations:
Request Body schema: application/jsonrequired
| src_file_url required | string Url of the file to run task. The url should be publicly accessible. |
| template_id required | string ID of the template. List predefined templates first, and use the id of a template. |
| output_count required | integer [ 1 .. 200 ] The number of generated images. It must be between 1 to 200. |
Responses
Request samples
- Payload
- curl
- Node.js
- JavaScript
- PHP
- Python
- Java
{- "template_id": "good_template_001",
- "output_count": 20
}Response samples
- 200
- 400
- 401
{- "status": 200,
- "data": {
- "task_id": "grH0CvsgXuAIHLUzD0V1Ol34hoet3R1tvdbtiVHrDb6_UqCLKIejAIajwxrhOAfe"
}
}Check the status of the AI Avatar task.
Authorizations:
path Parameters
| task_id required | string Example: grH0CvsgXuAIHLUzD0V1Ol34hoet3R1tvdbtiVHrDb6_UqCLKIejAIajwxrhOAfe ID of task to check |
Responses
Request samples
- curl
- Node.js
- JavaScript
- PHP
- Python
- Java
curl --request GET \ --url https://yce-api-01.makeupar.com/s2s/v2.0/task/ai-avatar/grH0CvsgXuAIHLUzD0V1Ol34hoet3R1tvdbtiVHrDb6_UqCLKIejAIajwxrhOAfe \ --header 'Authorization: Bearer <access_token for v1, API Key for v2>'
Response samples
- 200
- 400
- 401
- 500
{- "status": 200,
- "data": {
- "task_status": "running",
- "error": "exceed_max_filesize",
- "error_message": "string",
}
}AI Studio Generator
Embrace the excellence of studio kike AI Portrait Generator. Transform your selfie into a studio-quality portrait in a flash.
- Studio-Free Convenience: No need for a photographer or studio visits—create studio-quality artistic photos anytime, anywhere
- Quick Photo Transformation: Fast processing for instant high-quality artistic photo results, ideal for quick updates
- High-Quality Artistic Output: Delivers professional-standard artistic photos with clear details, perfect lighting, just like you've taken the photos in a studio
Use cases:


Suggestions for How to Shoot:
Supported Formats & Dimensions
| AI Feature | Supported Dimensions | Supported File Size | Supported Formats |
|---|---|---|---|
| AI Studio | Please ensure the input image has one face, a short side of at least 200 pixels, and a long side no greater than 1920 pixels; the engine will select the largest face if multiple are present, and the output resolution will not exceed 960×1280 (W×H) | < 10MB | jpg/jpeg/png |
Error Codes
| Error Code | Description |
|---|---|
| error_below_min_image_size | Input image resolution is too small |
| error_exceed_max_image_size | Input image resolution is too large |
Create a new file.
To upload a new file, you'll first need to use the File API. It will give you a URL – use that URL to upload your file. Once the upload is finished, you can use the file_id from the same response to start using our AI features.
Authorizations:
Request Body schema: application/jsonrequired
required | Array of objects |
Responses
Request samples
- Payload
- curl
- Node.js
- JavaScript
- PHP
- Python
- Java
{- "files": [
- {
- "content_type": "image/jpg",
- "file_name": "my-selfie.jpg",
- "file_size": 50000
}
]
}Response samples
- 200
- 400
- 401
{- "status": 200,
- "data": {
- "files": [
- {
- "content_type": "image/jpg",
- "file_name": "my-selfie.jpg",
- "file_id": "U8aqJbsXGT537jtGnEDFHqxdDXqh8+oTF/cSkLimzuvVwMP+Jb1XbjPsf7ZgUgLY",
- "requests": [
- {
- "headers": {
- "Content-Type": "image/jpg",
- "Content-Length": 50000
}, - "method": "PUT"
}
]
}
]
}
}List predefined templates.
Authorizations:
query Parameters
| page_size | integer Example: page_size=20 Number of results to return in this page. Valid value should be between 1 and 20. Default 20. |
| starting_token | string Example: starting_token=13045969587275114 Token for current page. Start with |
Responses
Request samples
- curl
- Node.js
- JavaScript
- PHP
- Python
- Java
curl --request GET \ --url 'https://yce-api-01.makeupar.com/s2s/v2.0/task/template/ai-studio?page_size=20&starting_token=13045969587275114' \ --header 'Authorization: Bearer <access_token for v1, API Key for v2>'
Response samples
- 200
- 400
- 401
{- "status": 200,
- "data": {
- "templates": [
- {
- "id": "good_template_001",
- "thumb": "string",
- "title": "string",
- "category_name": "string"
}
], - "next_token": 13045969587275114
}
}Run an AI Studio task.
Once you start an AI task, you need to keep polling at given polling_interval to check its status until it shows either success or error because if you don't, the task will time out and when you try to check the status later, you'll get an InvalidTaskId error even if the task did finish successfully and your units will still be consumed.
Authorizations:
Request Body schema: application/jsonrequired
| src_file_url required | string Url of the file to run task. The url should be publicly accessible. |
| template_id required | string ID of the template. List predefined templates first, and use the id of a template. |
| output_count required | integer [ 1 .. 200 ] The number of generated images. It must be between 1 to 200. |
Responses
Request samples
- Payload
- curl
- Node.js
- JavaScript
- PHP
- Python
- Java
{- "template_id": "good_template_001",
- "output_count": 20
}Response samples
- 200
- 400
- 401
{- "status": 200,
- "data": {
- "task_id": "grH0CvsgXuAIHLUzD0V1Ol34hoet3R1tvdbtiVHrDb6_UqCLKIejAIajwxrhOAfe"
}
}Check the status of the AI Studio task.
Authorizations:
path Parameters
| task_id required | string Example: grH0CvsgXuAIHLUzD0V1Ol34hoet3R1tvdbtiVHrDb6_UqCLKIejAIajwxrhOAfe ID of task to check |
Responses
Request samples
- curl
- Node.js
- JavaScript
- PHP
- Python
- Java
curl --request GET \ --url https://yce-api-01.makeupar.com/s2s/v2.0/task/ai-studio/grH0CvsgXuAIHLUzD0V1Ol34hoet3R1tvdbtiVHrDb6_UqCLKIejAIajwxrhOAfe \ --header 'Authorization: Bearer <access_token for v1, API Key for v2>'
Response samples
- 200
- 400
- 401
- 500
{- "status": 200,
- "data": {
- "task_status": "running",
- "error": "exceed_max_filesize",
- "error_message": "string",
}
}AI Image to Video Generator
YouCam AI Image to Video Generator quickly turns one image into stunning videos using advanced algorithms to create realistic motion effects. Offers a variety of highly optimized pre-made templates to animate your photos.
To easily create a video from an image using AI, start with a photo that has a clean background and a clear portrait. Simply upload your photo, and watch the magic happen!
Use cases:


Suggestions for How to Shoot:
Supported Formats & Dimensions
| AI Feature | Supported Dimensions | Supported File Size | Supported Formats |
|---|---|---|---|
| Image to Video (Standard) | Input: >= 300*300px with aspect ratio between 1:2.5 ~ 2.5:1. Output: Up to 720p 30fps | Input: <10MB. Output: 5 seconds or 10 seconds | jpg/jpeg/png |
| Image to Video (Professional) | Input: >= 300*300px with aspect ratio between 1:2.5 ~ 2.5:1. Output: Up to 1080p 30fps | Input: <10MB. Output: 5 seconds or 10 seconds | jpg/jpeg/png |
Error Codes
| Error Message | Description |
|---|---|
| Invalid request parameters | Check whether the request parameters are correct |
| Invalid parameters, such as incorrect key or illegal value | Refer to the specific information in the message field of the returned body and modify the request parameters |
| The requested method is invalid | Review the API documentation and use the correct request method |
| The requested resource does not exist, such as the model | Refer to the specific information in the message field of the returned body and modify the request parameters |
| Trigger strategy of the platform | Check if any platform policies have been triggered |
| Trigger the content security policy of the platform | Check the input content, modify it, and resend the request |
| Server internal error | Try again later, or contact customer service |
| Server temporarily unavailable, usually due to maintenance | Try again later, or contact customer service |
| Server internal timeout, usually due to a backlog | Try again later, or contact customer service |
Create a new file.
To upload a new file, you'll first need to use the File API. It will give you a URL – use that URL to upload your file. Once the upload is finished, you can use the file_id from the same response to start using our AI features.
Authorizations:
Request Body schema: application/jsonrequired
required | Array of objects |
Responses
Request samples
- Payload
- curl
- Node.js
- JavaScript
- PHP
- Python
- Java
{- "files": [
- {
- "content_type": "image/jpg",
- "file_name": "my-selfie.jpg",
- "file_size": 50000
}
]
}Response samples
- 200
- 400
- 401
{- "status": 200,
- "data": {
- "files": [
- {
- "content_type": "image/jpg",
- "file_name": "my-selfie.jpg",
- "file_id": "U8aqJbsXGT537jtGnEDFHqxdDXqh8+oTF/cSkLimzuvVwMP+Jb1XbjPsf7ZgUgLY",
- "requests": [
- {
- "headers": {
- "Content-Type": "image/jpg",
- "Content-Length": 50000
}, - "method": "PUT"
}
]
}
]
}
}List predefined templates.
Authorizations:
query Parameters
| page_size | integer Example: page_size=20 Number of results to return in this page. Valid value should be between 1 and 20. Default 20. |
| starting_token | string Example: starting_token=13045969587275114 Token for current page. Start with |
Responses
Request samples
- curl
- Node.js
- JavaScript
- PHP
- Python
- Java
curl --request GET \ --url 'https://yce-api-01.makeupar.com/s2s/v2.0/task/template/image-to-video?page_size=20&starting_token=13045969587275114' \ --header 'Authorization: Bearer <access_token for v1, API Key for v2>'
Response samples
- 200
- 400
- 401
{- "status": 200,
- "data": {
- "templates": [
- {
- "id": "good_template_001",
- "thumb": "string",
- "title": "string",
- "category_name": "string"
}
], - "next_token": 13045969587275114
}
}Run an Image to Video task.
Once you start an AI task, you need to keep polling at given polling_interval to check its status until it shows either success or error because if you don't, the task will time out and when you try to check the status later, you'll get an InvalidTaskId error even if the task did finish successfully and your units will still be consumed.
Authorizations:
Request Body schema: application/jsonrequired
| src_file_url required | string Url of the file to run task. The url should be publicly accessible. |
| template_id required | string ID of the template. List predefined templates first, and use the id of a template. |
| dst_duration required | integer Enum: 5 10 The length of video in seconds. Only accept 5 or 10 seconds |
| mode | string Enum: "std" "pro" The quailty mode. Standard (std) mode is faster speed, OK quailty. Professional (pro) mode is best quailty with richer details. Automatically select best mode by style if not provide. |
Responses
Request samples
- Payload
- curl
- Node.js
- JavaScript
- PHP
- Python
- Java
{- "template_id": "good_template_001",
- "dst_duration": 5,
- "mode": "std"
}Response samples
- 200
- 400
- 401
{- "status": 200,
- "data": {
- "task_id": "grH0CvsgXuAIHLUzD0V1Ol34hoet3R1tvdbtiVHrDb6_UqCLKIejAIajwxrhOAfe"
}
}Check the status of the Image to Video task.
Authorizations:
path Parameters
| task_id required | string Example: grH0CvsgXuAIHLUzD0V1Ol34hoet3R1tvdbtiVHrDb6_UqCLKIejAIajwxrhOAfe ID of task to check |
Responses
Request samples
- curl
- Node.js
- JavaScript
- PHP
- Python
- Java
curl --request GET \ --url https://yce-api-01.makeupar.com/s2s/v2.0/task/image-to-video/grH0CvsgXuAIHLUzD0V1Ol34hoet3R1tvdbtiVHrDb6_UqCLKIejAIajwxrhOAfe \ --header 'Authorization: Bearer <access_token for v1, API Key for v2>'
Response samples
- 200
- 400
- 401
- 500
{- "status": 200,
- "data": {
- "task_status": "running",
- "error": "exceed_max_filesize",
- "error_message": "string",
}
}Create a new file.
To upload a new file, you'll first need to use the File API. It will give you a URL – use that URL to upload your file. Once the upload is finished, you can use the file_id from the same response to start using our AI features.
Authorizations:
Request Body schema: application/jsonrequired
required | Array of objects |
Responses
Request samples
- Payload
- curl
- Node.js
- JavaScript
- PHP
- Python
- Java
{- "files": [
- {
- "content_type": "image/jpg",
- "file_name": "my-selfie.jpg",
- "file_size": 50000
}
]
}Response samples
- 200
- 400
- 401
{- "status": 200,
- "data": {
- "files": [
- {
- "content_type": "image/jpg",
- "file_name": "my-selfie.jpg",
- "file_id": "U8aqJbsXGT537jtGnEDFHqxdDXqh8+oTF/cSkLimzuvVwMP+Jb1XbjPsf7ZgUgLY",
- "requests": [
- {
- "headers": {
- "Content-Type": "image/jpg",
- "Content-Length": 50000
}, - "method": "PUT"
}
]
}
]
}
}Run an AI Image to Video Generator V2 task.
Once you start an AI task, you need to keep polling at given polling_interval to check its status until it shows either success or error because if you don't, the task will time out and when you try to check the status later, you'll get an InvalidTaskId error even if the task did finish successfully and your units will still be consumed.
Authorizations:
Request Body schema: application/jsonrequired
| src_file_url required | string Url of the file to run task. The url should be publicly accessible. |
| resolution required | string Enum: 480 720 1080 To select the output resolution used in inference. |
| dst_duration required | integer Enum: 5 10 To select the output duration used in inference. |
| prompt | string [ 1 .. 1500 ] characters Can be in any language. Will be automatically enhanced and output as English using Gemini API. Short prompts are ideal. |
| negative_prompt | string [ 1 .. 1500 ] characters The negative prompt. |
| model | string Value: "youcam-video-v2" Model name. |
Responses
Request samples
- Payload
- curl
- Node.js
- JavaScript
- PHP
- Python
- Java
{- "resolution": 480,
- "dst_duration": 5,
- "prompt": "その女性は微笑んで、カメラを見ています",
- "negative_prompt": "worst quality, low quality, JPEG compression residue, ugly.",
- "model": "youcam-video-v2"
}Response samples
- 200
- 400
- 401
{- "status": 200,
- "data": {
- "task_id": "grH0CvsgXuAIHLUzD0V1Ol34hoet3R1tvdbtiVHrDb6_UqCLKIejAIajwxrhOAfe"
}
}Check the status of a AI Image to Video Generator V2 task.
Authorizations:
path Parameters
| task_id required | string Example: grH0CvsgXuAIHLUzD0V1Ol34hoet3R1tvdbtiVHrDb6_UqCLKIejAIajwxrhOAfe ID of task to check |
Responses
Request samples
- curl
- Node.js
- JavaScript
- PHP
- Python
- Java
curl --request GET \ --url https://yce-api-01.makeupar.com/s2s/v2.0/task/image-to-video/youcam/grH0CvsgXuAIHLUzD0V1Ol34hoet3R1tvdbtiVHrDb6_UqCLKIejAIajwxrhOAfe \ --header 'Authorization: Bearer <access_token for v1, API Key for v2>'
Response samples
- 200
- 400
- 401
- 500
{- "status": 200,
- "data": {
- "task_status": "running",
- "error": "exceed_max_filesize",
- "error_message": "string",
}
}Run an AI Text To Video task.
Once you start an AI task, you need to keep polling at given polling_interval to check its status until it shows either success or error because if you don't, the task will time out and when you try to check the status later, you'll get an InvalidTaskId error even if the task did finish successfully and your units will still be consumed.
Authorizations:
Request Body schema: application/jsonrequired
| model | string Default: "youcam-video-v2" Value: "youcam-video-v2" Model name. | |||||||||||||||||||||||||||||||||
| prompt required | string [ 1 .. 5000 ] characters Text prompt describing the video content and visual style. Supports Chinese and English. Each character or letter counts as one. | |||||||||||||||||||||||||||||||||
| negative_prompt | string [ 1 .. 500 ] characters Negative prompt describing content to exclude from the video, constraining the output. Supports Chinese and English. | |||||||||||||||||||||||||||||||||
| resolution | string Default: "1080P" Enum: "720P" "1080P" Resolution tier of the generated video, controlling clarity (total pixels). | |||||||||||||||||||||||||||||||||
| ratio | string Default: "16:9" Enum: "16:9" "9:16" "1:1" "4:3" "3:4" Aspect ratio of the generated video. Output video resolutions (width*height) for each aspect ratio appear in the table below.:
| |||||||||||||||||||||||||||||||||
| dst_duration required | integer [ 2 .. 15 ] Default: 5 Duration of the generated video (seconds). | |||||||||||||||||||||||||||||||||
| prompt_extend | boolean Default: true Enum: true false Enable prompt rewriting. When enabled, a Large Language Model rewrites the input prompt intelligently. This improves results for short prompts but increases latency. |
Responses
Request samples
- Payload
- curl
- Node.js
- JavaScript
- PHP
- Python
- Java
{- "model": "youcam-video-v2",
- "prompt": "A kitten running in the moonlight.",
- "negative_prompt": "low resolution, error, worst quality, low quality, disfigured, extra fingers, bad proportions.",
- "resolution": "1080P",
- "ratio": "16:9",
- "dst_duration": 5,
- "prompt_extend": true
}Response samples
- 200
- 400
- 401
{- "status": 200,
- "data": {
- "task_id": "grH0CvsgXuAIHLUzD0V1Ol34hoet3R1tvdbtiVHrDb6_UqCLKIejAIajwxrhOAfe"
}
}Check the status of a AI Text To Video task.
Authorizations:
path Parameters
| task_id required | string Example: grH0CvsgXuAIHLUzD0V1Ol34hoet3R1tvdbtiVHrDb6_UqCLKIejAIajwxrhOAfe ID of task to check |
Responses
Request samples
- curl
- Node.js
- JavaScript
- PHP
- Python
- Java
curl --request GET \ --url https://yce-api-01.makeupar.com/s2s/v2.0/task/text-to-video/youcam/grH0CvsgXuAIHLUzD0V1Ol34hoet3R1tvdbtiVHrDb6_UqCLKIejAIajwxrhOAfe \ --header 'Authorization: Bearer <access_token for v1, API Key for v2>'
Response samples
- 200
- 400
- 401
- 500
{- "status": 200,
- "data": {
- "task_status": "running",
- "error": "exceed_max_filesize",
- "error_message": "string",
}
}AI Video Enhance
Fix blur, adjust sharpness and brightness, and instantly transform low-quality videos into clear, high-quality content with AI. From 480p to 4K, unblur, upscale, and boost quality with the video enhancer—no skills needed.
Supported format: .mp4, .mov are supported. Please keep the duration under 1 minute. Maximun output resolution: up to 4K.
Sample usage cases:


Create a new file.
To upload a new file, you'll first need to use the File API. It will give you a URL – use that URL to upload your file. Once the upload is finished, you can use the file_id from the same response to start using our AI features.
Authorizations:
Request Body schema: application/jsonrequired
required | Array of objects |
Responses
Request samples
- Payload
- curl
- Node.js
- JavaScript
- PHP
- Python
- Java
{- "files": [
- {
- "content_type": "video/mp4",
- "file_name": "my-selfie.mp4",
- "file_size": 50000
}
]
}Response samples
- 200
- 400
- 401
{- "status": 200,
- "data": {
- "files": [
- {
- "content_type": "video/mp4",
- "file_name": "my-selfie.mp4",
- "file_id": "U8aqJbsXGT537jtGnEDFHqxdDXqh8+oTF/cSkLimzuvVwMP+Jb1XbjPsf7ZgUgLY",
- "requests": [
- {
- "headers": {
- "Content-Type": "video/mp4",
- "Content-Length": 50000
}, - "method": "PUT"
}
]
}
]
}
}Run an AI Video Enhance task.
Once you start an AI task, you need to keep polling at given polling_interval to check its status until it shows either success or error because if you don't, the task will time out and when you try to check the status later, you'll get an InvalidTaskId error even if the task did finish successfully and your units will still be consumed.
Authorizations:
Request Body schema: application/jsonrequired
| src_file_url required | string Url of the file to run task. The url should be publicly accessible. |
| dst_duration required | integer The length of video in seconds |
Responses
Request samples
- Payload
- curl
- Node.js
- JavaScript
- PHP
- Python
- Java
{- "dst_duration": 0
}Response samples
- 200
- 400
- 401
{- "status": 200,
- "data": {
- "task_id": "grH0CvsgXuAIHLUzD0V1Ol34hoet3R1tvdbtiVHrDb6_UqCLKIejAIajwxrhOAfe"
}
}Check a AI Video Enhance task status.
Authorizations:
path Parameters
| task_id required | string Example: grH0CvsgXuAIHLUzD0V1Ol34hoet3R1tvdbtiVHrDb6_UqCLKIejAIajwxrhOAfe ID of task to check |
Responses
Request samples
- curl
- Node.js
- JavaScript
- PHP
- Python
- Java
curl --request GET \ --url https://yce-api-01.makeupar.com/s2s/v2.0/task/video-sr/grH0CvsgXuAIHLUzD0V1Ol34hoet3R1tvdbtiVHrDb6_UqCLKIejAIajwxrhOAfe \ --header 'Authorization: Bearer <access_token for v1, API Key for v2>'
Response samples
- 200
- 400
- 401
- 500
{- "status": 200,
- "data": {
- "task_status": "running",
- "error": "exceed_max_filesize",
- "error_message": "string",
}
}AI Video Face Swap
Video face swapping is an AI-powered process that uses YouCam’s AI Video Face Swap API to replace one person's face with another in a video. With advanced AI technology, the AI video face swap delivers remarkably realistic results. The facial expressions, lighting, and skin tones are finely tuned to ensure that the swapped faces blend seamlessly with the original footage.
Note: This API supports video with single face only. For customizable solution, please contact us.
Sample usage cases:


Create a new file.
To upload a new file, you'll first need to use the File API. It will give you a URL – use that URL to upload your file. Once the upload is finished, you can use the file_id from the same response to start using our AI features.
Authorizations:
Request Body schema: application/jsonrequired
required | Array of objects |
Responses
Request samples
- Payload
- curl
- Node.js
- JavaScript
- PHP
- Python
- Java
{- "files": [
- {
- "content_type": "video/mp4",
- "file_name": "my-selfie.mp4",
- "file_size": 50000
}
]
}Response samples
- 200
- 400
- 401
{- "status": 200,
- "data": {
- "files": [
- {
- "content_type": "video/mp4",
- "file_name": "my-selfie.mp4",
- "file_id": "U8aqJbsXGT537jtGnEDFHqxdDXqh8+oTF/cSkLimzuvVwMP+Jb1XbjPsf7ZgUgLY",
- "requests": [
- {
- "headers": {
- "Content-Type": "video/mp4",
- "Content-Length": 50000
}, - "method": "PUT"
}
]
}
]
}
}Run an AI Face Swap (video) task.
Once you start an AI task, you need to keep polling at given polling_interval to check its status until it shows either success or error because if you don't, the task will time out and when you try to check the status later, you'll get an InvalidTaskId error even if the task did finish successfully and your units will still be consumed.
Authorizations:
Request Body schema: application/jsonrequired
| src_file_url required | string Url of the file to run task. The url should be publicly accessible. |
| ref_file_url required | string Url of the reference file to run task. The url should be publicly accessible. |
| dst_duration required | integer The length of video in seconds |
Responses
Request samples
- Payload
- curl
- Node.js
- JavaScript
- PHP
- Python
- Java
{- "dst_duration": 0
}Response samples
- 200
- 400
- 401
{- "status": 200,
- "data": {
- "task_id": "grH0CvsgXuAIHLUzD0V1Ol34hoet3R1tvdbtiVHrDb6_UqCLKIejAIajwxrhOAfe"
}
}Check the status of the AI Face Swap (video) task.
Authorizations:
path Parameters
| task_id required | string Example: grH0CvsgXuAIHLUzD0V1Ol34hoet3R1tvdbtiVHrDb6_UqCLKIejAIajwxrhOAfe ID of task to check |
Responses
Request samples
- curl
- Node.js
- JavaScript
- PHP
- Python
- Java
curl --request GET \ --url https://yce-api-01.makeupar.com/s2s/v2.0/task/face-swap-vid/grH0CvsgXuAIHLUzD0V1Ol34hoet3R1tvdbtiVHrDb6_UqCLKIejAIajwxrhOAfe \ --header 'Authorization: Bearer <access_token for v1, API Key for v2>'
Response samples
- 200
- 400
- 401
- 500
{- "status": 200,
- "data": {
- "task_status": "running",
- "error": "exceed_max_filesize",
- "error_message": "string",
}
}AI Video Style Transfer
Create unique videos with our AI Video Filters and Effects. Easily enhance each video with stunning AI styles. AI Video Filters with Instant Transformation. Experience a seamless transformation with AI video filters that apply stunning effects instantly. Choose from an array of unique styles, including pop art, retro, anime, and more, to add depth and creativity to every frame.
Sample usage cases:
![]()
![]()
Create a new file.
To upload a new file, you'll first need to use the File API. It will give you a URL – use that URL to upload your file. Once the upload is finished, you can use the file_id from the same response to start using our AI features.
Authorizations:
Request Body schema: application/jsonrequired
required | Array of objects |
Responses
Request samples
- Payload
- curl
- Node.js
- JavaScript
- PHP
- Python
- Java
{- "files": [
- {
- "content_type": "video/mp4",
- "file_name": "my-selfie.mp4",
- "file_size": 50000
}
]
}Response samples
- 200
- 400
- 401
{- "status": 200,
- "data": {
- "files": [
- {
- "content_type": "video/mp4",
- "file_name": "my-selfie.mp4",
- "file_id": "U8aqJbsXGT537jtGnEDFHqxdDXqh8+oTF/cSkLimzuvVwMP+Jb1XbjPsf7ZgUgLY",
- "requests": [
- {
- "headers": {
- "Content-Type": "video/mp4",
- "Content-Length": 50000
}, - "method": "PUT"
}
]
}
]
}
}List predefined templates.
Authorizations:
query Parameters
| page_size | integer Example: page_size=20 Number of results to return in this page. Valid value should be between 1 and 20. Default 20. |
| starting_token | string Example: starting_token=13045969587275114 Token for current page. Start with |
Responses
Request samples
- curl
- Node.js
- JavaScript
- PHP
- Python
- Java
curl --request GET \ --url 'https://yce-api-01.makeupar.com/s2s/v2.0/task/template/video-trans?page_size=20&starting_token=13045969587275114' \ --header 'Authorization: Bearer <access_token for v1, API Key for v2>'
Response samples
- 200
- 400
- 401
{- "status": 200,
- "data": {
- "templates": [
- {
- "id": "good_template_001",
- "thumb": "string",
- "title": "string",
- "category_name": "string"
}
], - "next_token": 13045969587275114
}
}Run an AI Style Transfer (video) task.
Once you start an AI task, you need to keep polling at given polling_interval to check its status until it shows either success or error because if you don't, the task will time out and when you try to check the status later, you'll get an InvalidTaskId error even if the task did finish successfully and your units will still be consumed.
Authorizations:
Request Body schema: application/jsonrequired
| src_file_url required | string Url of the file to run task. The url should be publicly accessible. |
| template_id required | string ID of the template. List predefined templates first, and use the id of a template. |
| dst_duration required | integer The length of video in seconds |
Responses
Request samples
- Payload
- curl
- Node.js
- JavaScript
- PHP
- Python
- Java
{- "template_id": "good_template_001",
- "dst_duration": 0
}Response samples
- 200
- 400
- 401
{- "status": 200,
- "data": {
- "task_id": "grH0CvsgXuAIHLUzD0V1Ol34hoet3R1tvdbtiVHrDb6_UqCLKIejAIajwxrhOAfe"
}
}Check the status of the AI Style Transfer (video) task.
Authorizations:
path Parameters
| task_id required | string Example: grH0CvsgXuAIHLUzD0V1Ol34hoet3R1tvdbtiVHrDb6_UqCLKIejAIajwxrhOAfe ID of task to check |
Responses
Request samples
- curl
- Node.js
- JavaScript
- PHP
- Python
- Java
curl --request GET \ --url https://yce-api-01.makeupar.com/s2s/v2.0/task/video-trans/grH0CvsgXuAIHLUzD0V1Ol34hoet3R1tvdbtiVHrDb6_UqCLKIejAIajwxrhOAfe \ --header 'Authorization: Bearer <access_token for v1, API Key for v2>'
Response samples
- 200
- 400
- 401
- 500
{- "status": 200,
- "data": {
- "task_status": "running",
- "error": "exceed_max_filesize",
- "error_message": "string",
}
}Create a new file.
To upload a new file, you'll first need to use the File API. It will give you a URL – use that URL to upload your file. Once the upload is finished, you can use the file_id from the same response to start using our AI features.
Authorizations:
Request Body schema: application/jsonrequired
required | Array of objects |
Responses
Request samples
- Payload
- curl
- Node.js
- JavaScript
- PHP
- Python
- Java
{- "files": [
- {
- "content_type": "video/mp4",
- "file_name": "my-selfie.mp4",
- "file_size": 50000
}
]
}Response samples
- 200
- 400
- 401
{- "status": 200,
- "data": {
- "files": [
- {
- "content_type": "video/mp4",
- "file_name": "my-selfie.mp4",
- "file_id": "U8aqJbsXGT537jtGnEDFHqxdDXqh8+oTF/cSkLimzuvVwMP+Jb1XbjPsf7ZgUgLY",
- "requests": [
- {
- "headers": {
- "Content-Type": "video/mp4",
- "Content-Length": 50000
}, - "method": "PUT"
}
]
}
]
}
}Run an AI Video Background Replace task.
Once you start an AI task, you need to keep polling at given polling_interval to check its status until it shows either success or error because if you don't, the task will time out and when you try to check the status later, you'll get an InvalidTaskId error even if the task did finish successfully and your units will still be consumed.
Authorizations:
Request Body schema: application/jsonrequired
| src_file_url required | string Url of the file to run task. The url should be publicly accessible. |
| ref_file_url required | string Url of the reference file to run task. The url should be publicly accessible. |
| background_mode | string Default: "crop" Enum: "crop" "stretch" How the background image (the ref file) is fit onto the source video. |
Responses
Request samples
- Payload
- curl
- Node.js
- JavaScript
- PHP
- Python
- Java
{- "background_mode": "crop"
}Response samples
- 200
- 400
- 401
{- "status": 200,
- "data": {
- "task_id": "grH0CvsgXuAIHLUzD0V1Ol34hoet3R1tvdbtiVHrDb6_UqCLKIejAIajwxrhOAfe"
}
}Check the status of an AI Video Background Replace task.
Authorizations:
path Parameters
| task_id required | string Example: grH0CvsgXuAIHLUzD0V1Ol34hoet3R1tvdbtiVHrDb6_UqCLKIejAIajwxrhOAfe ID of task to check |
Responses
Request samples
- curl
- Node.js
- JavaScript
- PHP
- Python
- Java
curl --request GET \ --url https://yce-api-01.makeupar.com/s2s/v2.0/task/bg-replace-vid/grH0CvsgXuAIHLUzD0V1Ol34hoet3R1tvdbtiVHrDb6_UqCLKIejAIajwxrhOAfe \ --header 'Authorization: Bearer <access_token for v1, API Key for v2>'
Response samples
- 200
- 400
- 401
- 500
{- "status": 200,
- "data": {
- "task_status": "running",
- "error": "exceed_max_filesize",
- "error_message": "string",
}
}Create a new file.
To upload a new file, you'll first need to use the File API. It will give you a URL – use that URL to upload your file. Once the upload is finished, you can use the file_id from the same response to start using our AI features.
Authorizations:
Request Body schema: application/jsonrequired
required | Array of objects |
Responses
Request samples
- Payload
- curl
- Node.js
- JavaScript
- PHP
- Python
- Java
{- "files": [
- {
- "content_type": "video/mp4",
- "file_name": "my-selfie.mp4",
- "file_size": 50000
}
]
}Response samples
- 200
- 400
- 401
{- "status": 200,
- "data": {
- "files": [
- {
- "content_type": "video/mp4",
- "file_name": "my-selfie.mp4",
- "file_id": "U8aqJbsXGT537jtGnEDFHqxdDXqh8+oTF/cSkLimzuvVwMP+Jb1XbjPsf7ZgUgLY",
- "requests": [
- {
- "headers": {
- "Content-Type": "video/mp4",
- "Content-Length": 50000
}, - "method": "PUT"
}
]
}
]
}
}Run an AI Video Object Removal task.
Once you start an AI task, you need to keep polling at given polling_interval to check its status until it shows either success or error because if you don't, the task will time out and when you try to check the status later, you'll get an InvalidTaskId error even if the task did finish successfully and your units will still be consumed.
Authorizations:
Request Body schema: application/jsonrequired
| src_file_url required | string Url of the file to run task. The url should be publicly accessible. |
| msk_file_url required | string URL of the mask file. This should be a grey scale mask image with the exact same width and height with the input source file where white pixels indicate foreground and black pixels represent background. The URL should be publicly accessible. |
| frame_idx required | integer Frame index of the input video that the provided mask image corresponds to. |
Responses
Request samples
- Payload
- curl
- Node.js
- JavaScript
- PHP
- Python
- Java
{- "frame_idx": 0
}Response samples
- 200
- 400
- 401
{- "status": 200,
- "data": {
- "task_id": "grH0CvsgXuAIHLUzD0V1Ol34hoet3R1tvdbtiVHrDb6_UqCLKIejAIajwxrhOAfe"
}
}Check the status of a AI Video Object Removal task.
Authorizations:
path Parameters
| task_id required | string Example: grH0CvsgXuAIHLUzD0V1Ol34hoet3R1tvdbtiVHrDb6_UqCLKIejAIajwxrhOAfe ID of task to check |
Responses
Request samples
- curl
- Node.js
- JavaScript
- PHP
- Python
- Java
curl --request GET \ --url https://yce-api-01.makeupar.com/s2s/v2.0/task/obj-rem-vid/grH0CvsgXuAIHLUzD0V1Ol34hoet3R1tvdbtiVHrDb6_UqCLKIejAIajwxrhOAfe \ --header 'Authorization: Bearer <access_token for v1, API Key for v2>'
Response samples
- 200
- 400
- 401
- 500
{- "status": 200,
- "data": {
- "task_status": "running",
- "error": "exceed_max_filesize",
- "error_message": "string",
}
}